In April 2022, WhatsApp recorded 2.44 billion unique active users daily worldwide, thus making it the most widely used communication and IM app globally. Aside from text messaging and media file sharing, the app also allows users now to send and receive payments, too. However, did you know that you can schedule WhatsApp messages too?
Whether you use WhatsApp for business or personal communication, scheduling messages can be helpful. For instance, if you are a business owner, you may want to schedule specific messages for your customers such as payment reminders or subscription renewal messages, etc.
Likewise, if you use WhatsApp to communicate with friends and family, you can schedule WhatsApp messages for events such as their birthday or marriage anniversaries.
As a business, scheduling WhatsApp messages could help you drive engagement and boost your sales. In this how-to guide, we show you step-by-step how to schedule WhatsApp messages, whether you are a WhatsApp or WhatsApp Business user accessing the application from Android, iOS, or the Web.
Please note: This guide links to external tools to schedule WhatsApp messages. You are signing up and using external services at your own risk.
How to schedule WhatsApp messages on Android?
If you wish to schedule WhatsApp messages on an Android device, follow the steps below.
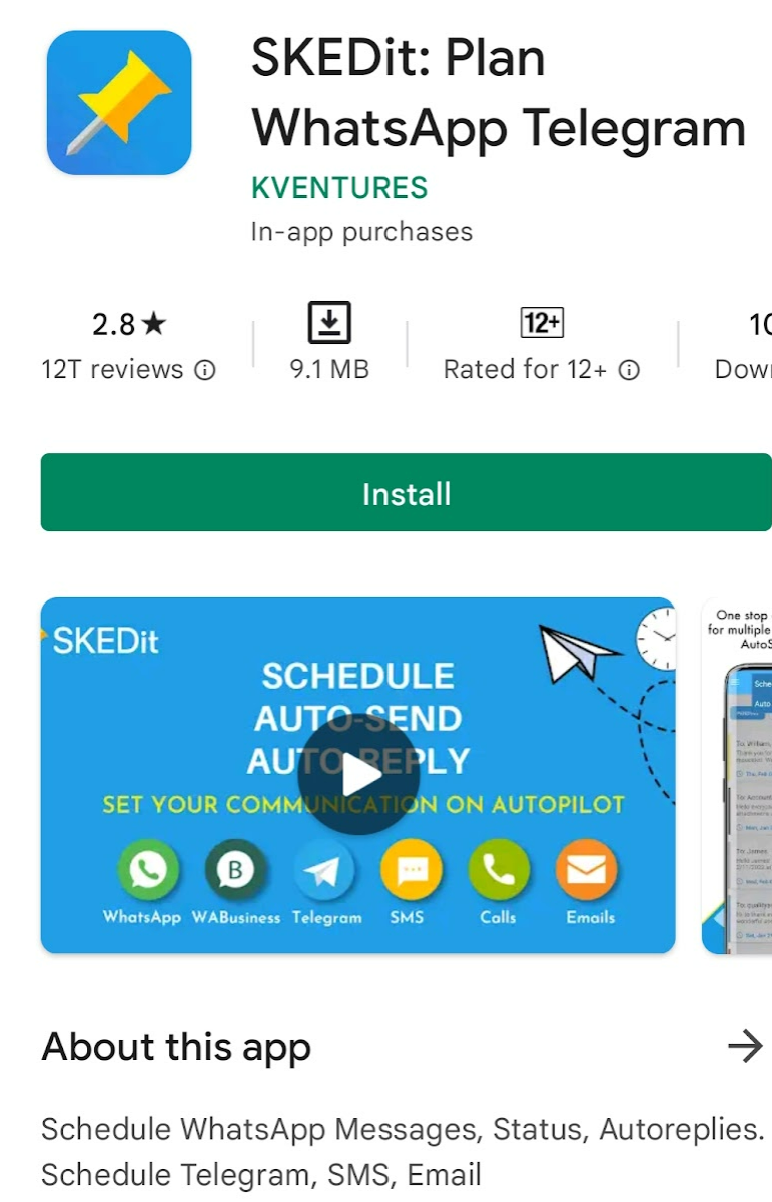
1. Head over to the Google Play Store, and download the WhatsApp Message Scheduler app and open it.
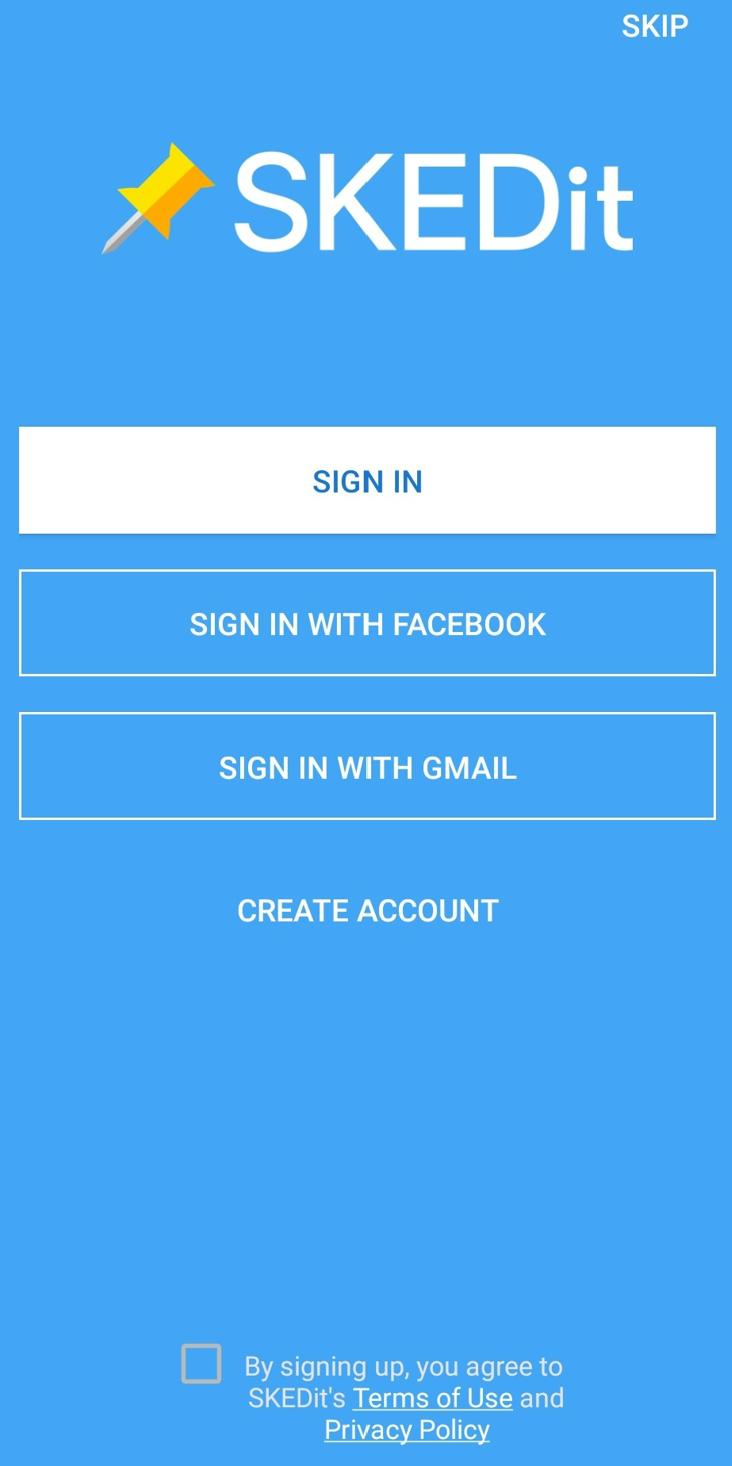
2. You can either choose to sign in (in case you already have an account), or sign-in with Gmail or Facebook if you have those accounts. Alternatively, just tick the ‘agree to terms and conditions’ and then click on ‘Skip’ to skip the registration process.
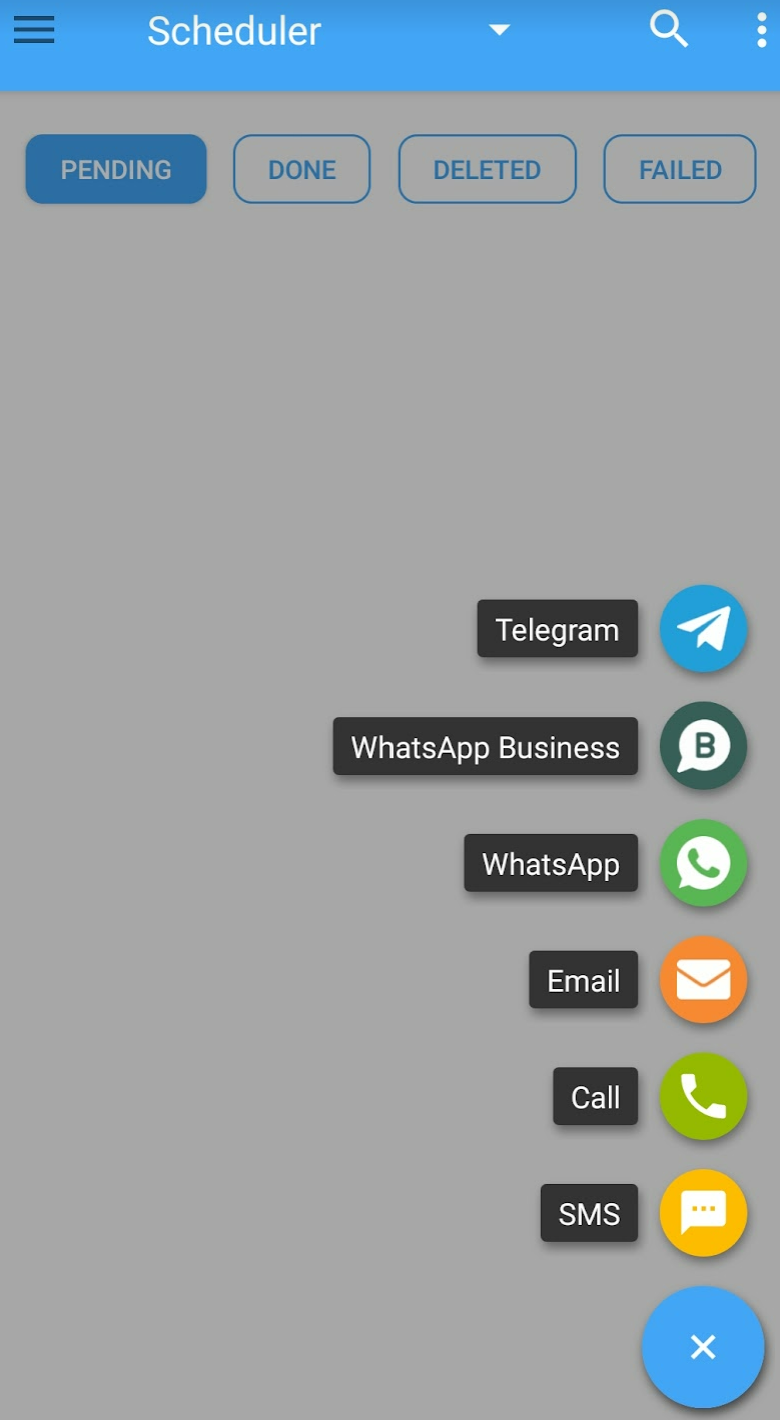
3. Tap the ‘+’ to schedule a new message, then tap on ‘WhatsApp’ or ‘WhatsApp Business’. Note that you can use this app to also schedule messages on other IM applications like Telegram, etc.
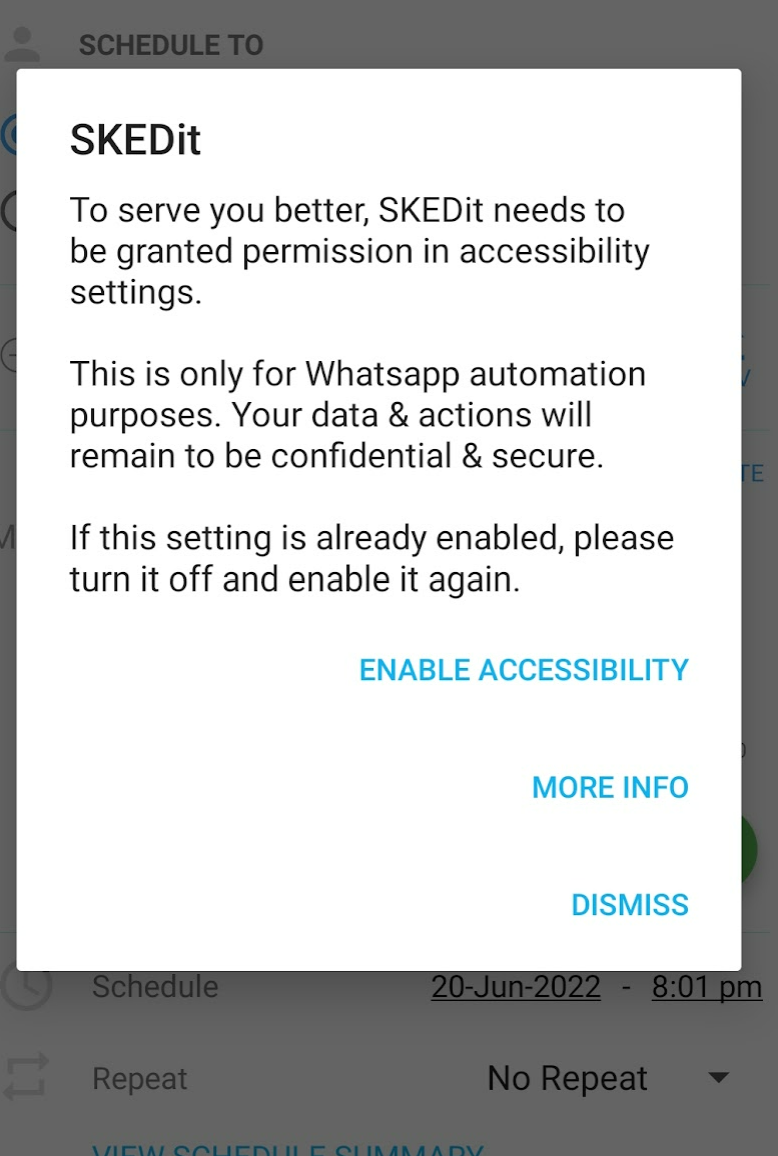
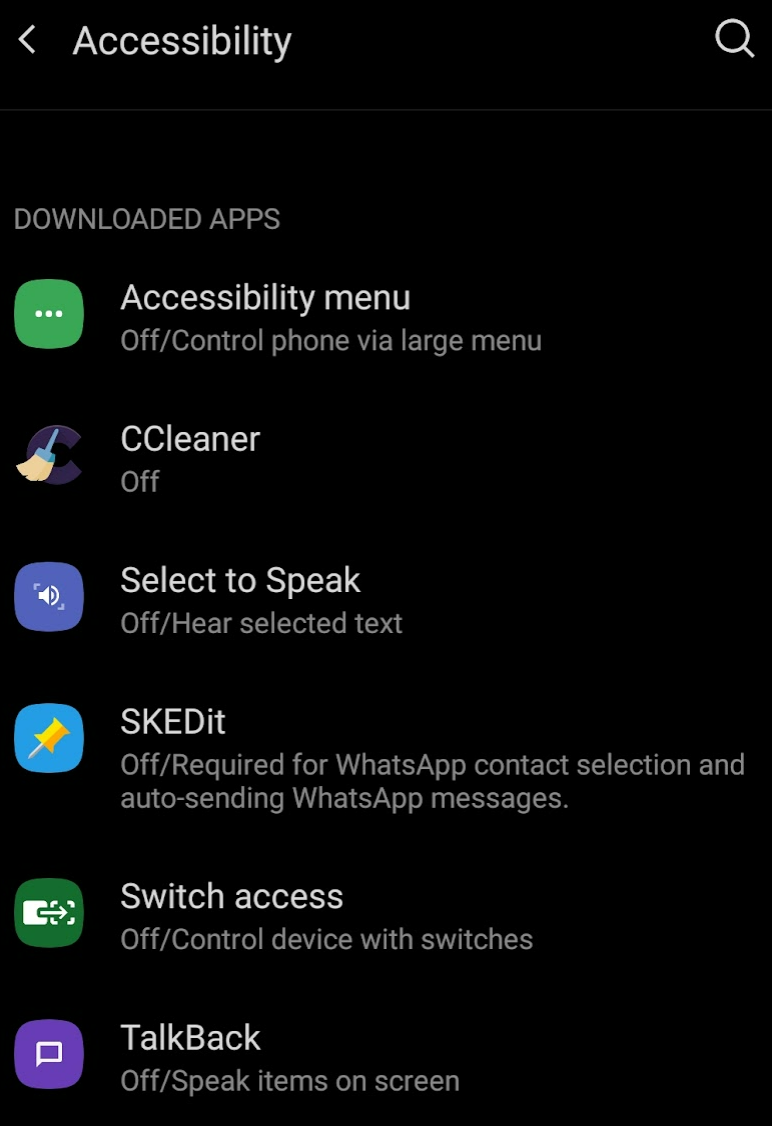
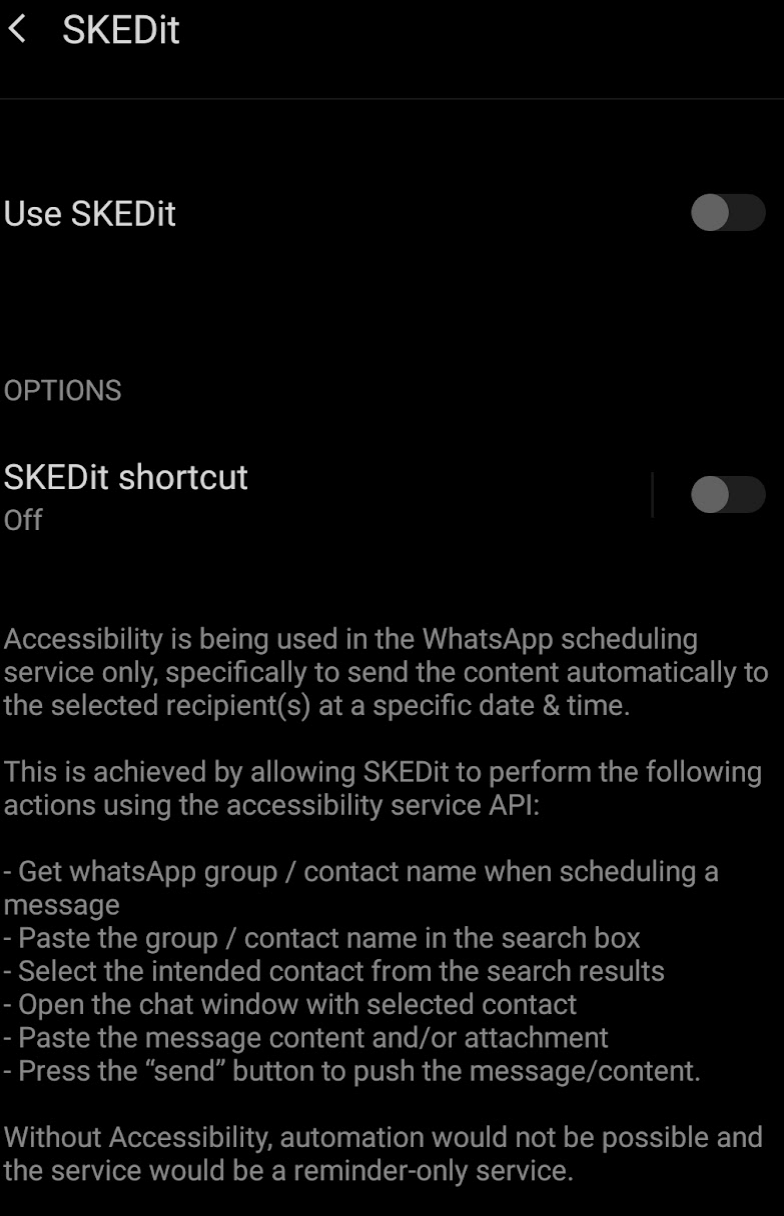
4. You may see a message prompt asking you to grant the app accessibility; to schedule messages on WhatsApp, we need to ‘Enable Accessibility’, so go ahead and do that. When you tap on ‘Enable Accessibility’, you will see another menu where you must tap on ‘SKEDit’ and then grant it the necessary permissions by selecting ‘Use SKEDit’.
5. Tap on ‘Add Recipients’ to select the users you wish to receive your scheduled message. This could help when you want to wish your friends and family on an occasion, or perhaps when you want to send a promotional message or reminder to your customers if you are a business owner.
If you have a large list of users, you can tap on the ‘CSV’ option to add a CSV list of accounts and phone numbers you want to receive your scheduled message, but this option requires you to have a premium account (paid) in the app.
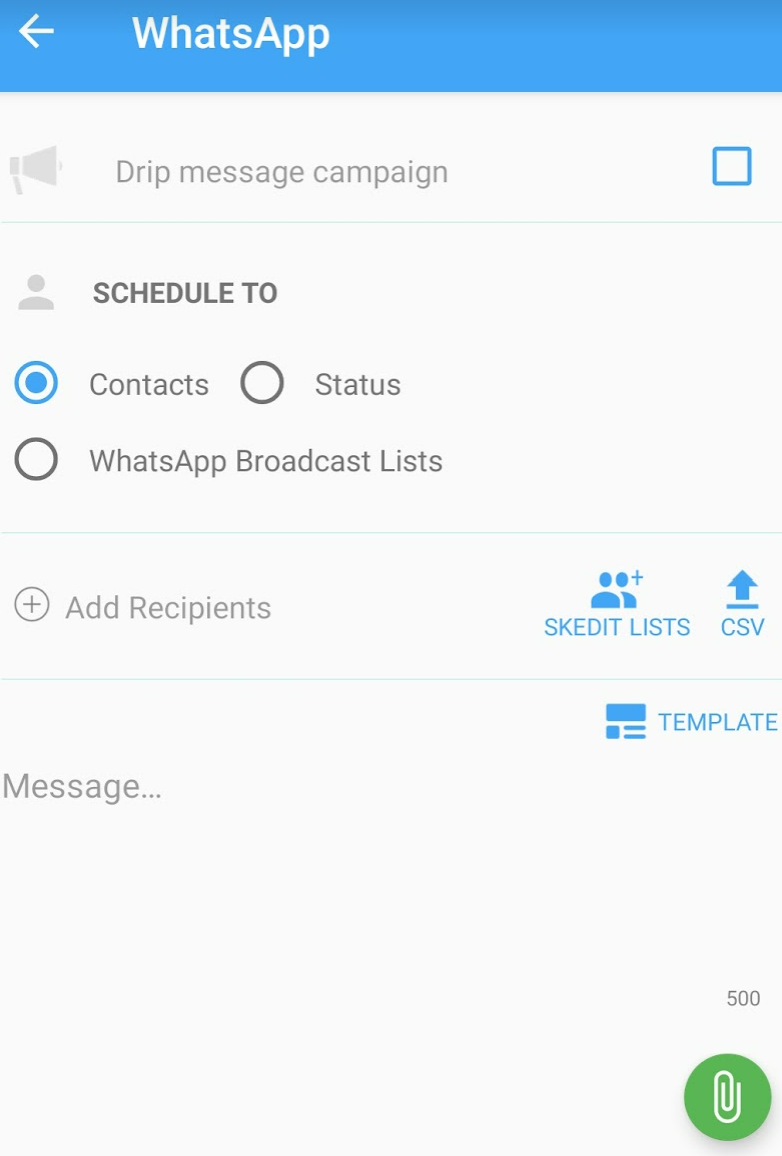
6. You will receive a message prompt asking whether you want to choose the contacts from your WhatsApp account or your Phonebook. Since we want to schedule messages for WhatsApp here, tap on ‘WhatsApp’. Tap ‘OK’ on the message prompt that follows.
7. You will be directed to the ‘Display over other apps’ menu, scroll down, select ‘SKEDit’ and make sure the ‘Allow display over other apps’ is turned ON. Head back once done. Tap on ‘Add Recipients’ again, followed by ‘WhatsApp’.
8. You will now be directed to your WhatsApp (or WhatsApp Business, depending on the version of the app you want to schedule messages for), tap on a contact or user you want to add to your list. If you do not have an active chat with a user you want to receive your scheduled message, tap on the ‘New chat’ option and select the user from your WhatsApp contact list. If you have mistakenly added a user, simply tap on their name from the SKEDit menu followed by the ‘Cross’ option to remove them from the list.
9. Once you have selected the users, tap on the ‘Message’ box and type the message you wish to schedule; you can type up to 500 characters.
10. Tap on the ‘Schedule’ option to set the date and time for when your scheduled message must be sent to the users on the list.
11. Tap on the ‘Tick’ mark on the upper right-hand corner of the screen. If you have a screen lock prompt, just do as the message asks or your scheduled message won’t be delivered. If you do not wish to turn OFF your screen lock, just enable ‘Ask me before sending’.
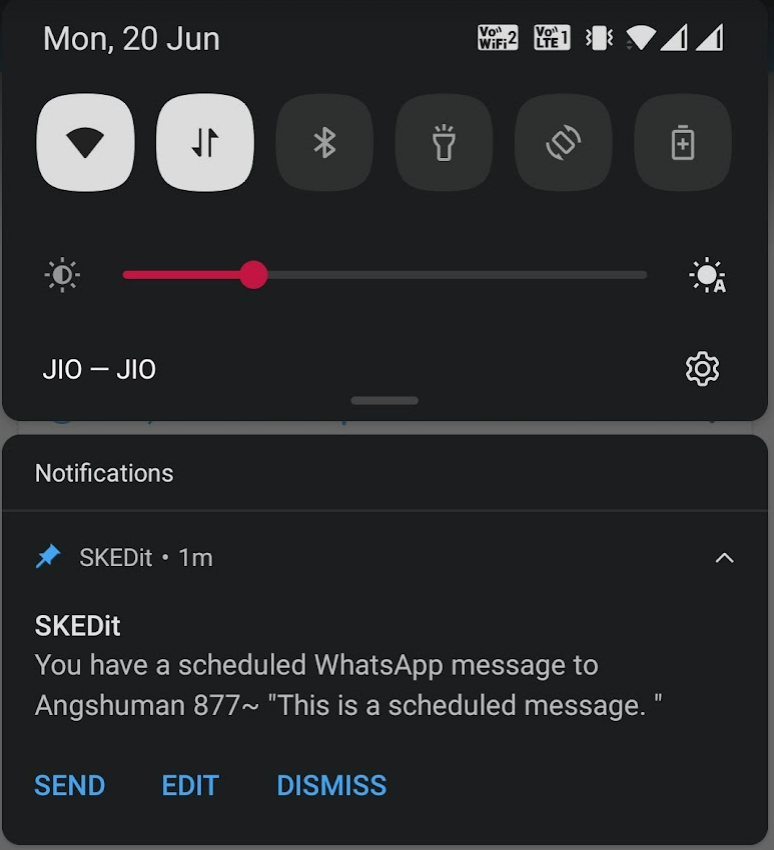
12. You will then be directed to the Scheduler where you will see upcoming scheduled messages before they are sent to the respective users. You will also receive an overview notification about the scheduled message sometime before its scheduled date/time.

How to schedule WhatsApp messages on iOS?
The process of scheduling WhatsApp messages is somewhat harder on iOS devices due to the overwhelming emphasis Apple puts on security of its users, but it can be done nonetheless. Follow the steps below to schedule WhatsApp messages from iOS devices.
1. Download the ‘Shortcuts’ app from the Apple App Store if you do not already have it. Tap on it.
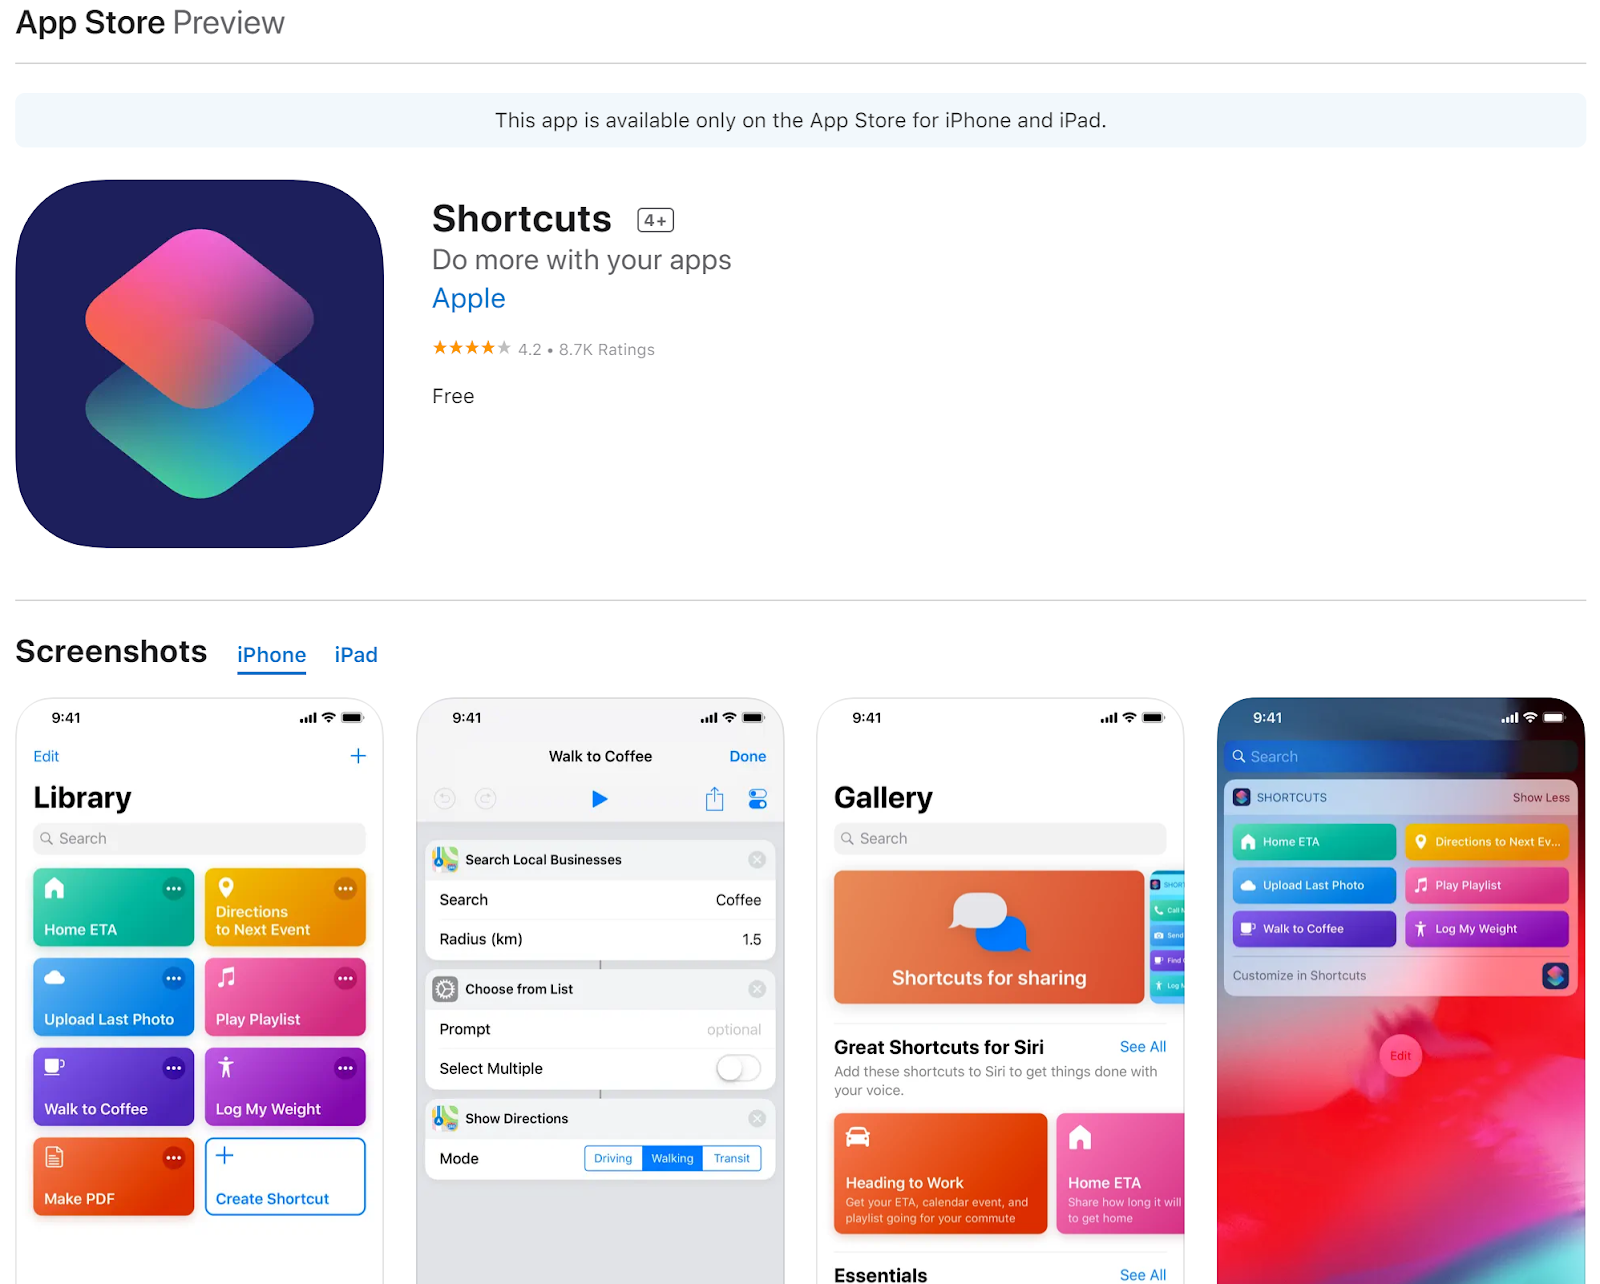
2. Tap on ‘Automation’ in the middle from the bottom bar, tap on ‘Personal automation’.

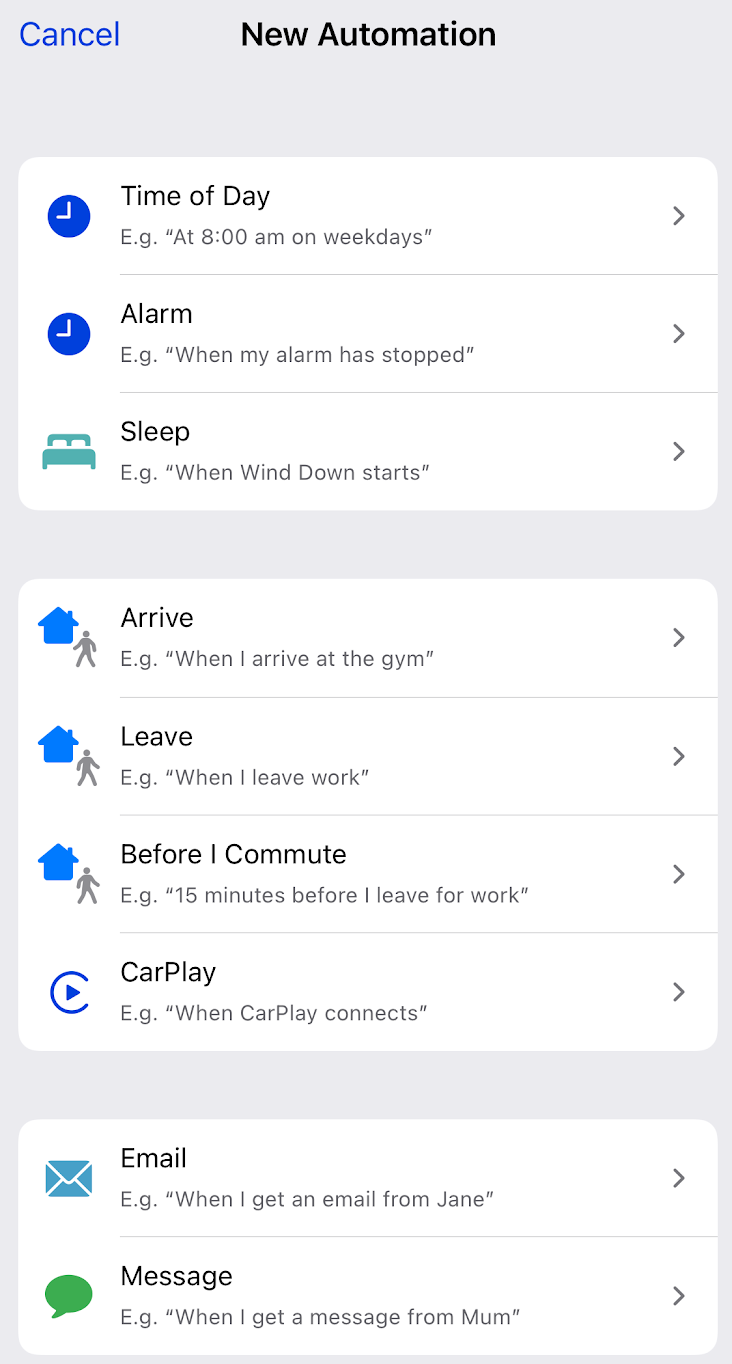
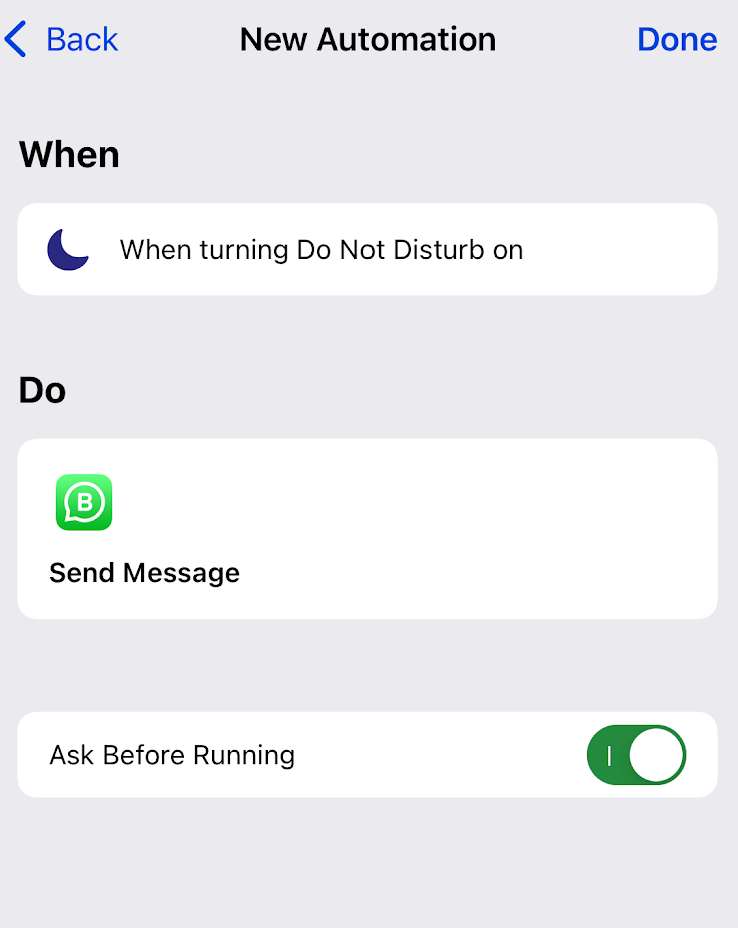
3. You will then be directed to the menu for ‘New Automation’, scroll down and select the automation you wish to execute. For the purpose of this article, consider that we want an automated message to be sent to our WhatsApp contacts whenever ‘Do Not Disturb’ is turned on. Scroll down and tap on ‘Do Not Disturb’, followed by ‘When Turning On’ and then ‘Next’
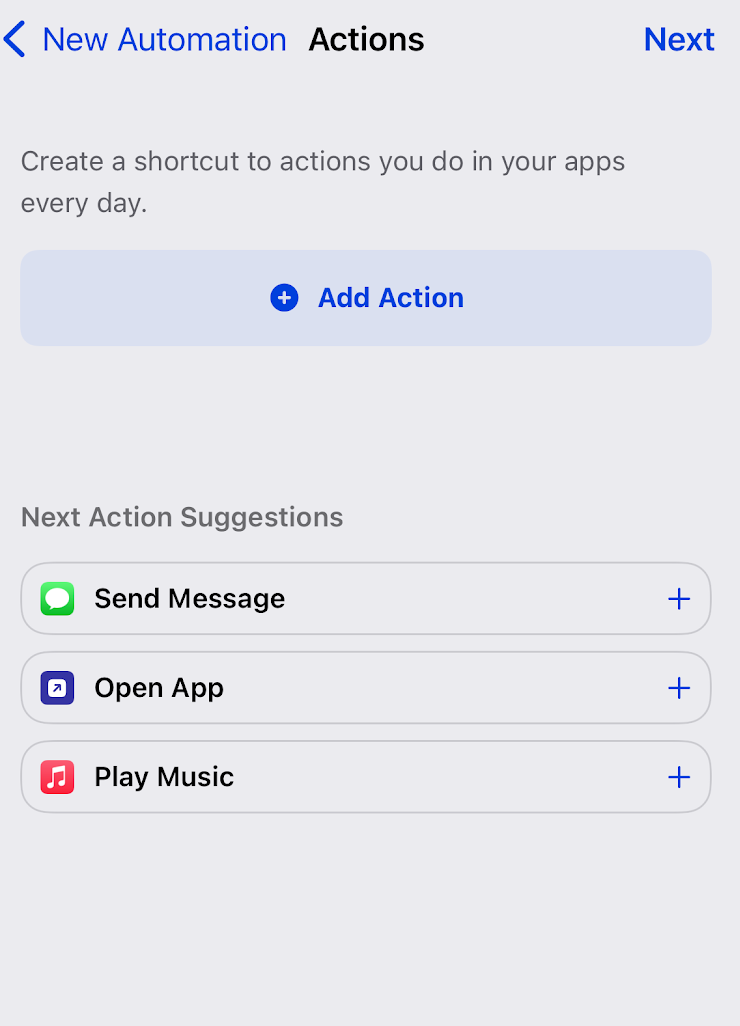
4. Tap on ‘Add Action’ and select ‘Send Message’ with your contacts or users in the list as shown below. Then tap on ‘Message’ in the ‘Send “Message” to Recipients’ and type the message you wish to schedule.

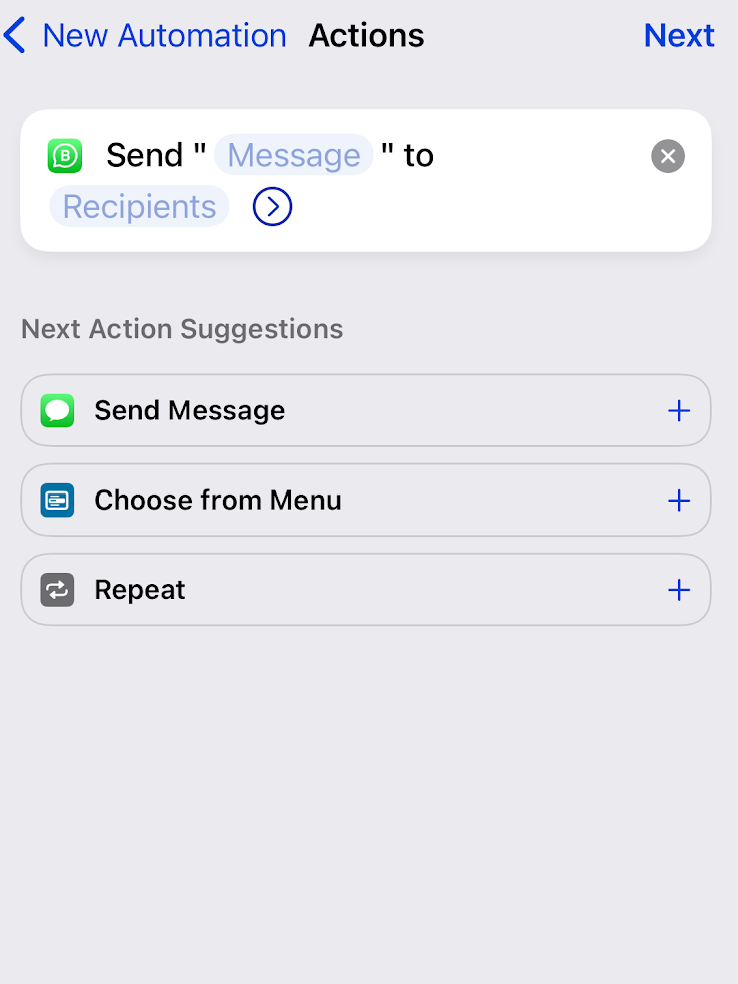
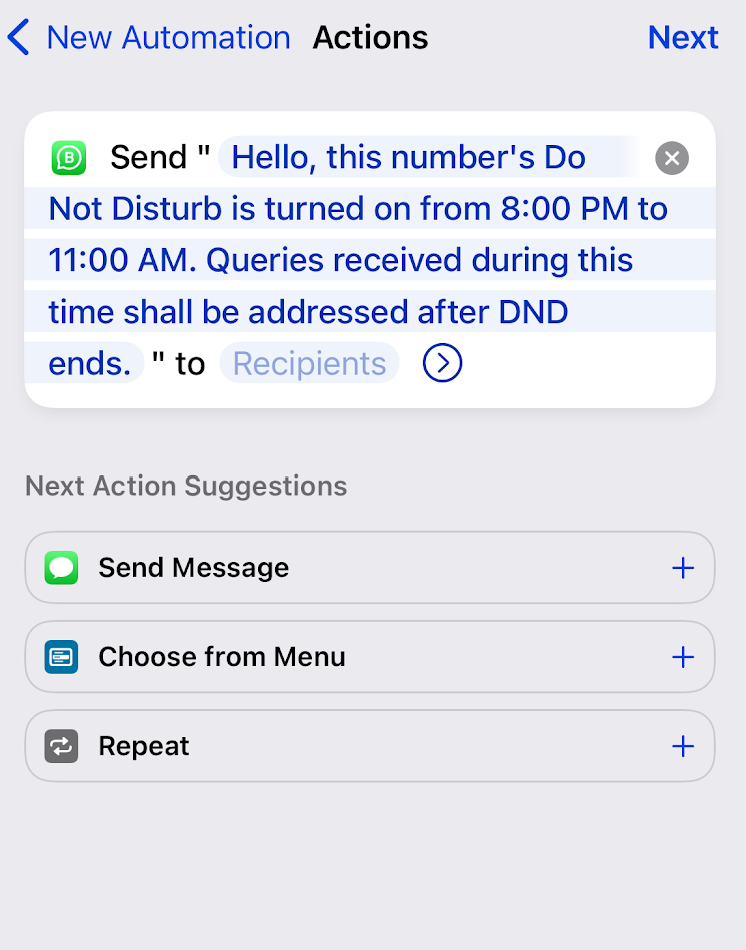
5. Tap on ‘Next’ once your scheduled message has been set (as shown above), then tap ‘Done’ to finalize your scheduled WhatsApp message on iOS.
How to schedule WhatsApp messages on WhatsApp Web?
To schedule WhatsApp messages using WhatsApp Web, follow the steps below. Note that whether you have a WhatsApp or WhatsApp Business account, the steps will be the same in either case.
1. Install the WhatsApp Web Message Scheduler (it is a Google Chrome extension; if you do not use Google Chrome, then you need to install the browser to automate WhatsApp message sending from the WhatsApp Web client).
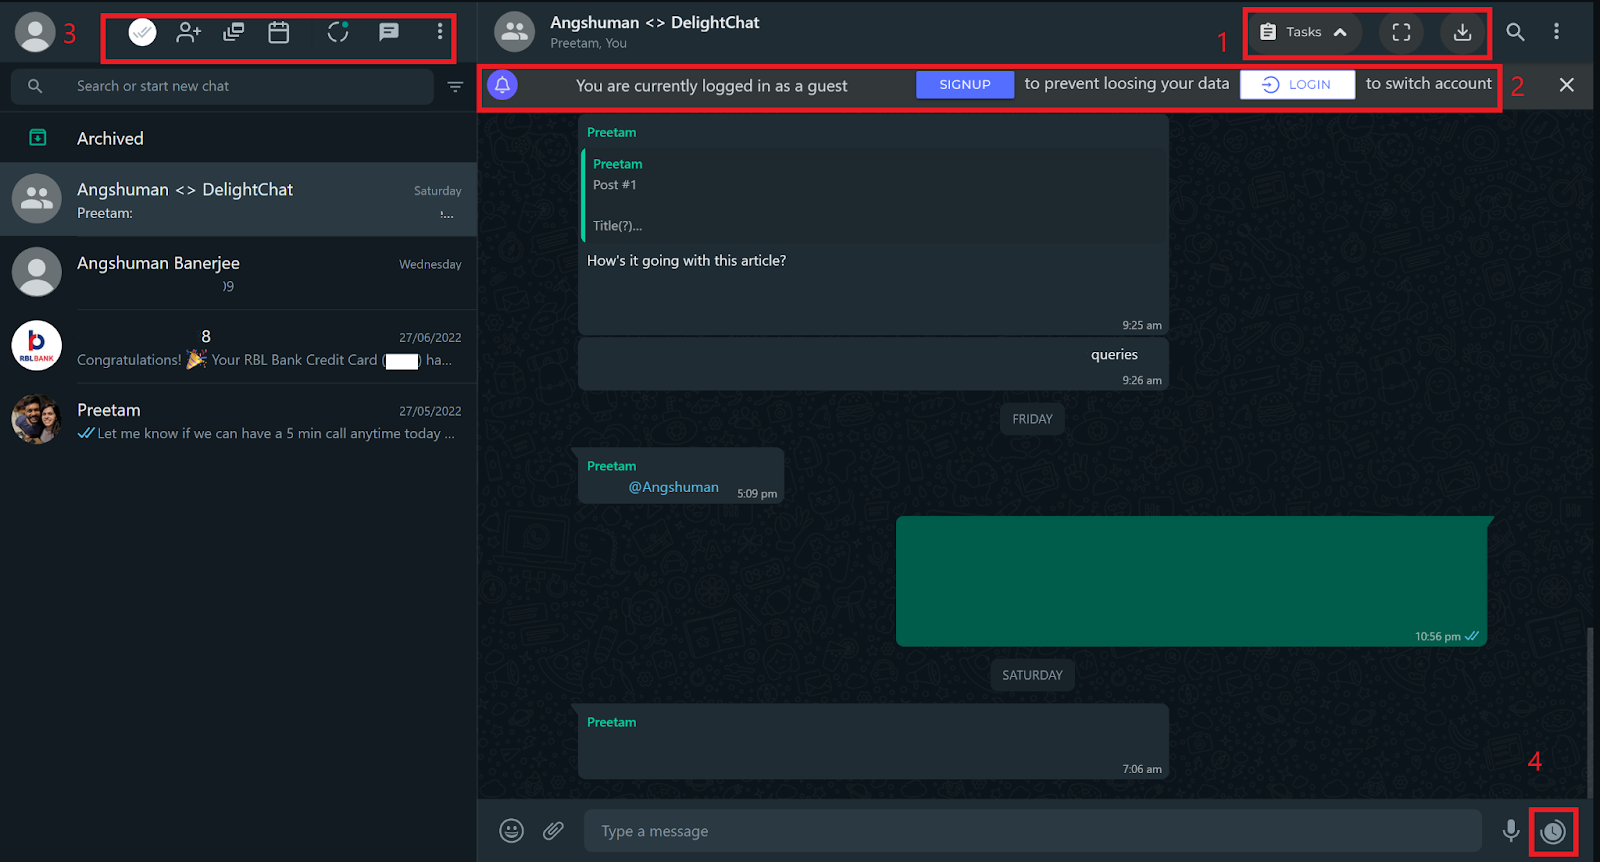
2. Login to your WhatsApp account from WhatsApp Web. Notice that your UI looks different. The user interface has been labeled below.
- (1) - task menu for creating group tasks, exit/enter fullscreen, and export group members
- (2) - signup/login menu to save your existing account details of WhatsApp (for example, groups created, tasks assigned)
- (3) - open WhatsApp scheduler menu, open chat by phone number, broadcast, and list of scheduled messages
- (4) - schedule a WhatsApp message for the current participant or group
3. With the WhatsApp Web message scheduler, you can -
- Schedule a WhatsApp message to an individual user
- Schedule a WhatsApp message to a group of users (broadcast)
To schedule a WhatsApp message to an individual user, follow the steps below.
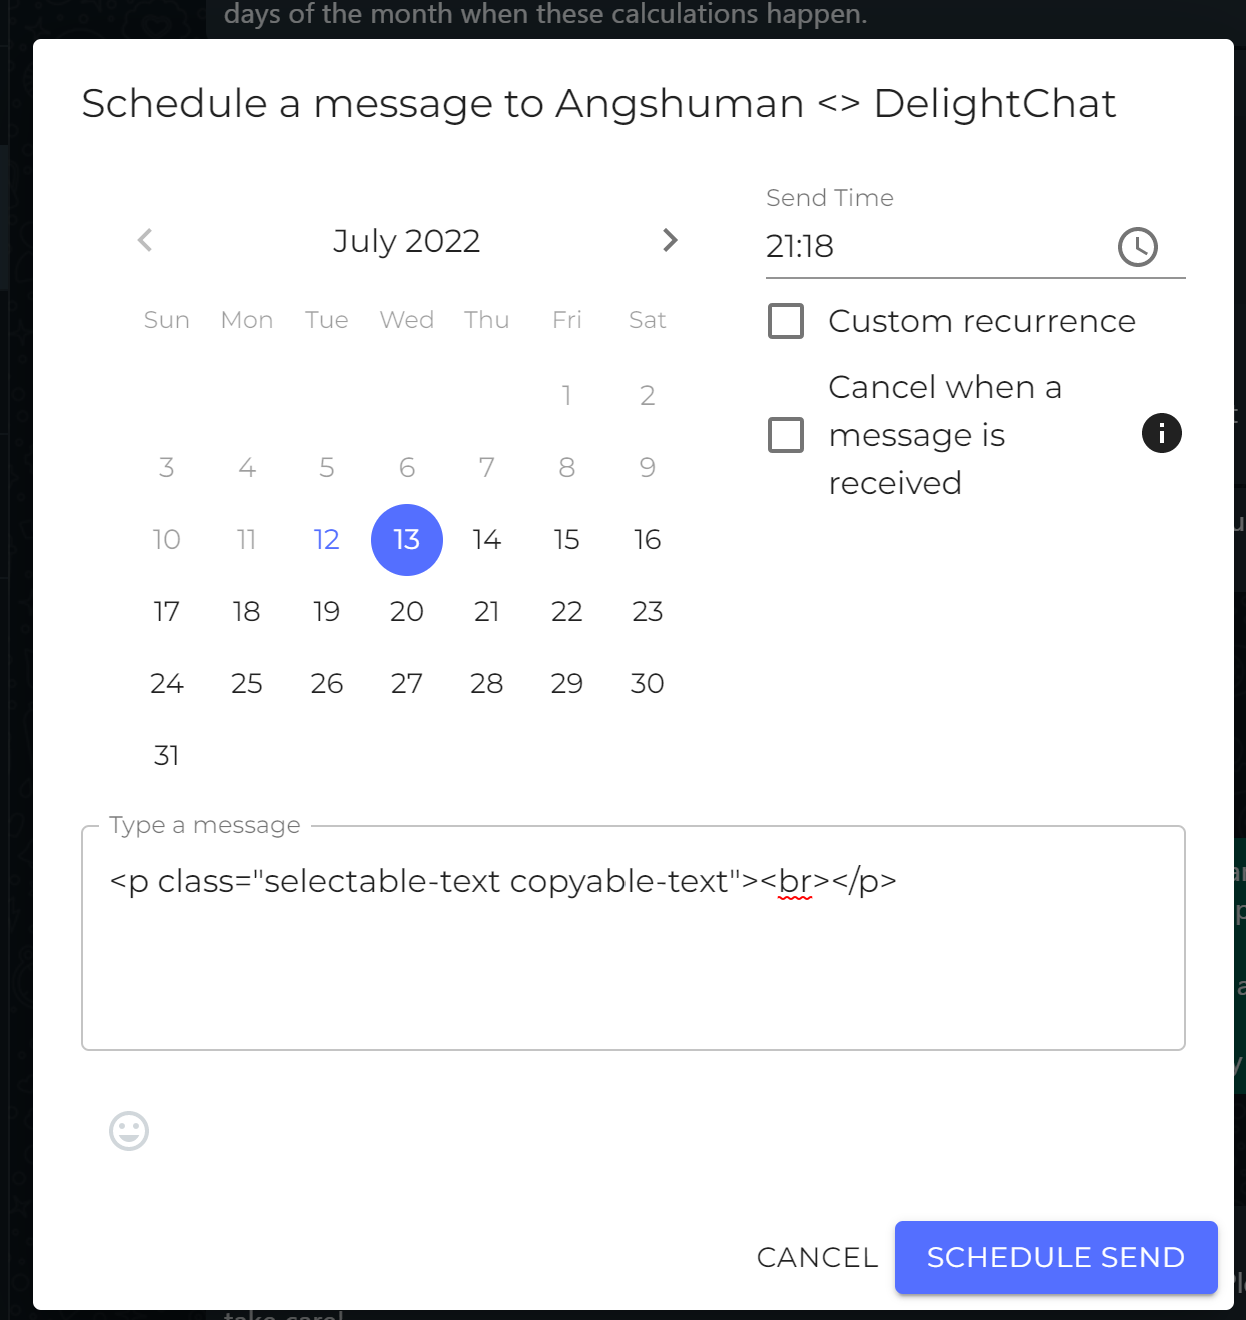
- Click on the (4) in the screenshot above, you will receive a prompt asking you to set the date, time, and message to be scheduled for the user/group.
- Select the date (day/month) followed by the time (send time) to fix the message schedule timing. Alternatively, you may click the clock icon to set the time.
- Type the message to be broadcasted in the ‘Type a message’ box and click on ‘Schedule Send’
To schedule a WhatsApp message to a group of users, follow the steps below.
- Click on the Broadcast option from the WhatsApp Web scheduler menu (shown below).
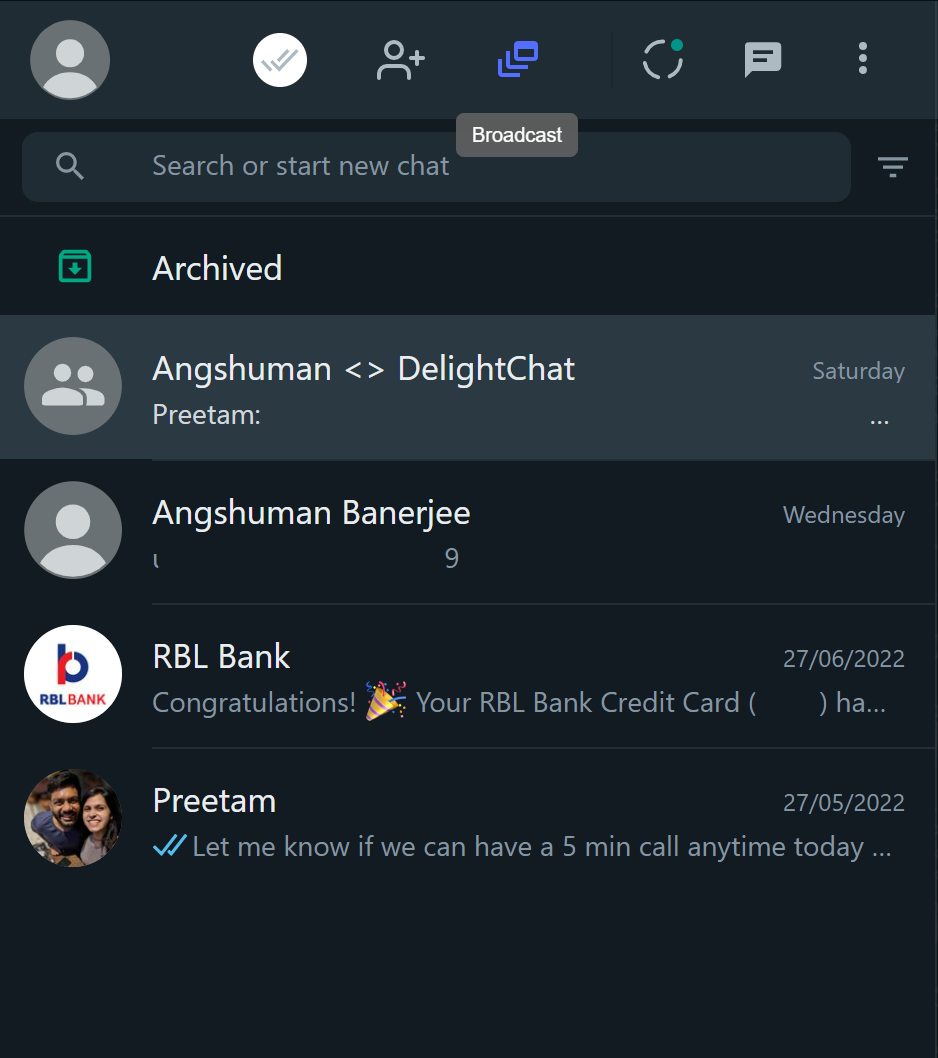
- Signup for the service if you haven’t already (you need to have an account to use the broadcast schedule message service). Login once you have signed up.
- You will see a menu with three options - Lists, Templates, and Campaigns.
- Enter a name for your WhatsApp broadcast schedule message.

- Select the WhatsApp users from your contacts you want to receive your scheduled WhatsApp broadcast message
- Enter the message to be broadcasted to the WhatsApp list and click on ‘Schedule Broadcast’
How to schedule WhatsApp messages on WhatsApp Business?
If you have a WhatsApp Business account, you can schedule messages using three options, including - ‘Away message’ or ‘Greeting message’ or ‘Quick replies’. Note that those messages cannot be sent on any specific date or time, but are automated responses sent whenever you receive a message from a new or existing user. To schedule WhatsApp messages on WhatsApp Business, follow the steps below.
1. Navigate to ‘Business Tools’ on WhatsApp Business. You can do this by tapping on ‘More’ on Android and ‘Settings’ if you are using an iOS device.
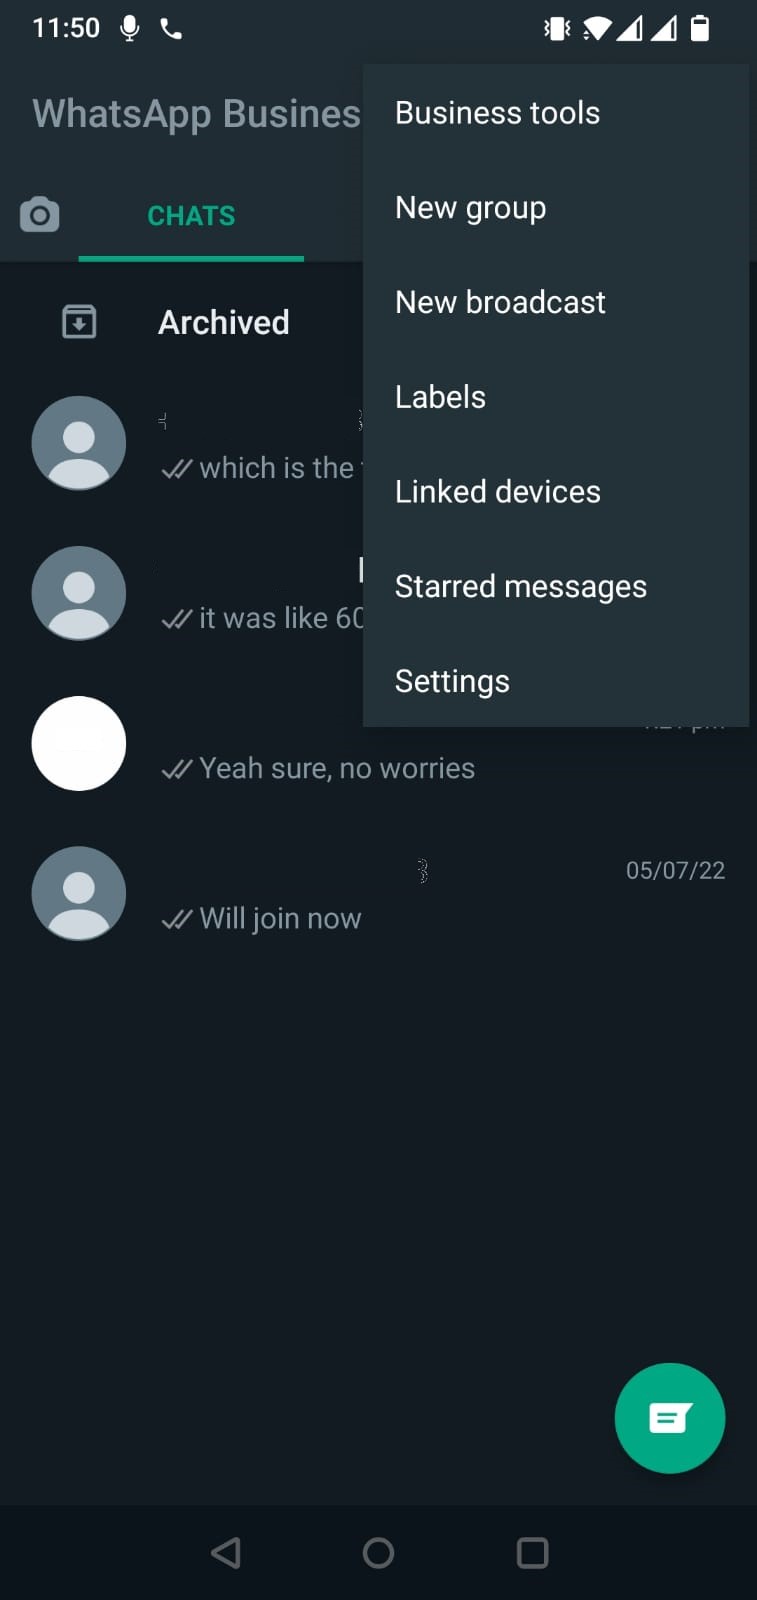
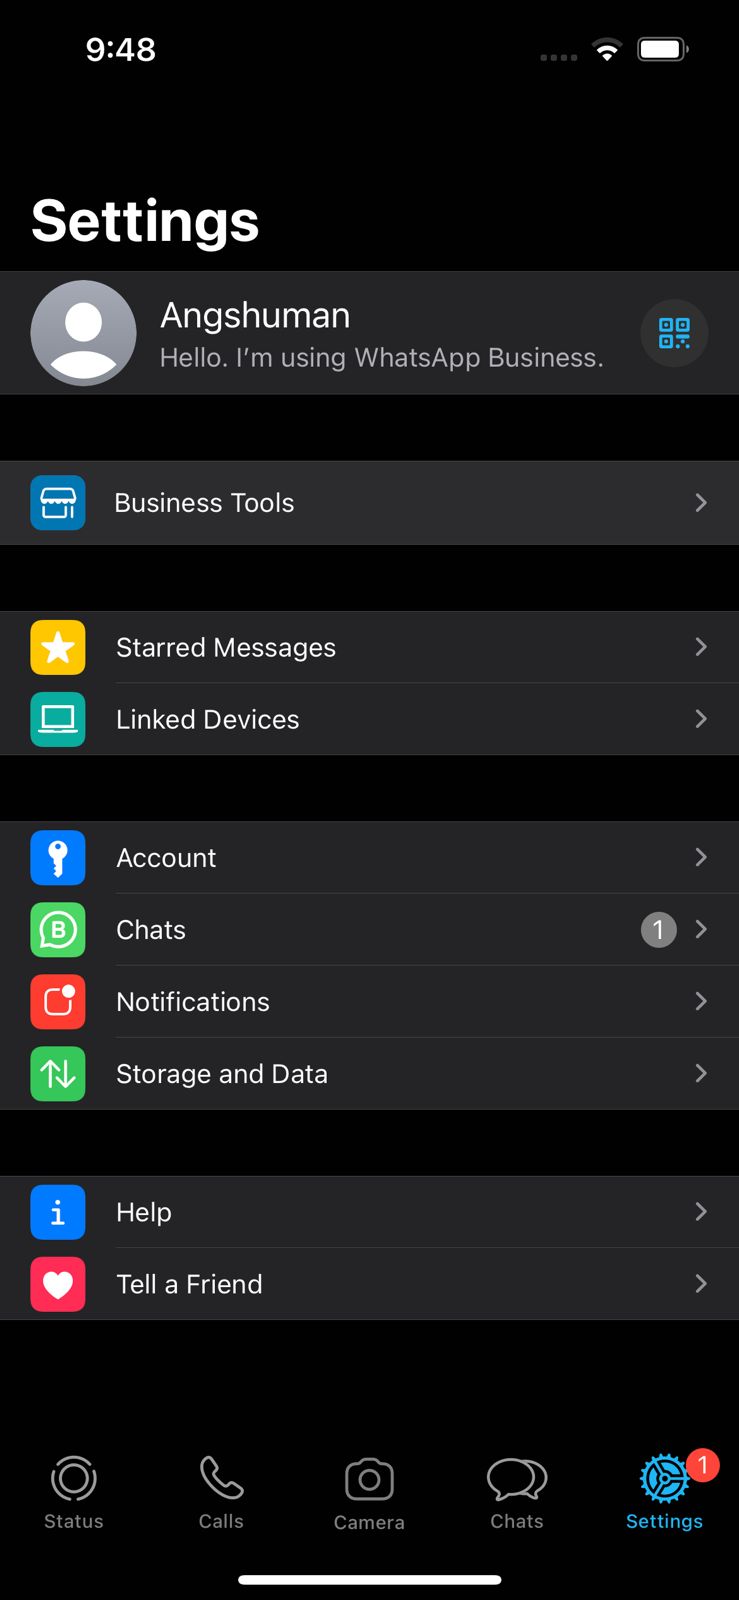
2. Click on ‘Greeting message’ or ‘Away message’ or ‘Quick replies’ depending on the type of message you wish to schedule.
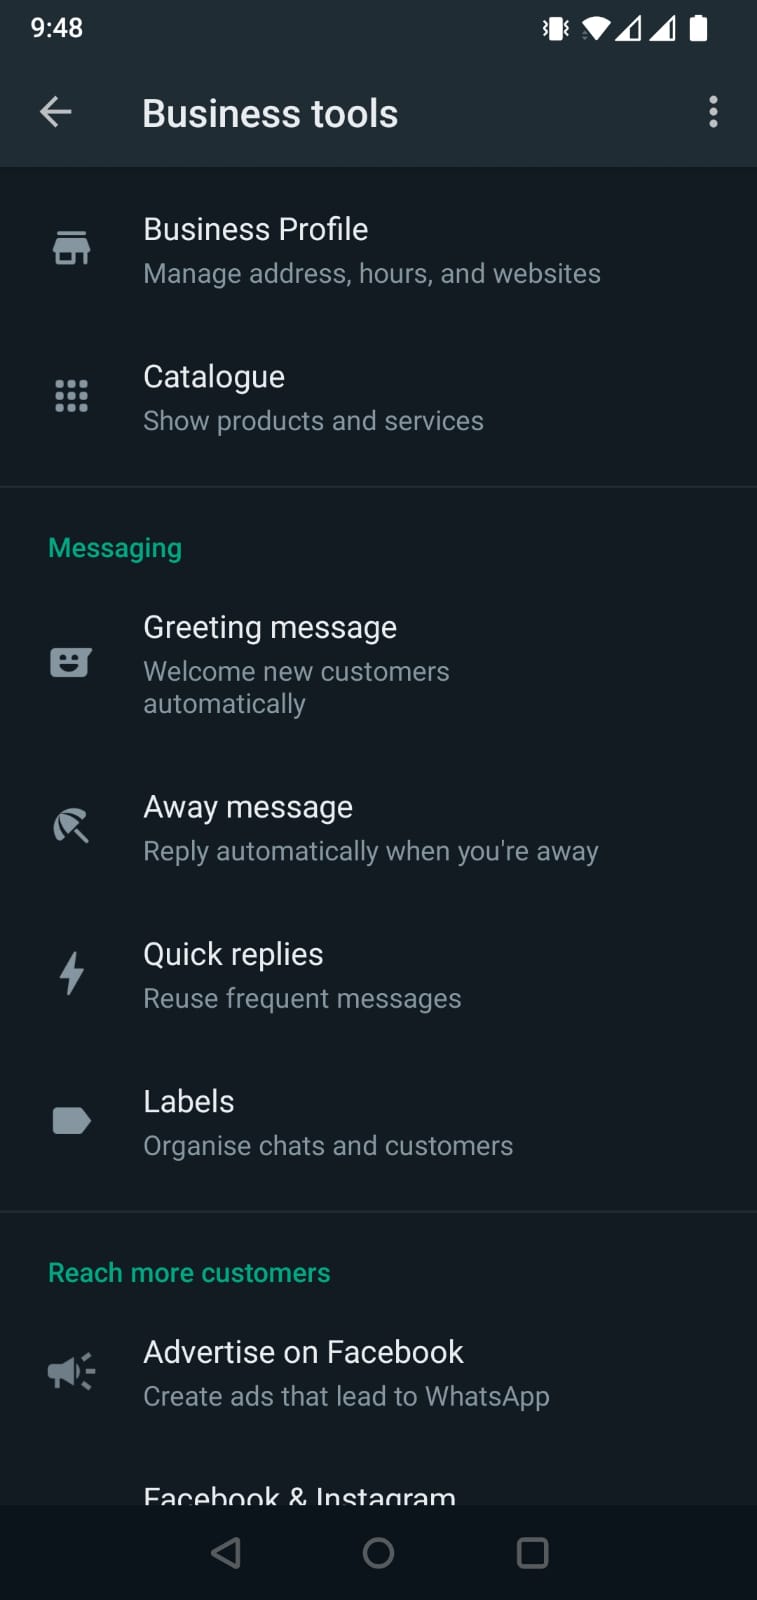
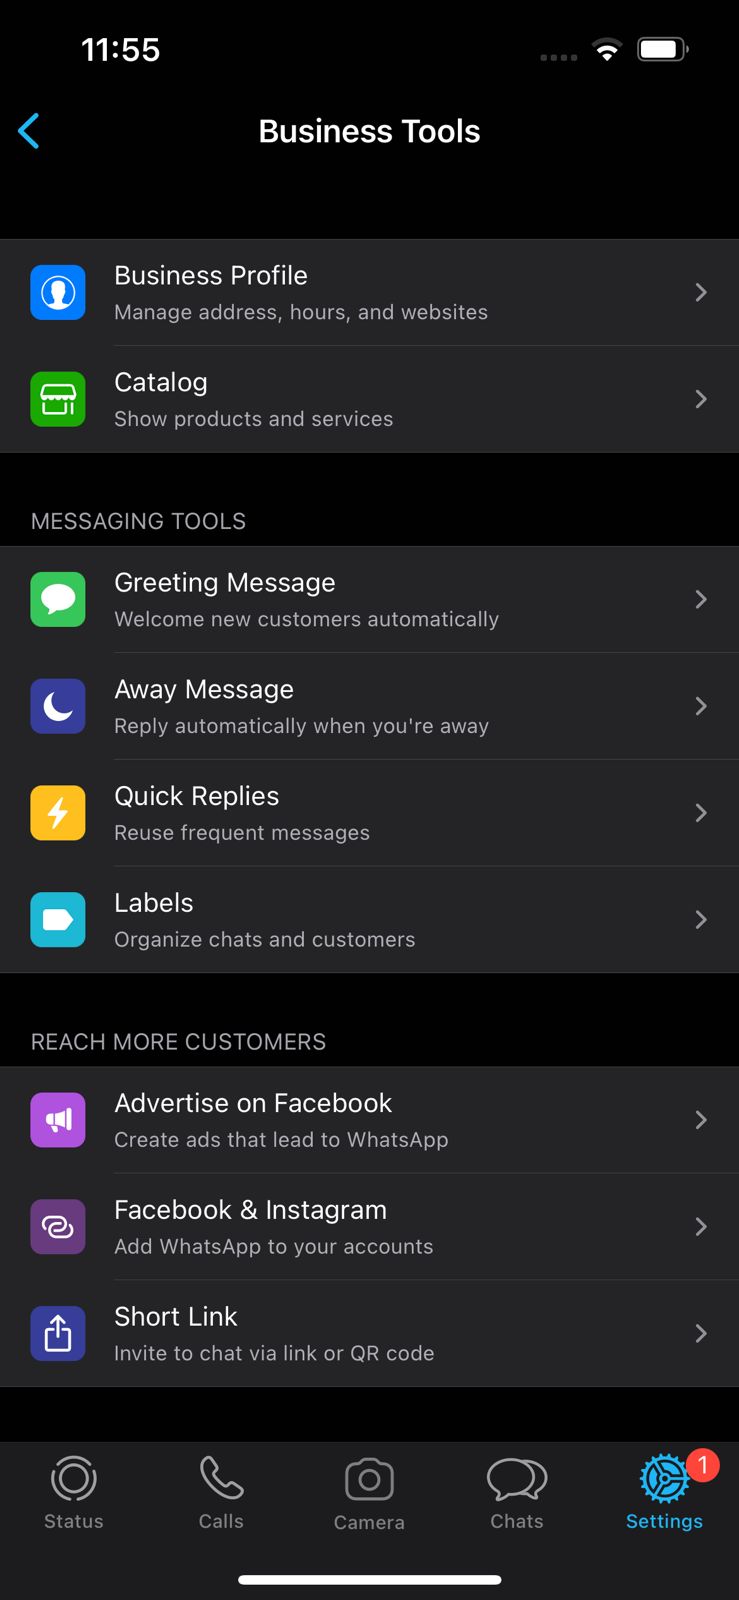
3. Choose the option based on your desired functionality -
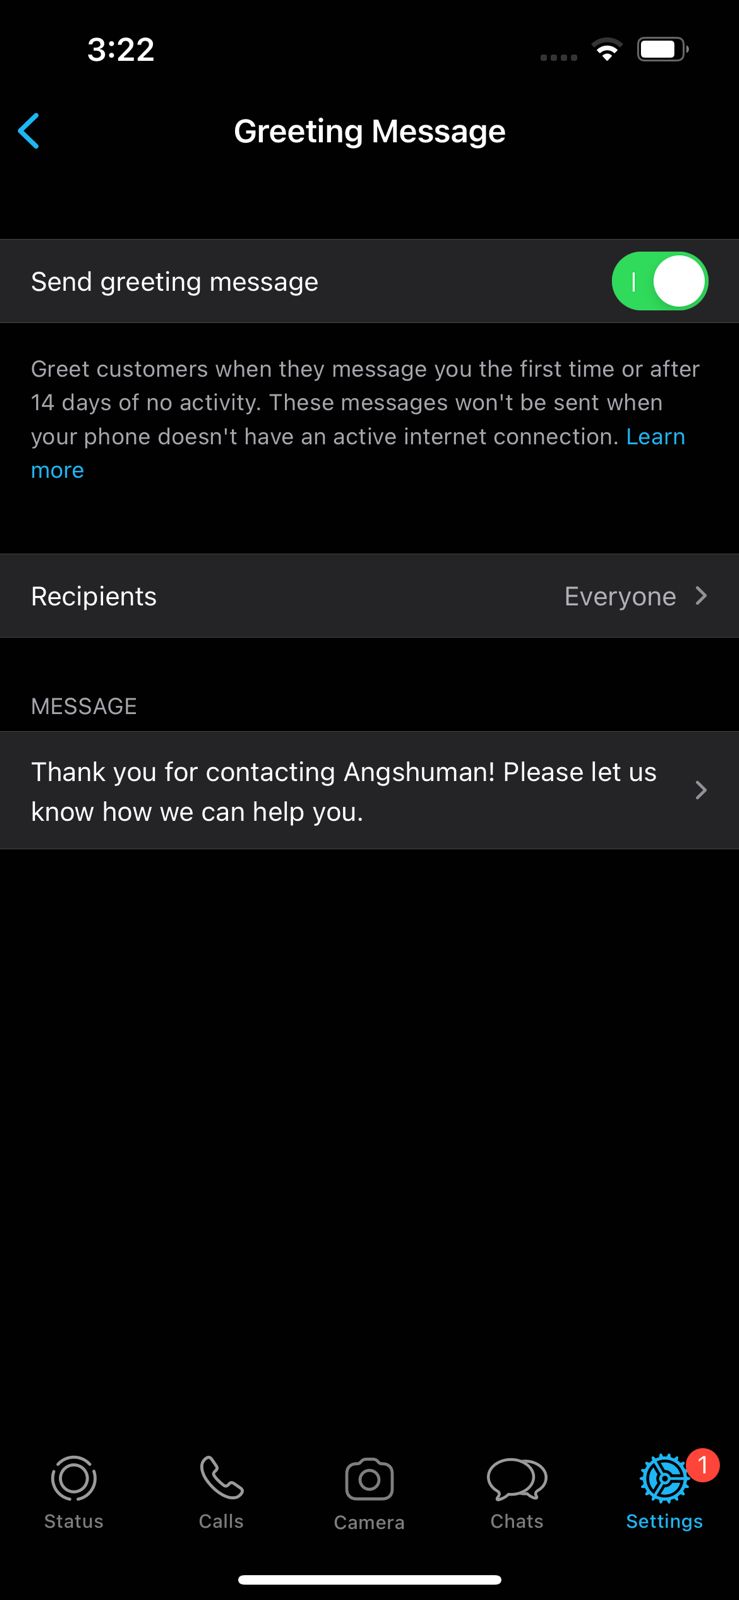
- Greeting message - automates messages to users who message you for the first time
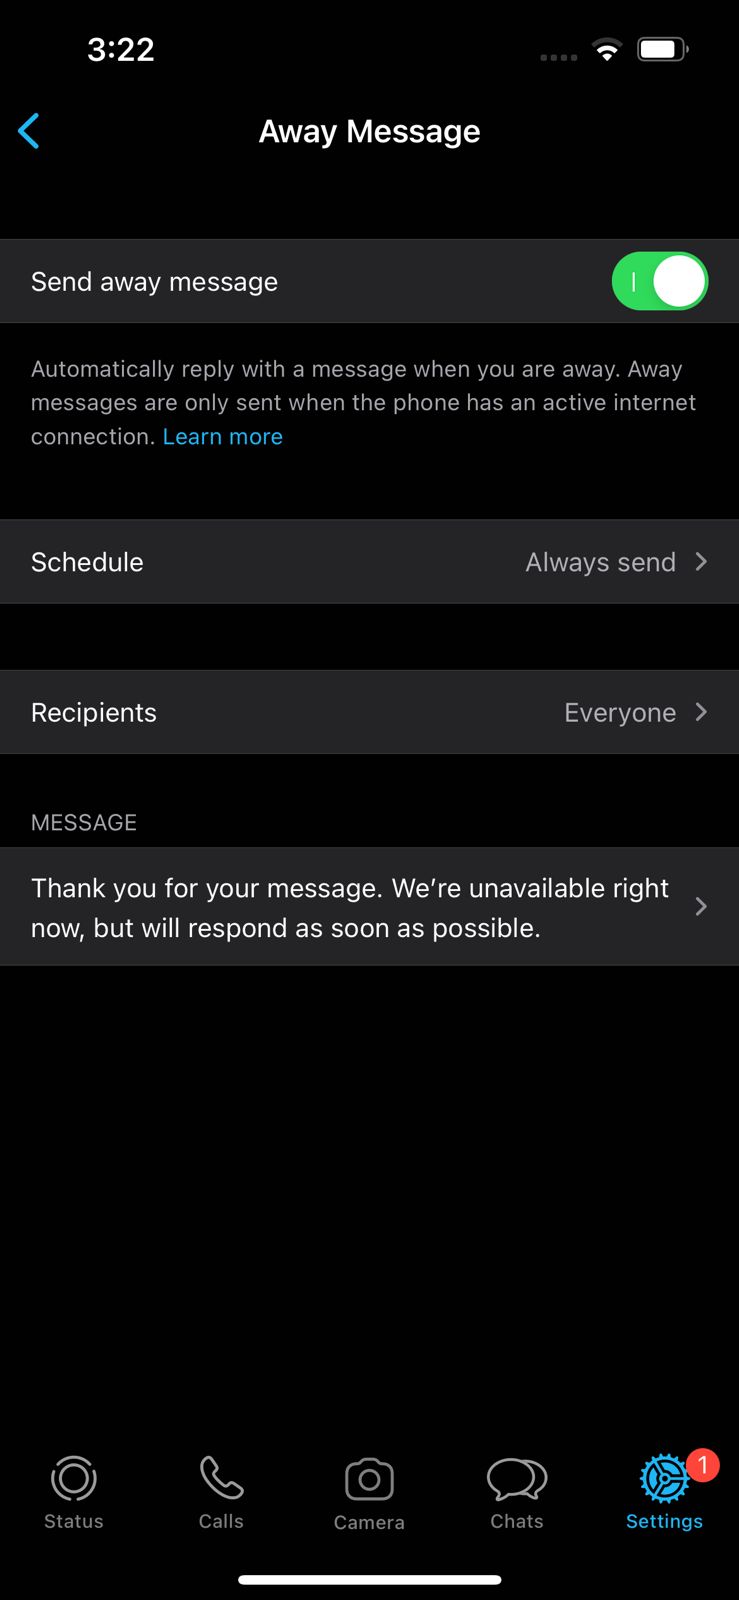
- Away message - automates messages to users who message your WhatsApp account while your status is set to “Away”
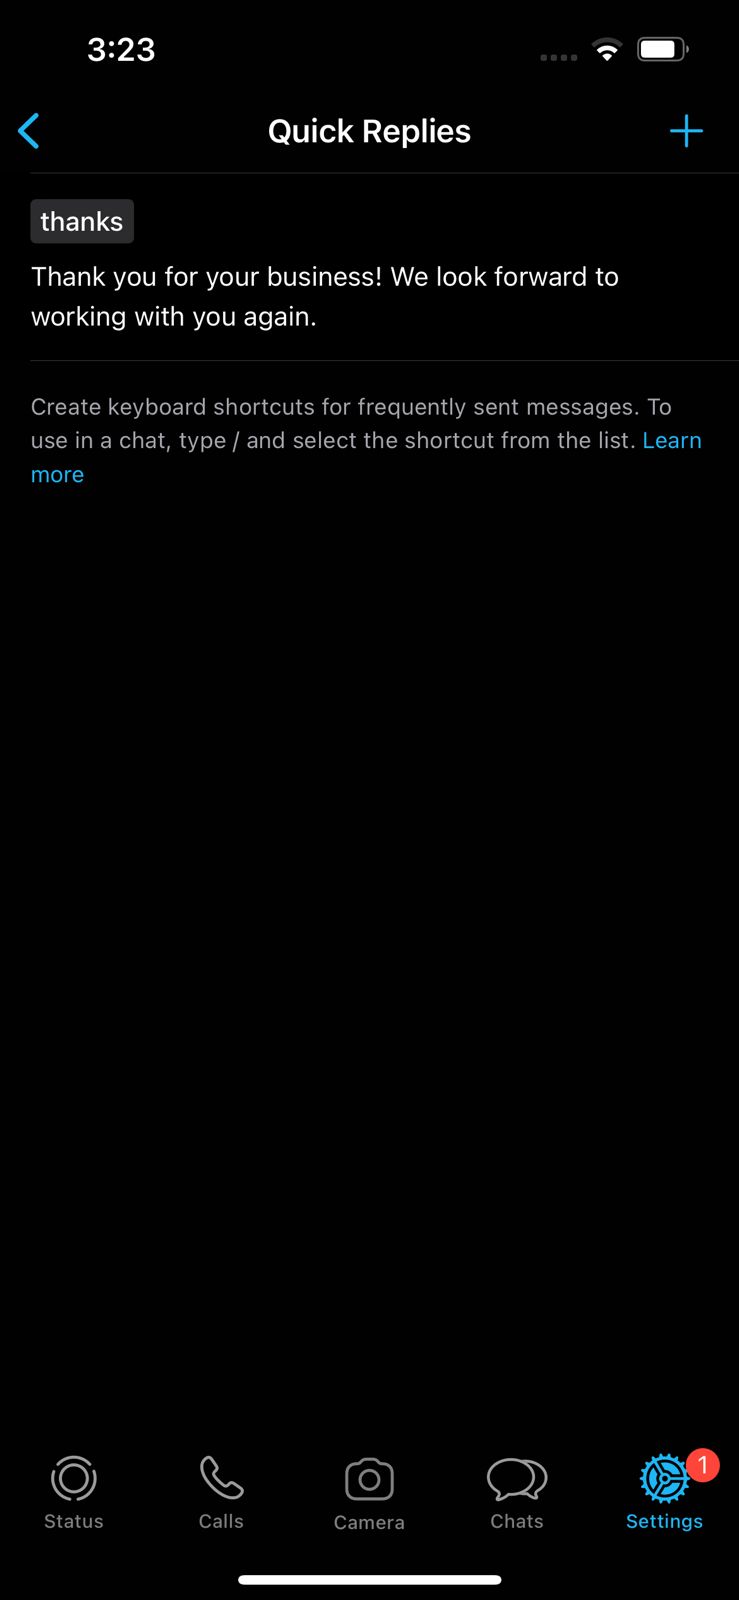
- Quick replies - automates messages to specific messages or messages containing specific words by users who message you; while the message can be preset, you still need to execute it however by typing the command associated with it.
To schedule a message, enable the ‘Send greeting message’ or ‘Send away message’ option, tap on the ‘Greeting message’ or ‘Away message’ to set the message to be scheduled, and then tap on ‘Recipients’ to select the recipients you wish to receive the message or just send to everyone if you are unsure.
For quick replies, tap on the message below the “thanks” to set the message you wish to respond with. However, you cannot schedule quick messages on WhatsApp Business as you must manually enter them in response to whenever other users message you.
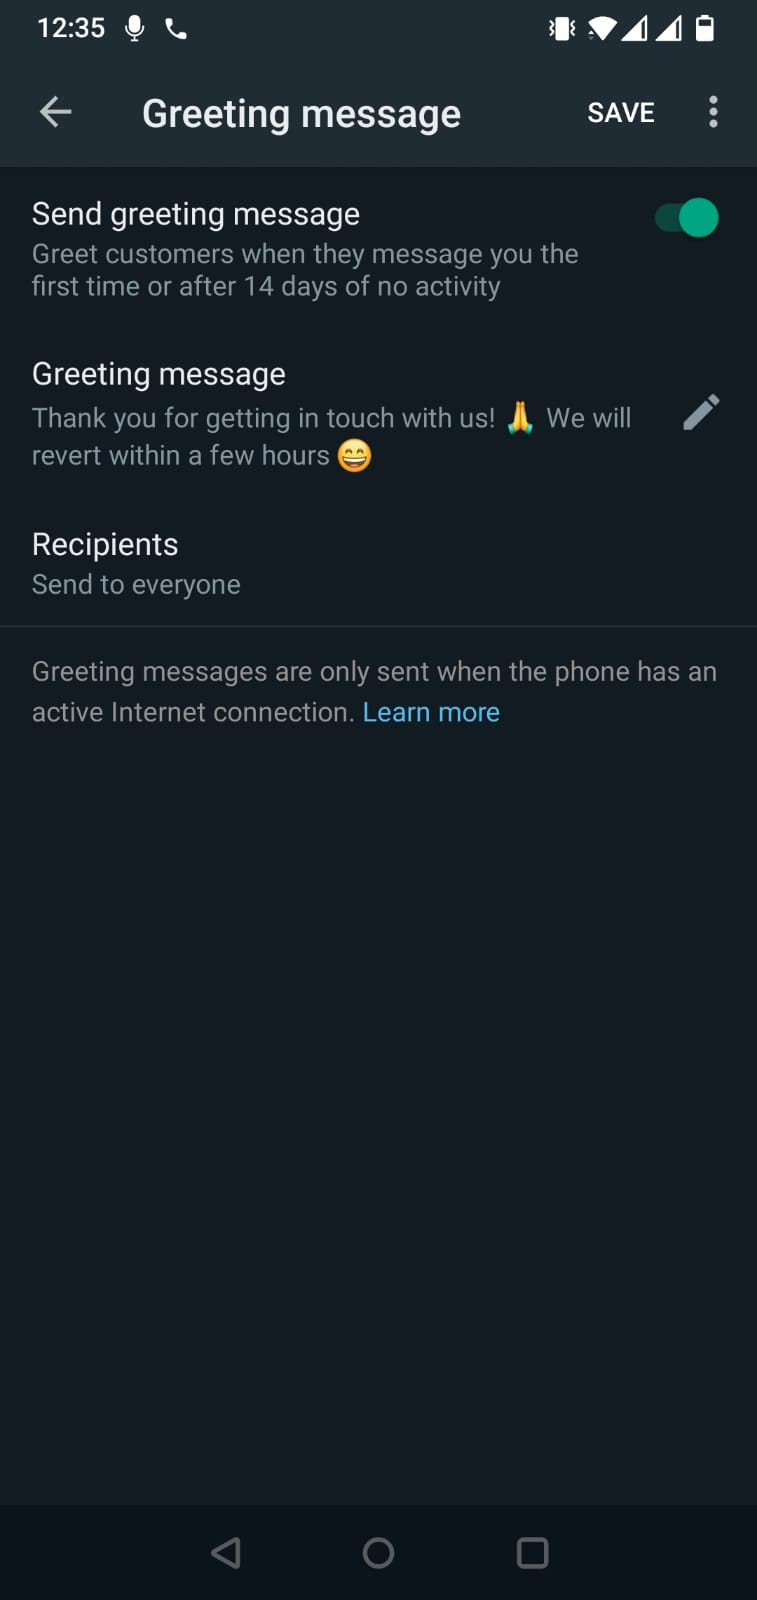
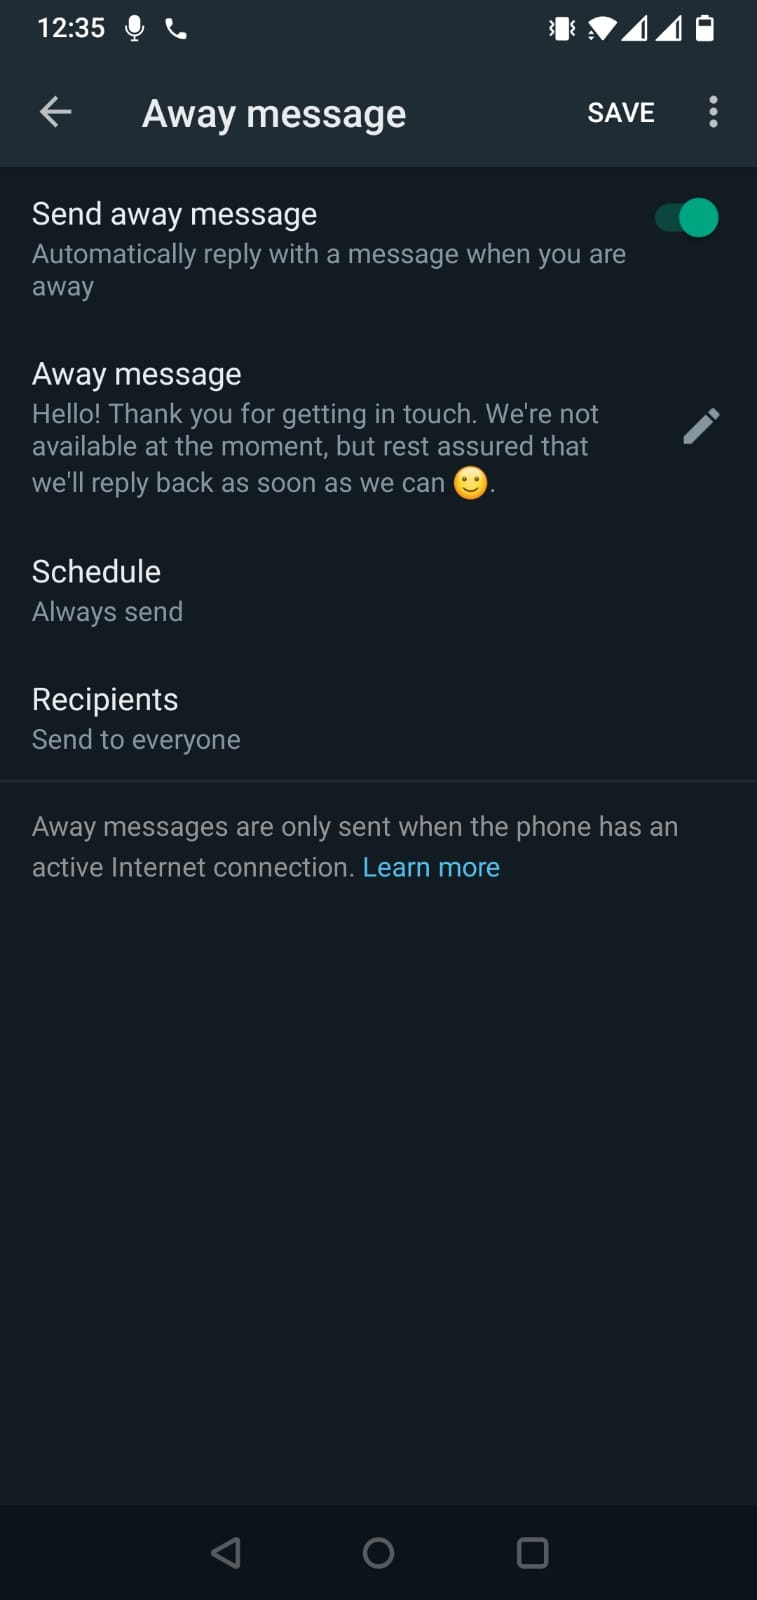
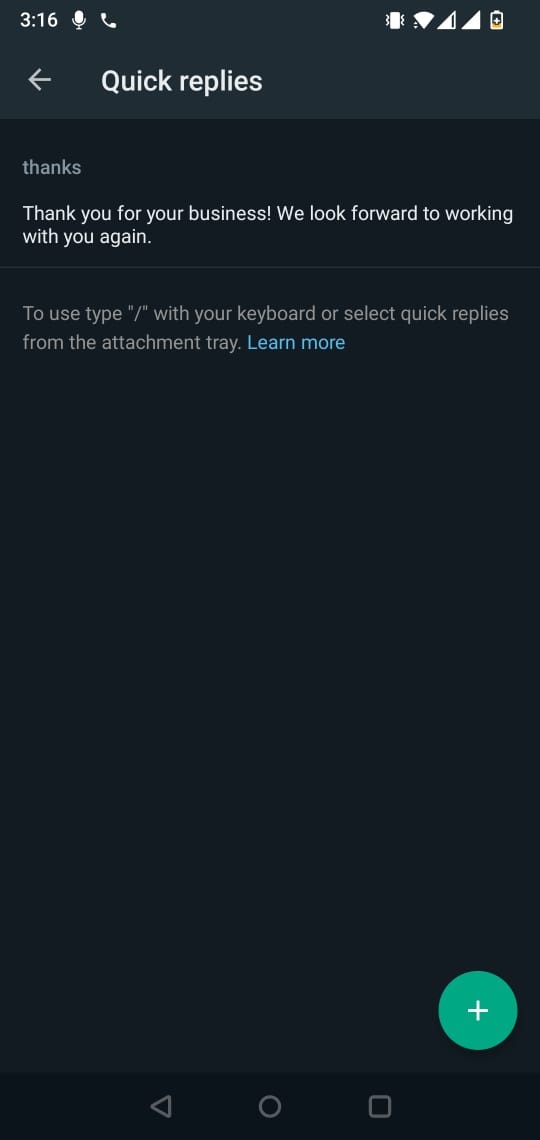
The menus and settings are the same on iOS devices as shown in the screenshots below.
How to schedule WhatsApp promotional messages on WhatsApp API?
For business owners, scheduling promotional WhatsApp broadcasts could be quite helpful. With this functionality, you can plan promotions, discounts, offers, etc. at predetermined timings. Combine this with a period when customers are likely to shop more (such as during Christmas or Thanksgiving), and you could dramatically boost your sales.
So, if you know that a festival is scheduled on the calendar, you can set a promotional broadcast message to be sent to your customers such that they are offered a discount or other promotional offer during the festive timing. This provides them an added incentive to purchase your products or continue their memberships.
With DelightChat, you can schedule promotional WhatsApp broadcasts in as little as 2 minutes.
You also get a host of powerful WhatsApp marketing features such as automated WhatsApp broadcasts, abandoned cart recovery, order tracking confirmation, analytics ROI, and more.
To schedule promotional WhatsApp broadcasts on WhatsApp API with DelightChat, follow the steps below.
1. Login to your DelightChat account; if you don’t have a DelightChat account, signup today or feel free to schedule a demo.

2. Navigate to WhatsApp Marketing from the left-side vertical navigation bar and click on ‘Broadcasts’. Note that you must have message templates that you wish to send through WhatsApp broadcasts since all your users in the broadcast list would receive the same message (which is why it is a template).
If you do not have a set message template in mind, here are 14 WhatsApp promotional message examples to help you create one you like.
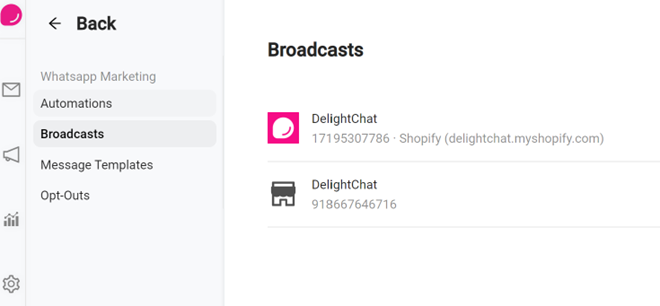
3. Select your account on DelightChat and click on ‘Edit’ on the right-side of your account.
4. Click on ‘Create New Broadcast’ on the top right of the screen.

5. Type in the ‘Campaign Name’ whatever the name of your promotional WhatsApp broadcast is.
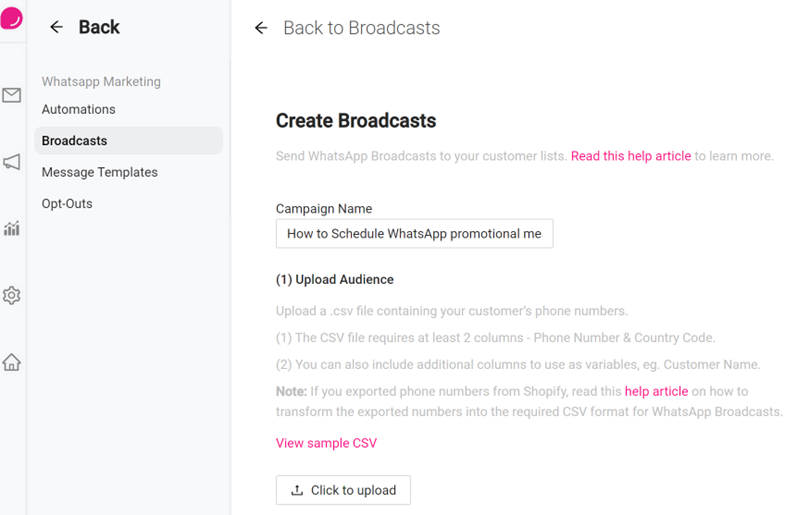
6. Upload your customers’ list from WhatsApp as a CSV file. If you run a Shopify store, learn how to export your Shopify customers’ data to use in a WhatsApp broadcast.
7. Select a message template from the dropdown menu; if you do not have any message templates, head to ‘Message Templates’ from the left-side navigation bar, select your account, click ‘Edit’, followed by ‘Create Message Template’.

8. Once selected, the chosen message template will display on the right as well as below in the form of ‘Message Template Body’ and ‘Preview’ as shown. If you want to make changes to the information in the template, you can do so by heading back to the ‘Message Templates’ list.

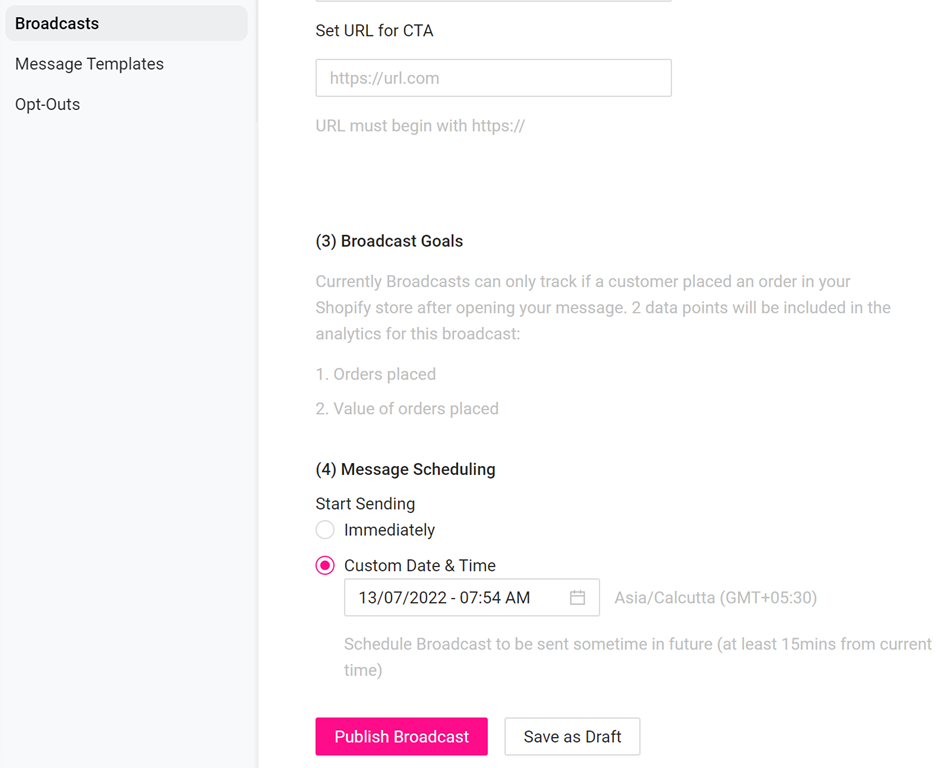
9. Set the URL for your call to action (CTA); this is useful if you want your promotional WhatsApp message to include a link that your customers can click on. If not, just leave it blank.
10. Select the date and time for the scheduled promotional WhatsApp broadcast to be sent out to the customers. Once set, click on ‘Publish Broadcast’.
Automate Cart Recovery, Order Notifications, Broadcast Campaigns using DelightChat
If you want to schedule promotional WhatsApp broadcasts through the WhatsApp API to grow your sales, DelightChat can help.
With DelightChat, you can access several useful WhatsApp Marketing features including -
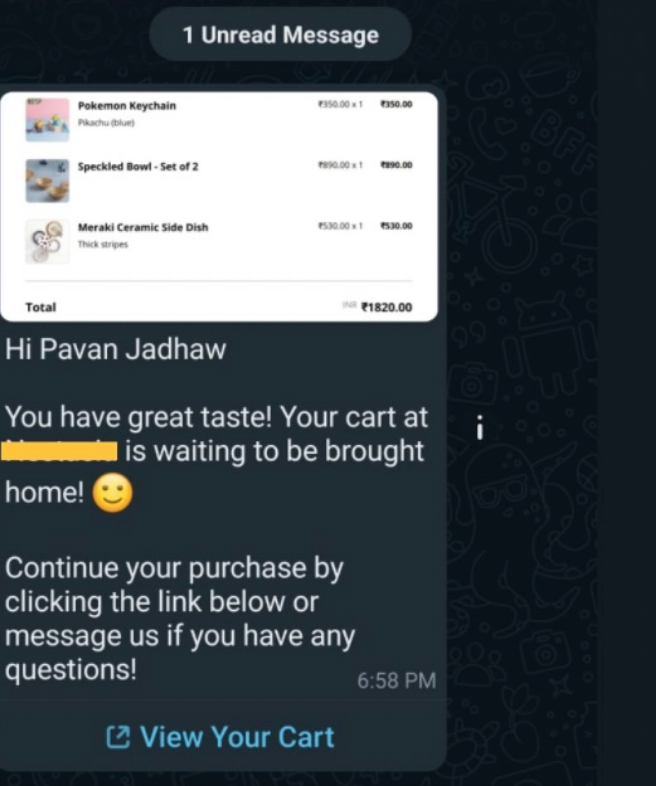
- Abandoned Cart Recovery - minimize lost sales due to abandoned shopping carts on your Shopify store or website with DelightChat’s abandoned cart recovery feature. The final message received by the customer looks like -
- WhatsApp Broadcasts - maximize your holiday season sales by sending promotional WhatsApp broadcast messages to your customers with discounts, coupon codes, and more.
- Order Confirmations - customers like to be informed about the progress of their orders. With DelightChat, you can automate order confirmations via WhatsApp API.
- Order Tracking - DelightChat also enables you to provide real-time order tracking updates to your customers regarding their purchases. This makes the entire process more interactive and engaging for a firm’s customers.

To know more about how DelightChat’s WhatsApp marketing and omnichannel support capabilities can help your business, signup today or schedule a live demo today!

