With more than 1 billion monthly active users, WhatsApp has emerged as the leading platform for brands to connect with their audiences.
Regardless of your nature and field of business, your customers are likely to be on WhatsApp. This is why many businesses are now implementing WhatsApp marketing into their strategies.
While larger enterprises use WhatsApp to communicate with their customers and reinforce the effectiveness of their customer support capabilities, there are some businesses (primarily micro to small-sized enterprises) that completely run their online stores via WhatsApp. Those are known as WhatsApp shops. To benefit sellers, Meta has launched the WhatsApp catalog feature.
In this article, we will explain everything you need to know about the WhatsApp catalog feature, and how you can add your store products to it for a more complete and streamlined customer experience.
What is a WhatsApp Catalog?
Whenever you visit a store or an online website (eCommerce store), you will receive or be given a paper-based or digital document that lists the products the store has for you to buy, which is a product catalog. Without a catalog, you as a customer would not know what all are available for sale.
So, for any seller, having a catalog is a must. Now, since we have moved to digital stores and shops, catalogs too have been made digital. Online sellers that have the funds and requirements to maintain a website or smartphone app do so. Customers can either log in to their website and/or download their app, browse the collections, and make a purchase.
But, Meta understands that there are numerous micro, small, and sometimes, even medium-sized businesses that do not have a platform to sell their products.
Those firms either do not have the scale of business needed to justify building an app or a website, or they do not have the funds to build and maintain those platforms. For cases such as this, Meta has launched the WhatsApp catalog.
The WhatsApp Catalog is a feature that enables WhatsApp Business users to create a catalog or a list of products their store sells. Customers can browse the catalog and select the products and/or services they wish to buy.
They can then forward the shopping cart (the list of products and/or services they have chosen) to the seller via a message. Note that this feature is only available in WhatsApp Business; the non-commercial variant does not have it.
Later on, we will also discuss how you can enable and implement the WhatsApp catalog for WhatsApp Business API or WhatsApp API – Meta’s enterprise variant for companies that need advanced functionality to handle larger businesses.
What does a WhatsApp catalog include?
A WhatsApp catalog includes –
- Products and/or services list – as per Meta, up to 500 entries can be added per WhatsApp Business account
- Business name and description – this information is automatically copied from your WhatsApp Business profile
Each product or service on the list includes a total of five fields that you can fill –
- Image – you can add a picture of the product; a total of 10 photos may be added per product. Photos uploaded are reviewed by Meta to examine whether they meet their terms and conditions.
- Product or service name – here you can list the product name or the service; if it is a product, you can also list the model number if applicable.
- Price – in some countries, WhatsApp allows you to mention the price of the product or service; however, this field is optional, so you can leave it blank in case your offering has variable pricing.
- Country of origin – if your WhatsApp store sells imported goods, you may list the country of origin here. You may leave it blank if it is not applicable to your business, or simply input the country you are based out of, if your products are local.
- Description – here, you can list the benefits of the product or service that your buyers will enjoy from purchasing it.
- Link – in case you have an online website or e-commerce store, you may link the URL of the said product or service here.
- Code – if you have inventory managers and/or have a product or service code, you can specify the same here
What are the Benefits of WhatsApp Catalogs?
As a business owner, you can enjoy several benefits by creating and maintaining WhatsApp catalogs for your WhatsApp store products, such as –
- Free to use – WhatsApp catalog or WhatsApp Business catalog is completely free to create and use indefinitely
- Increased convenience – customers can simply browse your catalog and add their preferred products and/or services to the cart and forward you the list instead of waiting for you to manually send them product pictures
- Time-saving – even if you have an e-commerce store, you can save your customers’ time by including a WhatsApp catalog on your WhatsApp Business profile; this saves them the hassle of navigating to your site to browse and/or purchase.
What are the Disadvantages of WhatsApp Catalogs?
While WhatsApp catalogs are helpful tools to any business owner’s toolkit, they have some disadvantages, such as –
- The WhatsApp catalog can only list a total of 500 products and/or services maximum
- Automatic adding of products and/or services isn’t possible yet; manually adding a huge number of products may take a significant amount of time
How to Create a WhatsApp Catalog?
Whether you are selling only via a WhatsApp store or are just using WhatsApp to supplement your website and/or app, creating a WhatsApp catalog is essential. You can create a WhatsApp catalog as a WhatsApp Business user on three platforms, including Android, iOS, and Web/Desktop clients. This section elaborates the process step-by-step for all three cases.
Creating a WhatsApp Catalog on Android
Follow the steps below to create a WhatsApp catalog for your WhatsApp Business account.
- Navigate to the three dots on WhatsApp Business

- Tap on ‘Business Tools’ and then ‘Catalogue’ or ‘Catalog’
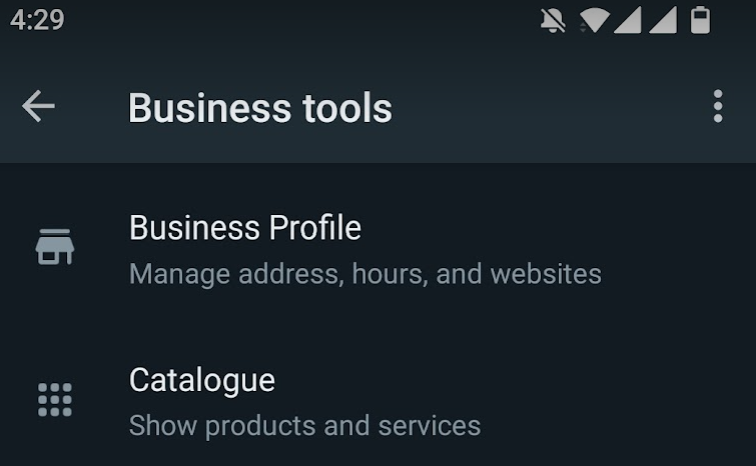
- You will now be directed to the Catalogue Manager where you can see your WhatsApp Business profile picture at the top, followed by a blank list where you can add new items.
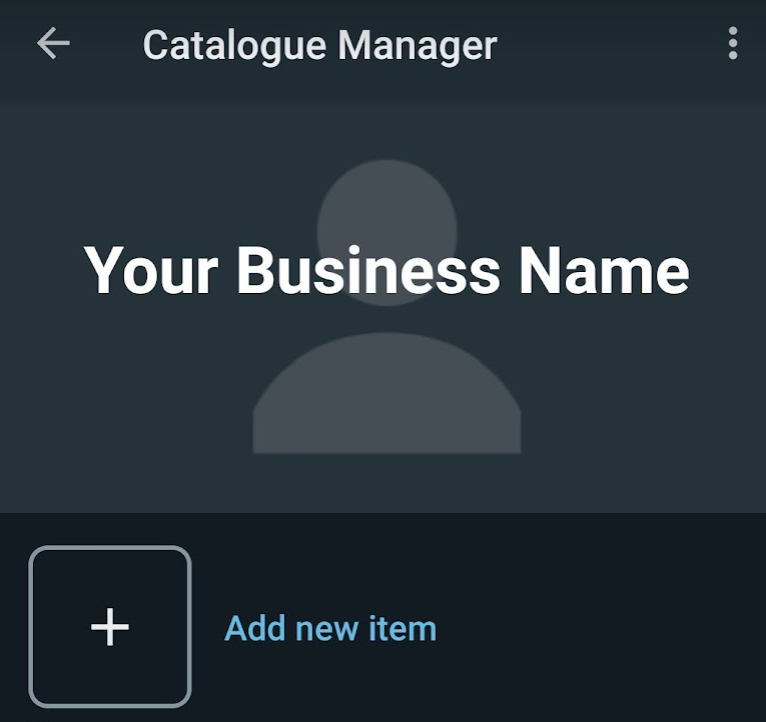
- Tap on ‘Add new item’. If this is the first time you are adding products to your WhatsApp catalog, you may also need to add your business details. The image here is an example and the information shown is only for illustration purposes.

- Fill in the following details:
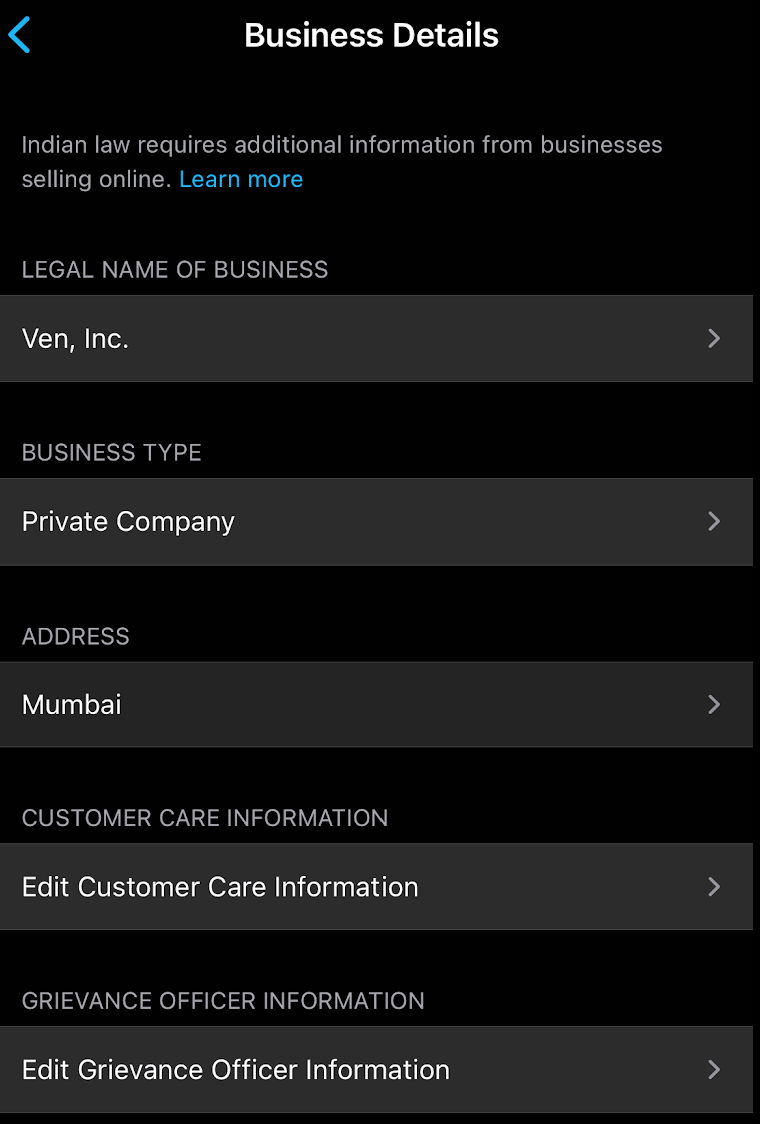
- Legal Name of Business – as per your proof of identity (such as company registration documents)
- Business Type – whether it is a sole proprietorship, a limited liability partnership, or another form of business
- Business Address – the business address must match your registered documents
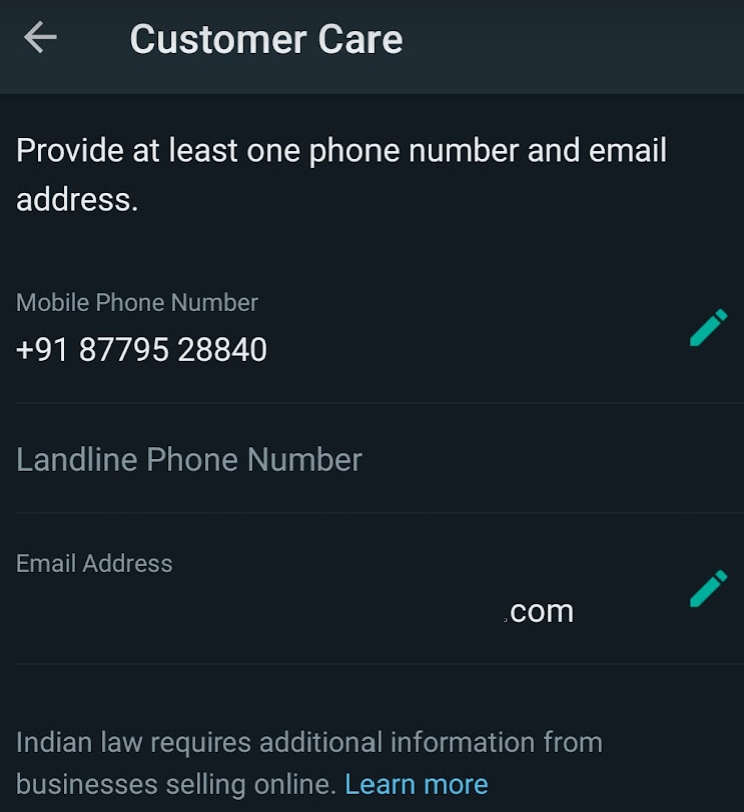
- Customer Care Information – you need to add at least one phone number (either mobile or landline) and an email address. If you do not have a dedicated customer care officer, simply add your own phone number and email address.
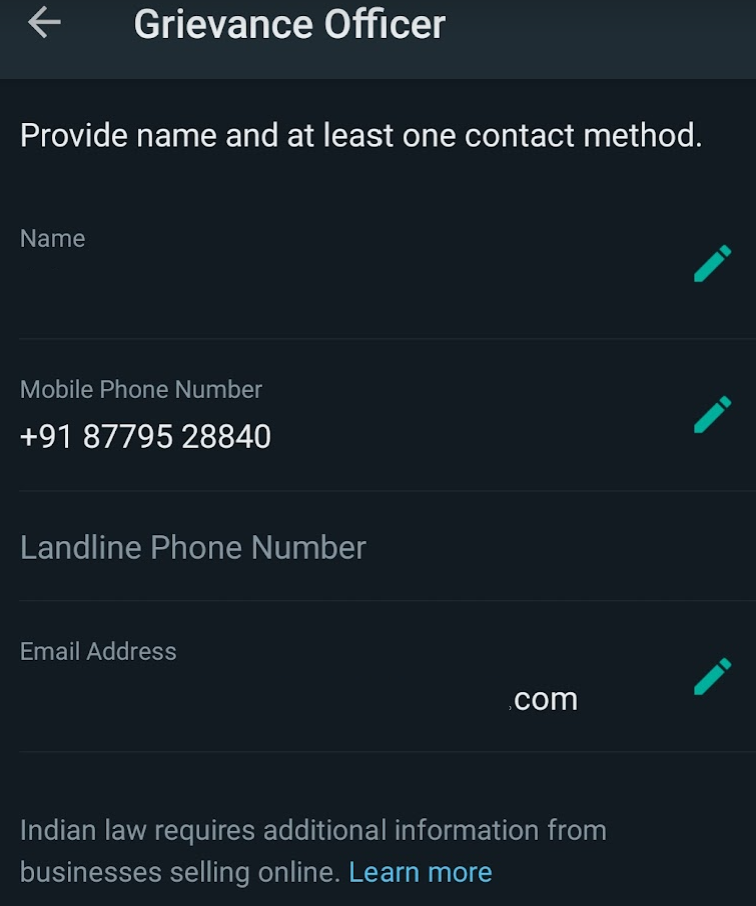
- Grievance Officer Information – similar to the customer care information; however here what you need to do is also add a name for the grievance officer. Just add your own details if you do not have a grievance officer or anyone else who handles customers’ grievances.
- Now, you will be taken to the WhatsApp Catalog Manager again, and tap on ‘Add new item’ once more.
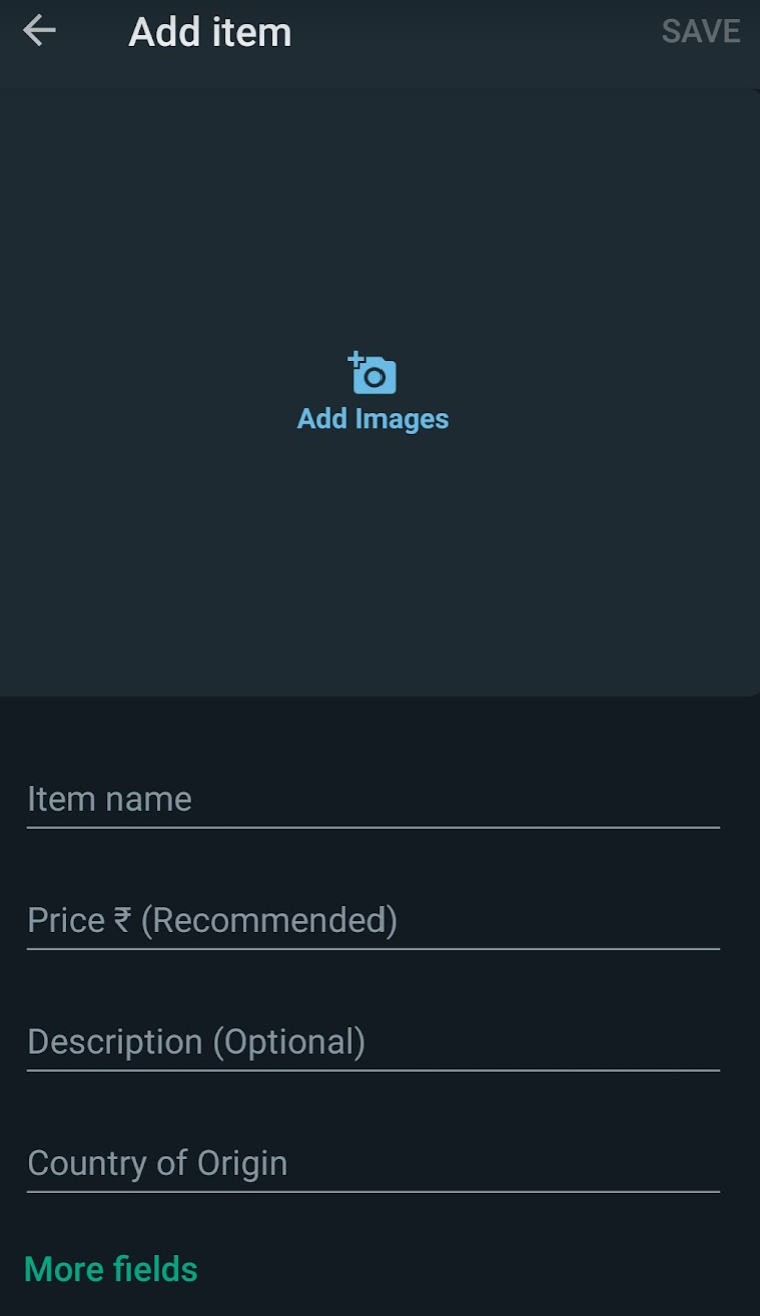
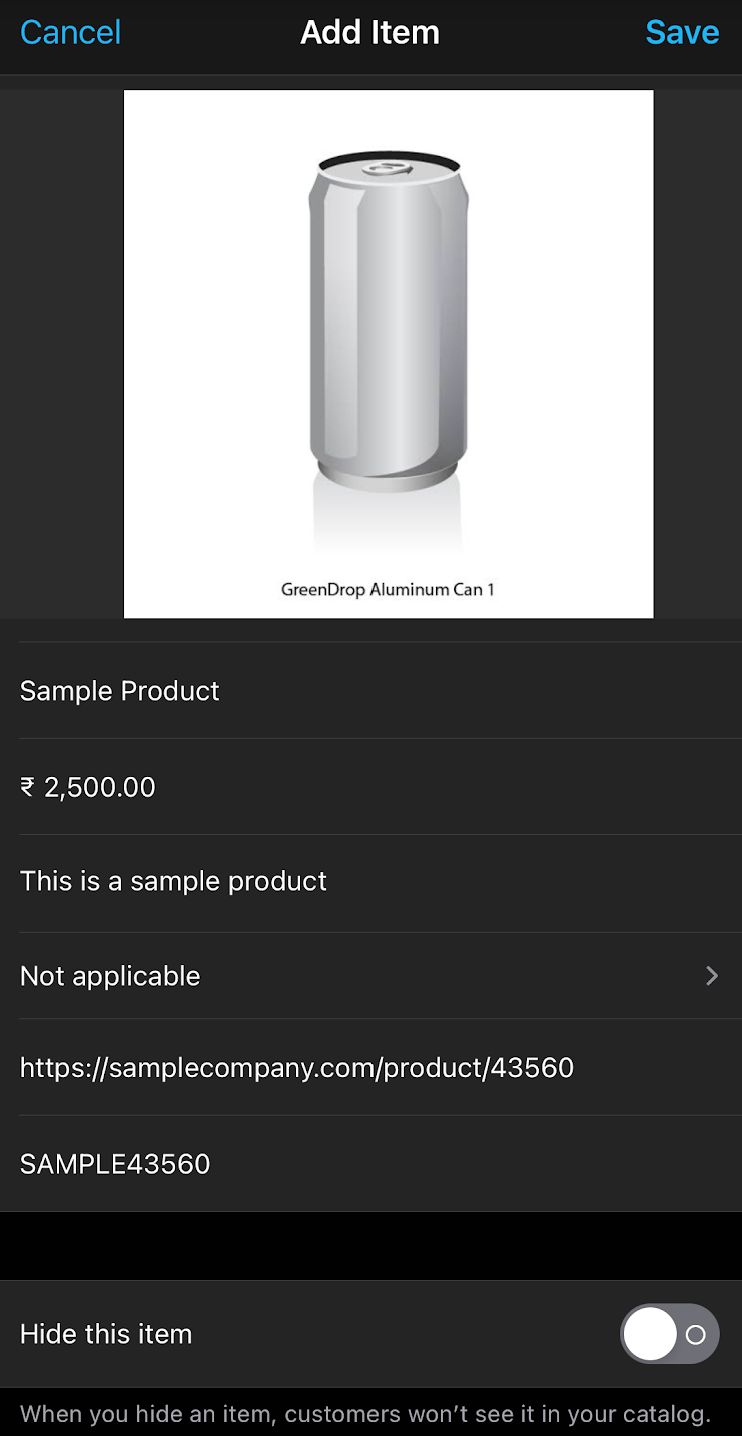
- Fill the item fields as appropriate. As for the ‘Country of Origin’, you can choose ‘Not applicable’ if you are not selling a physical good. However, if you do choose the country of origin, you need to include the importer information.

- Add the importer information to the best of your knowledge as per the available import documents. Note that information in the screenshot above is only for illustration purposes.
- Include the website URL or link for the product if you have an e-commerce store that also includes this product on its catalog. A suggestion here is to write a brief description of your products, and then provide the link to your website where you can present more details.
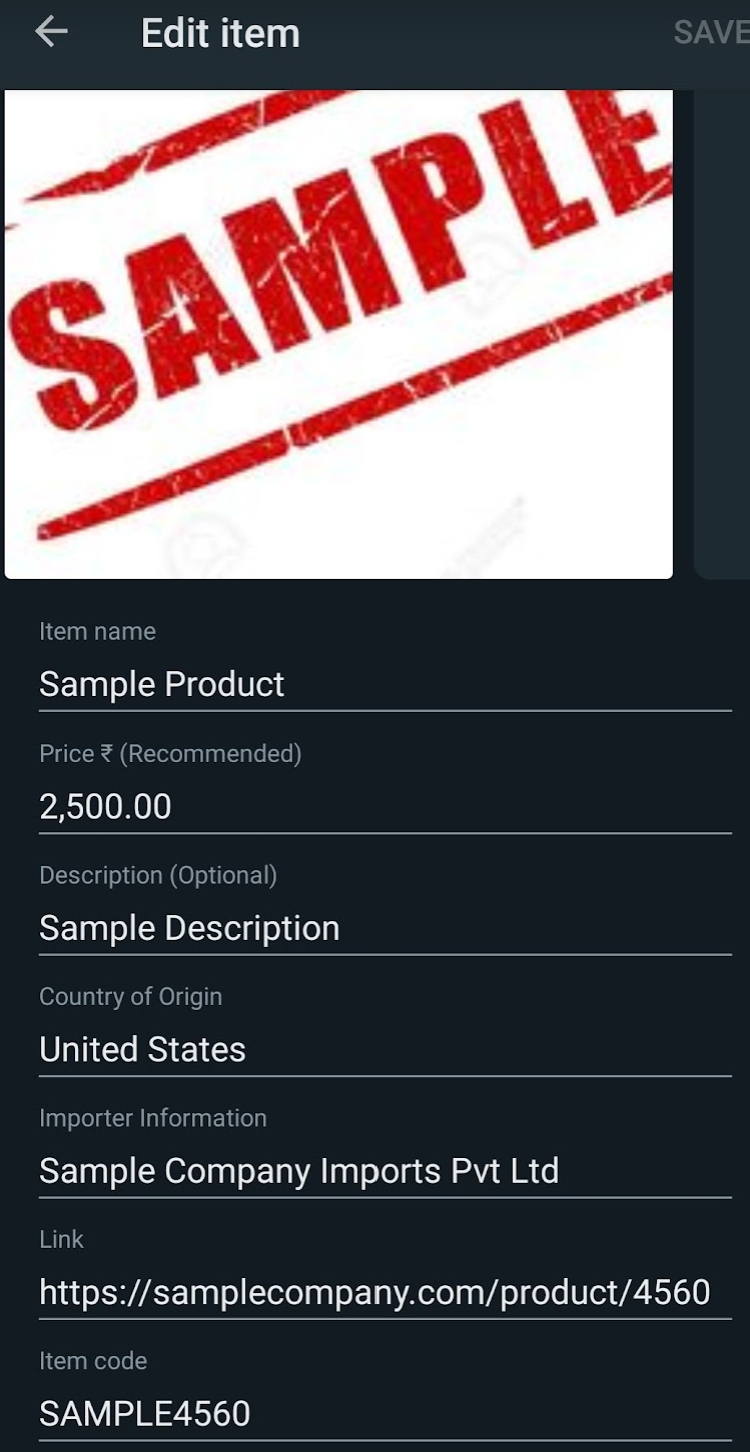
- Add the item code if applicable and tap on ‘Save’ on the top right-hand corner.
- You will be redirected back to the Catalogue Manager, but this time, you will see your newly added product.
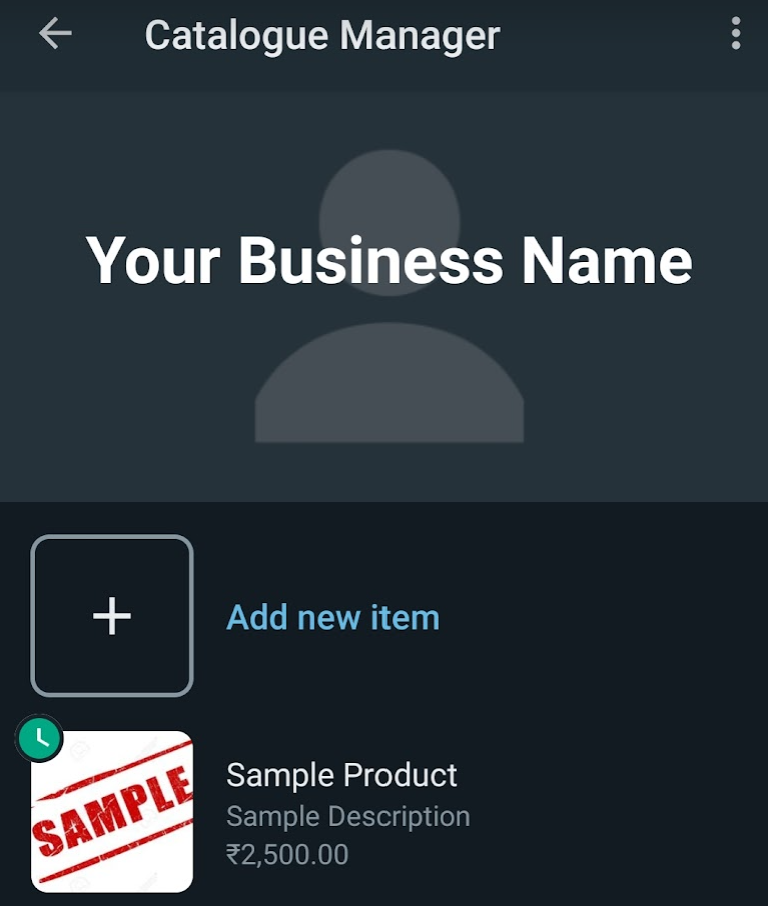
- Notice the clock icon on the top left of the product icon? That shows that Meta is currently evaluating your product listing to make sure that it does not violate their Commerce Policy.
- Your customers will be able to see the product listing once it has been approved by Meta. You can add more products in the same manner, but you still need to wait for Meta to clear them before you can start selling them to your customers via WhatsApp Business.
Creating a WhatsApp Catalog on iOS
The process of creating a WhatsApp catalog on iOS devices is somewhat similar to that of Android devices; follow the steps below if you are using WhatsApp Business on an iOS device.
- Open WhatsApp Business and navigate to ‘Settings’, followed by ‘Business Tools’.
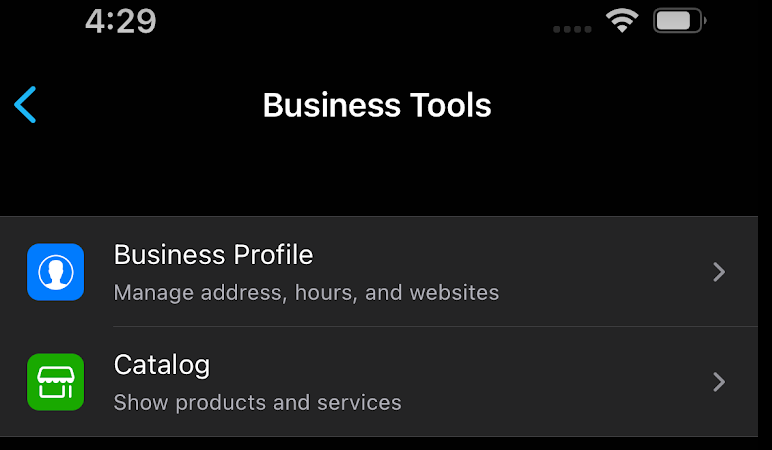
- While the ‘Business Tools’ tab is opened, tap on ‘Catalog’.
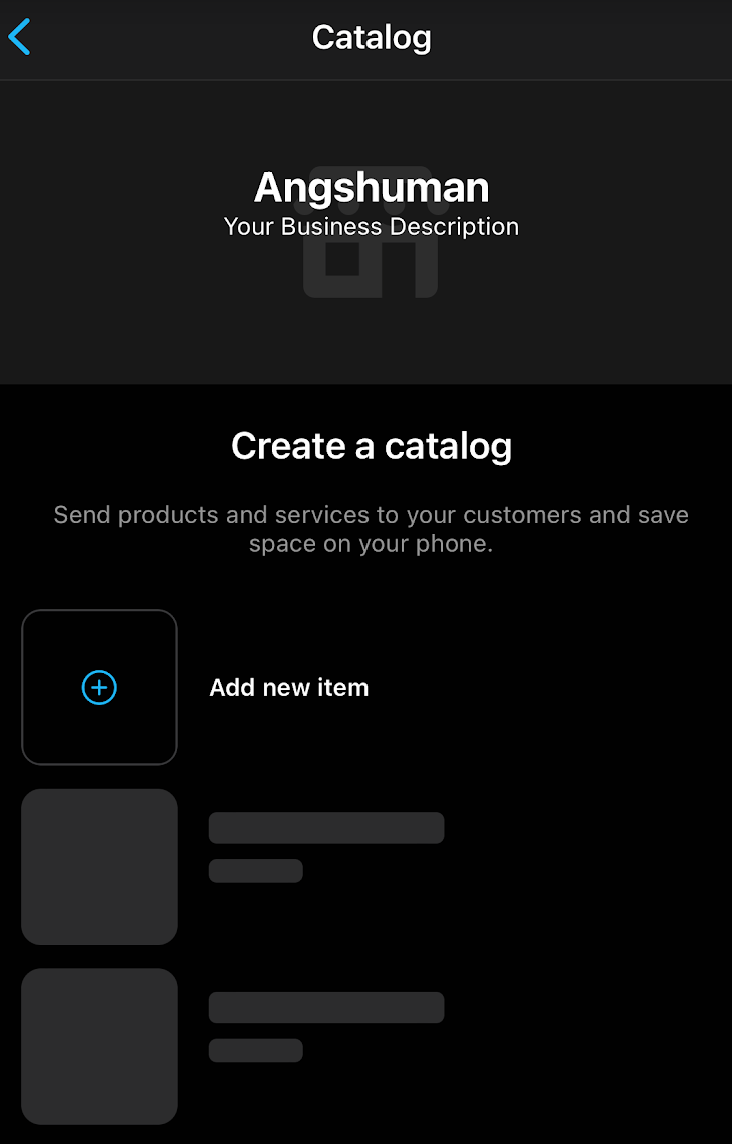
- You will be directed to the WhatsApp Catalog creation screen wherein your current WhatsApp Business profile picture will be used as the background of the screen. For the screenshot below, it shows the current WhatsApp status.
- You may be required to complete filling your WhatsApp Business Details; if prompted, do so. Screenshot below for illustrative purposes only.
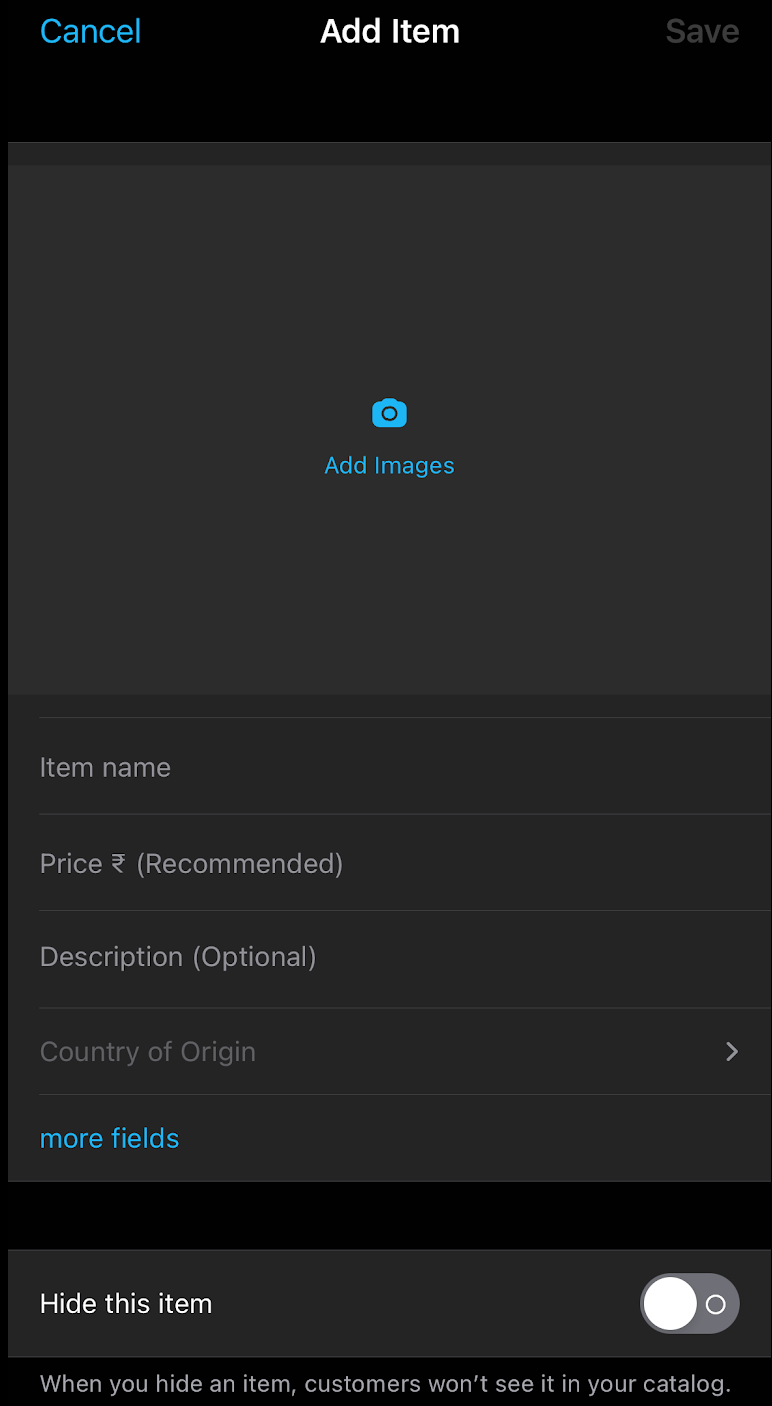
- Go back to your WhatsApp Catalog, and tap on ‘Add Item’; you will then be directed to the ‘Add item’ screen. Fill in the details as appropriate; the iOS version of WhatsApp Business also gives you an option to ‘Hide this item’ which is useful if you have added a new product and cannot or do not want to sell it right away.
- Once added, you can then tap on ‘Save’ to save the product details and forward the listing to Meta for review and approval.
- You will see that your product entry is awaiting approval. You will know when the product has been approved as the clock icon next to the entry will not be present anymore.
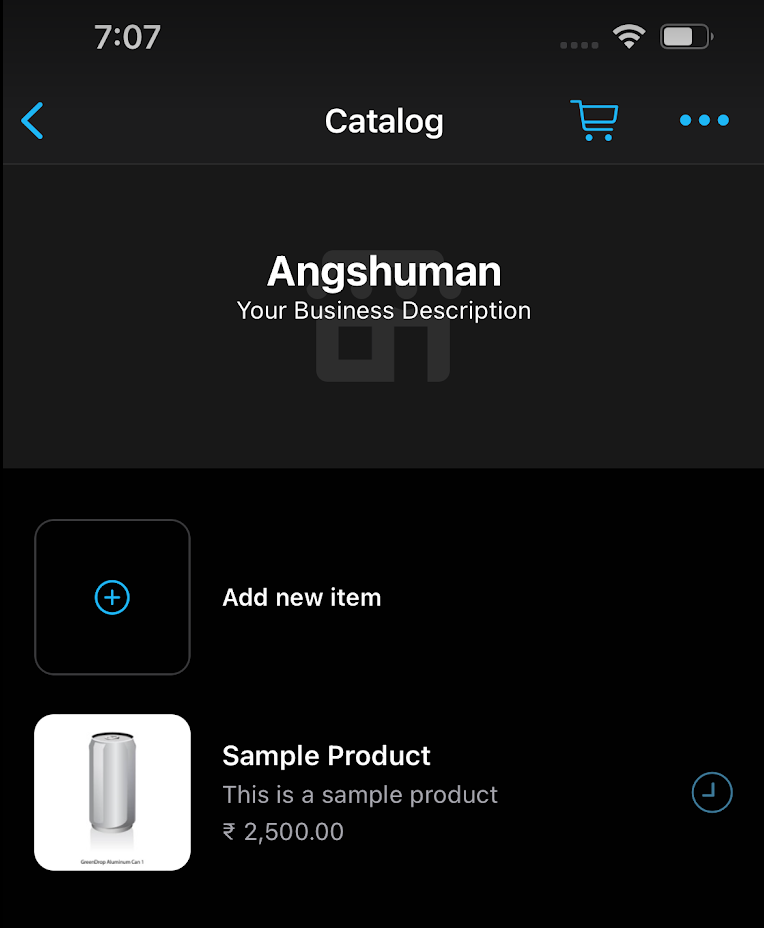
Creating a WhatsApp Catalog on WhatsApp Web/Desktop
Finally, you can also create a WhatsApp catalog using your WhatsApp Web or WhatsApp Desktop client (available for Windows and Mac). The steps are largely the same in both cases; therefore, you can follow them in either or both cases. To create a WhatsApp Catalog, follow the steps below -
- Log in to www.web.whatsapp.com if you are using WhatsApp Web or to your WhatsApp Desktop Client if you are running the downloaded version.
- Click on the three dots (vertical order in case you are using WhatsApp Web, and horizontal order in case you are using WhatsApp Desktop version).


- Click on Catalog, then click on ‘Add New Item’.
- You will be directed to the new item creation screen; it will have the same details as the Android/iOS versions of the app. So, just fill them up and click on ‘Add to Catalog.

- You will receive the confirmation regarding Meta’s review of the added product listing as shown below. Regardless of the outcome, you shall be notified. As you can see, until it is approved, you cannot share the catalog with a customer due to which the Share button is grayed out on the top right-hand corner.
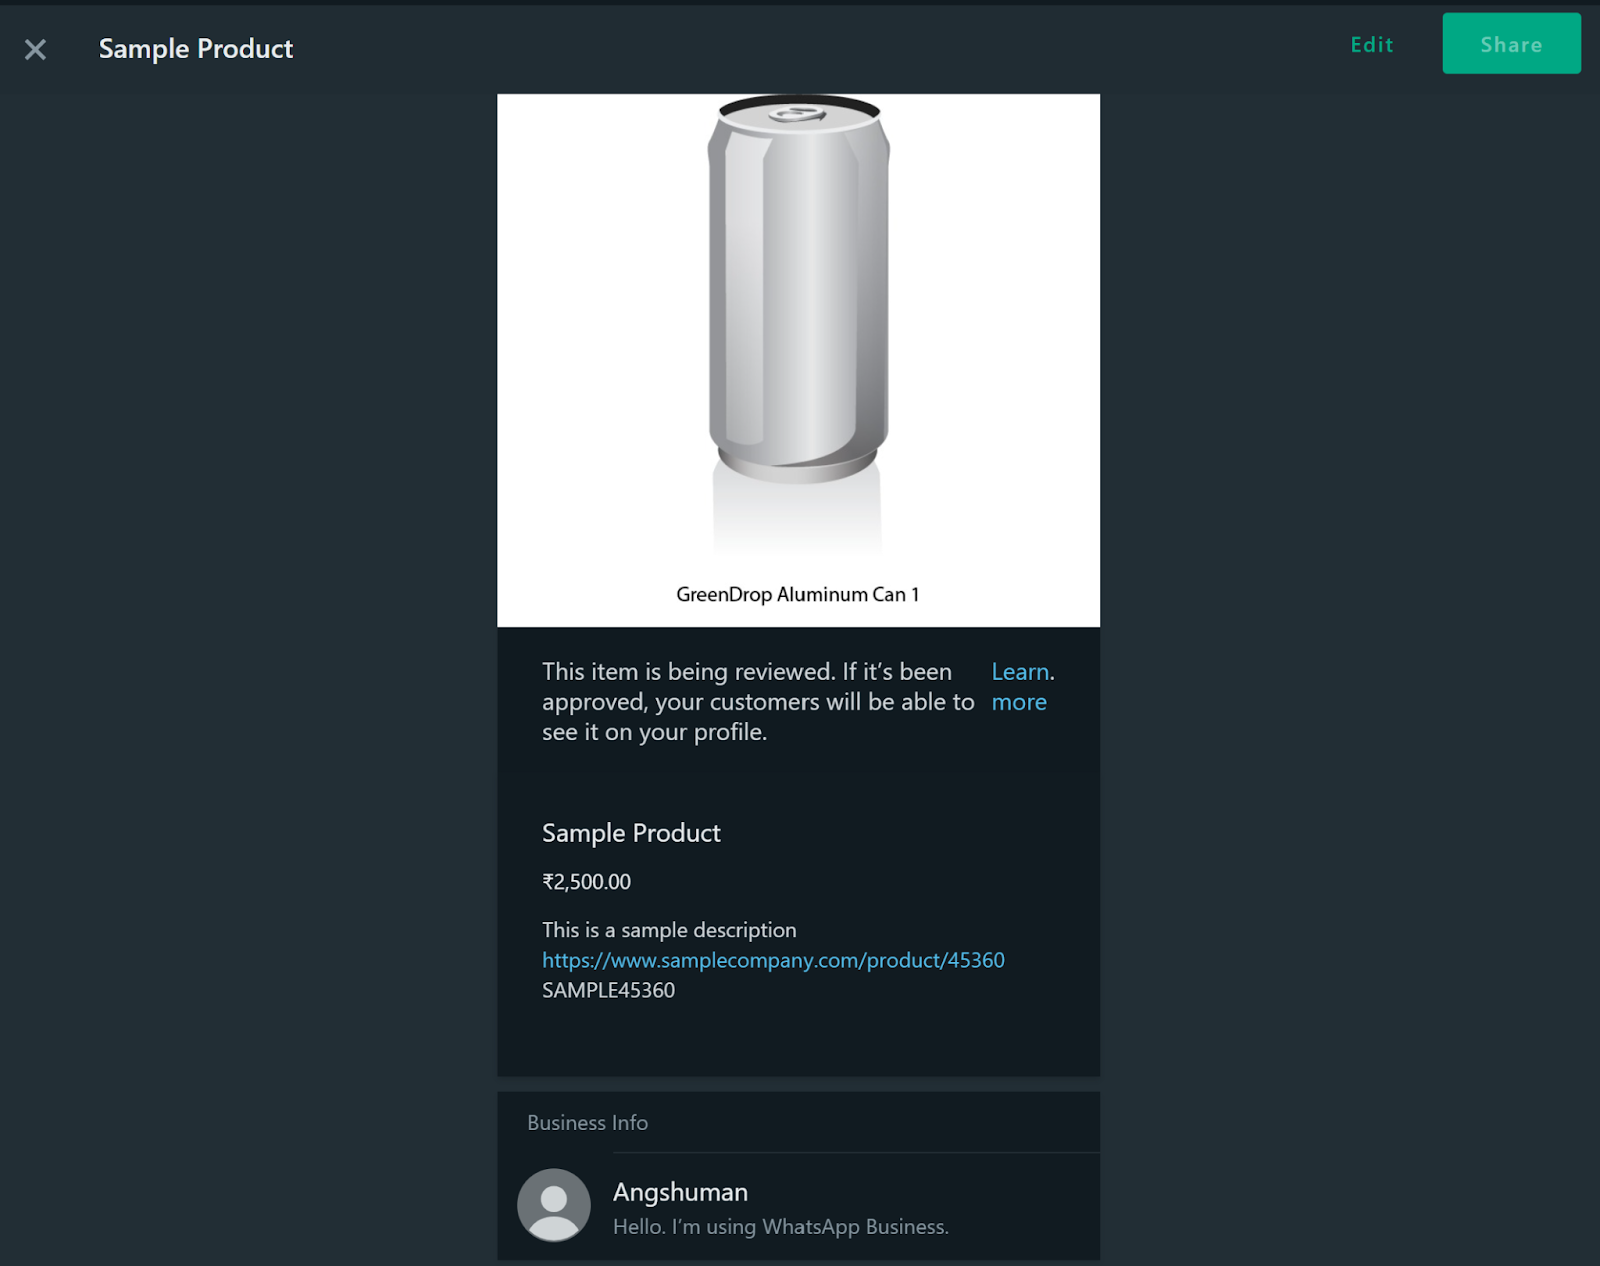
Now that we have created the WhatsApp catalog, the next step is to share it with our customers.
How to Share a WhatsApp Catalog?
Once again, a WhatsApp catalog can be shared via Android, iOS, and the WhatsApp Web/Desktop client. This guide will show you all three ways.
Sharing a WhatsApp Catalog via Android
As a WhatsApp Business user, you can share your store catalog with your customers. Here is how you can do so via an Android device –
- Open the WhatsApp chat with the customer or user you wish to forward the catalog to.

- Tap on the paper clip icon; a menu will open containing multiple options.

- Tap on ‘catalog’ from the menu; you will be taken to your product catalog where you can either forward a specific item (or multiple items) or the entire catalog. Tap on ‘’Send Catalog’.
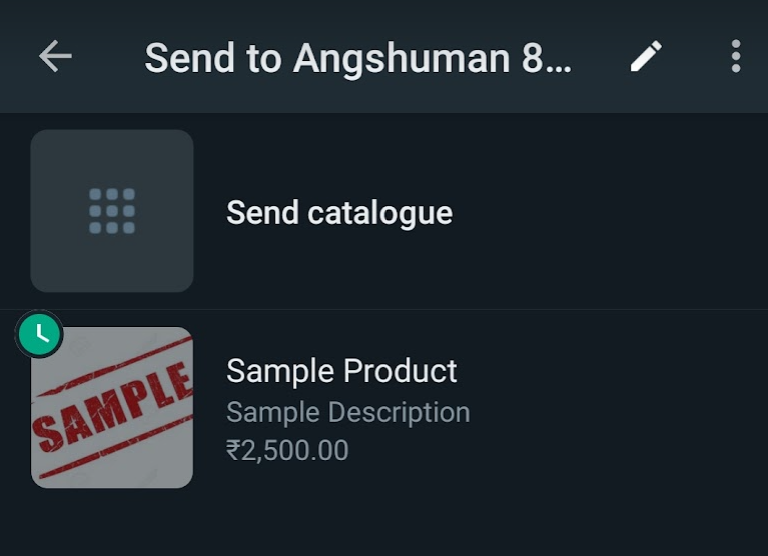
- Send the message containing the link to your product catalog to the user.

Alternatively, you can also share your WhatsApp catalog from your catalog manager directly; to do this on Android, follow the steps below -
- Navigate to your WhatsApp catalog manager, and tap on ‘Share’

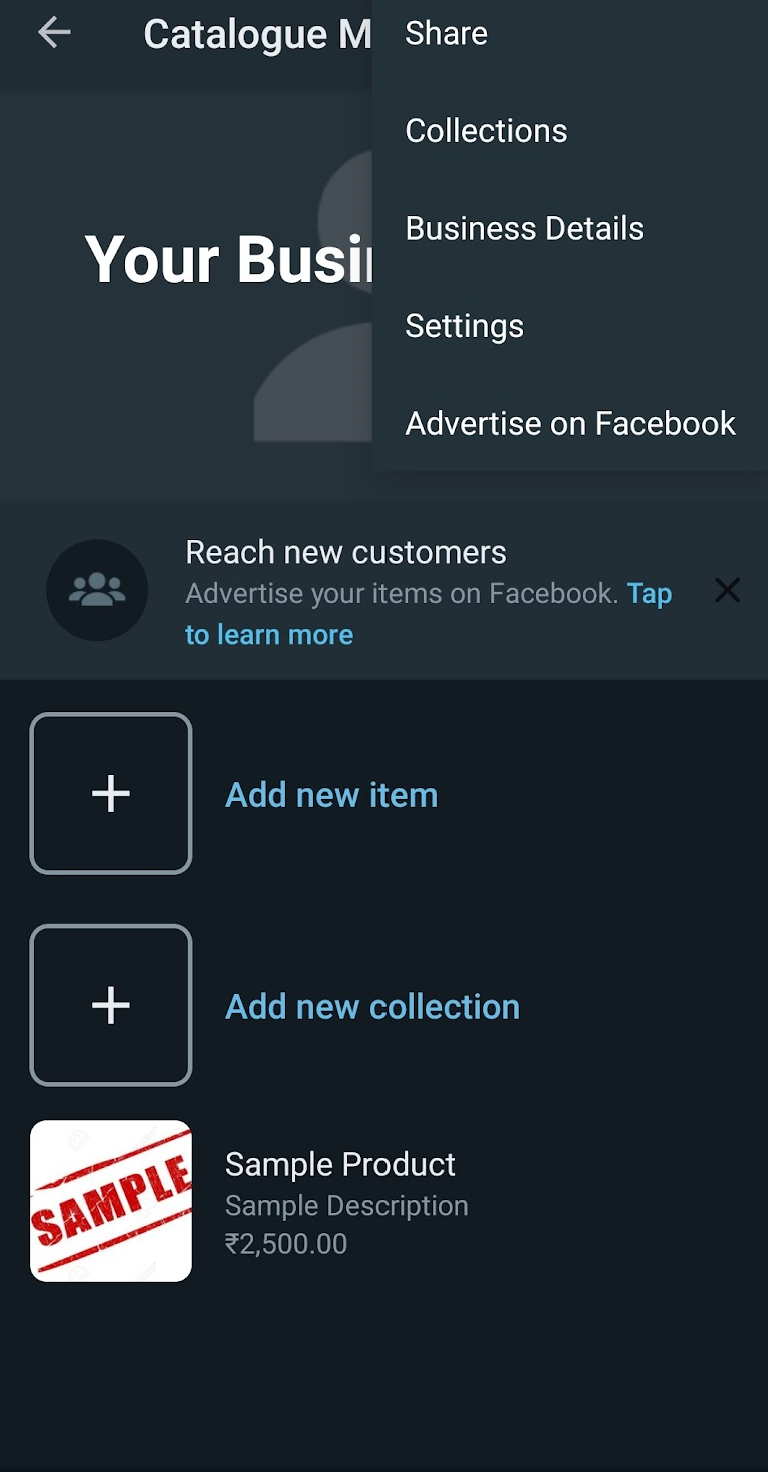

- You will be directed to the Catalogue Link, you can either ‘Copy link’ and paste it in a chat, or ‘Send link via WhatsApp Business’ to any of your contacts/users on the list. In case you want to send it to multiple contacts, you may send it to “My status”, and all users who can see your status will be able to see the catalog link.
- Finally, you may ‘Share link’ if you wish to share it cross-application, like from WhatsApp to another application such as Telegram, Twitter, Slack, etc.
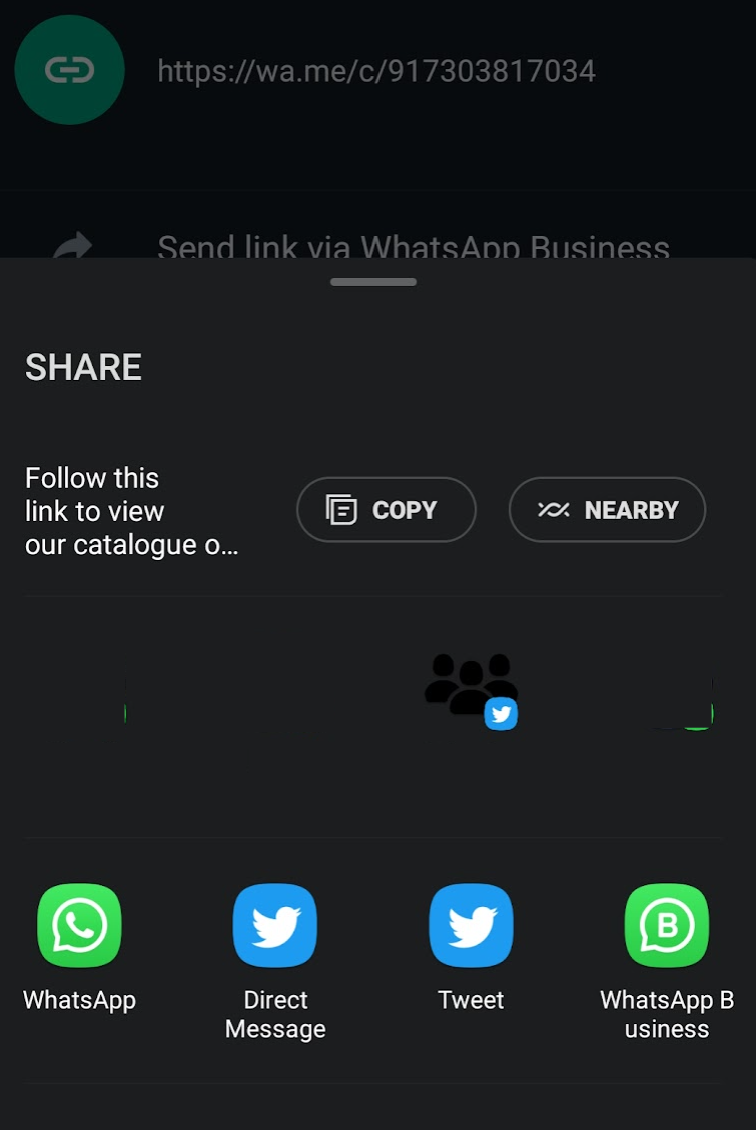
That does it for sharing a WhatsApp catalog via Android; as for iOS sharing, the next subsection covers it.
Sharing a WhatsApp Catalog via iOS
- Open the WhatsApp chat with the customer or user you wish to forward the catalog to, and tap on the + as shown below.
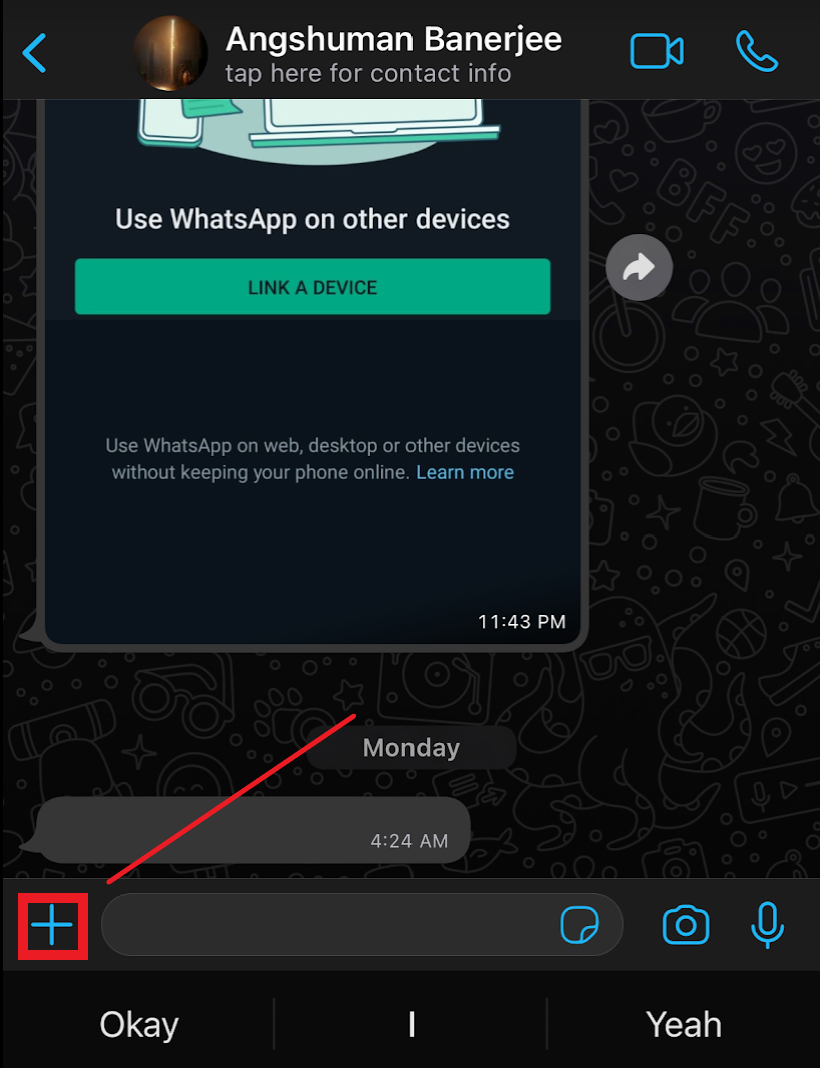
- Tap on ‘Catalog’ from the list that pops up; you will be then taken to the Catalog page where you will be able to view all your product listings.

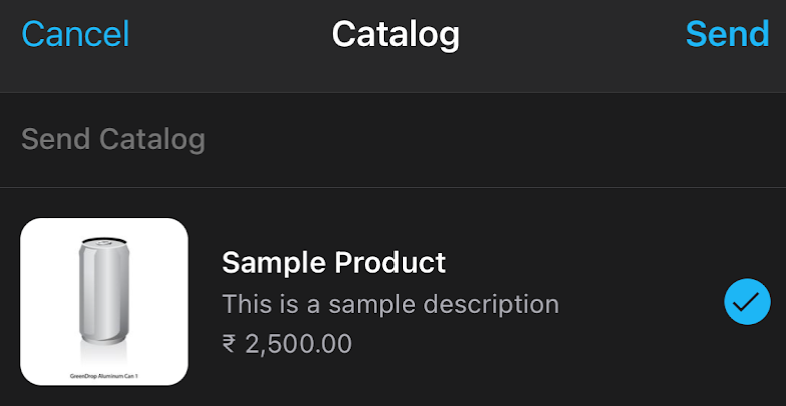
- Since we only have one product listing, that’s all it shows. Now, you have the option to either select send only one (or few) product listings from the catalog, or you can send the entire catalog at once. For right now, it does not make a difference since we have only one product listing, but it is important to distinguish in case you have multiple products.
- To send only one product, tap and hold it for a second to select it (shown below), then tap on ‘Send’.
- If you want to share the entire catalog, instead of opening the chat with a user in step #1 of this process, proceed to open your Catalog by navigating to Settings → Business Tools → Catalog, then tap the three horizontal dots next to the ‘Catalog’ header and tap on ‘Share’.
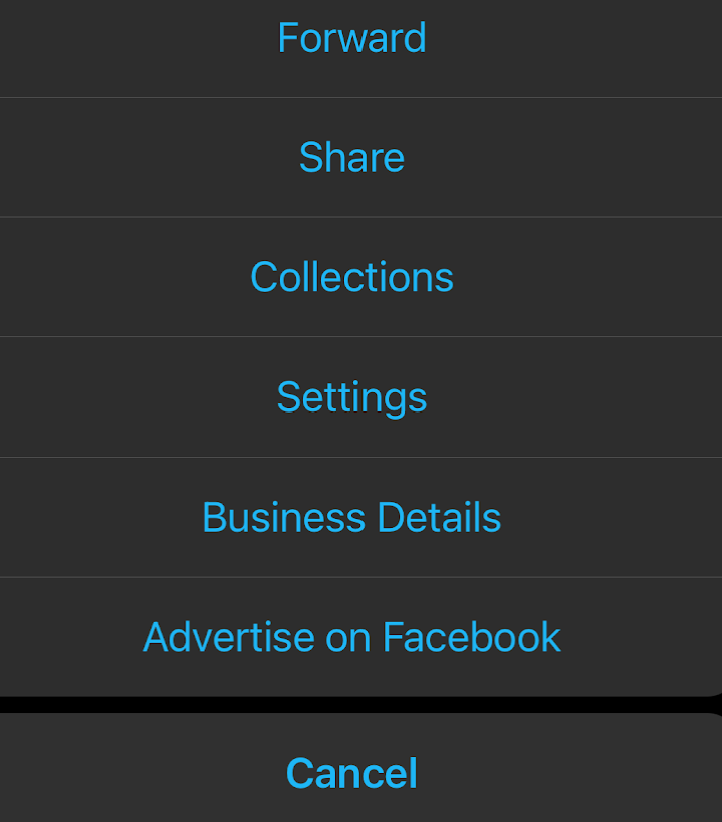
- Select the contact you wish to share it with, or you can select another app if you wish to send the link through a cross-application basis.

Sharing a WhatsApp Catalog via Web/Desktop Client
- Log in to your WhatsApp Business Web account or WhatsApp desktop client.
- Tap on the user or contact you wish to send the catalog to, then tap on the paper clip icon, followed by the catalog icon.
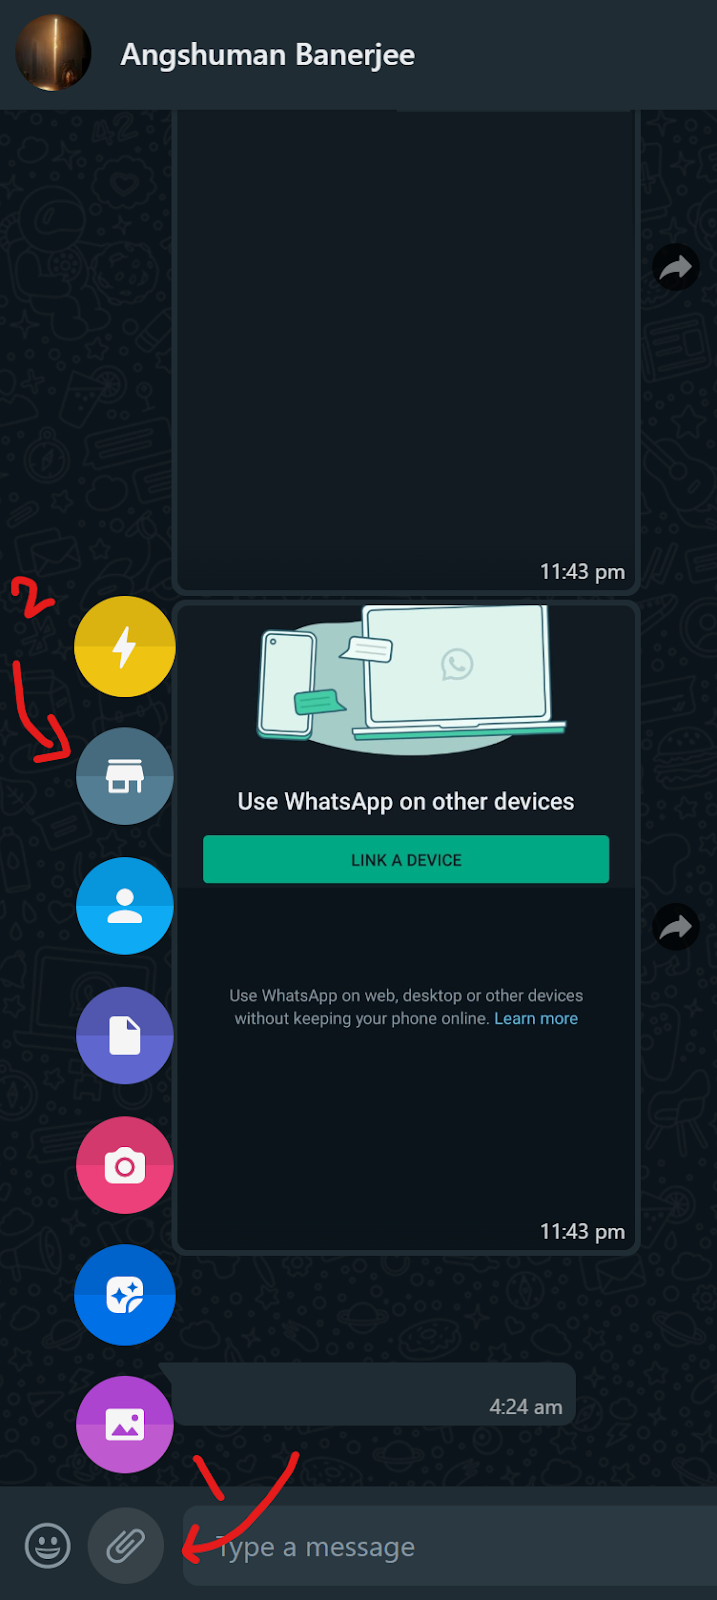
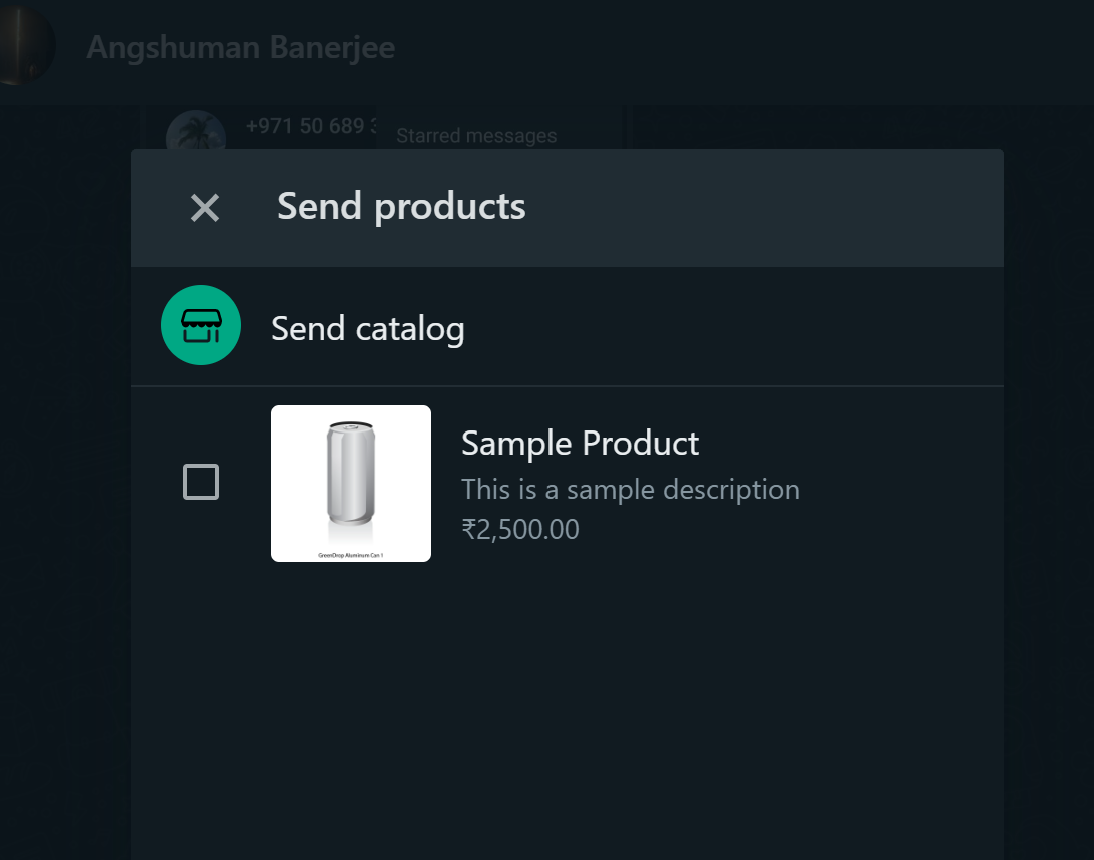
- You will see a prompt open where you can choose to either send a specific product from the catalog or the entire catalog itself. Choose accordingly and share.
How to Modify or Delete a WhatsApp Catalog?
You can modify your WhatsApp catalog by editing or removing entries to the catalog. To do so, simply navigate to your WhatsApp catalog, tap on the product you wish to edit or delete, then tap on the three dots on the top right-hand corner, followed by ‘Delete’ if you wish to remove the entry.
If you are using an iOS device, simply follow the same steps, but after you tap on the three dots, tap on ‘Edit’, then change the product’s information (if applicable) or scroll down and tap on ‘Delete’.
WhatsApp Catalog API
Until this point, we were discussing how business owners who use WhatsApp Business could create WhatsApp catalog and list their products on them. However, larger enterprises are more likely to use WhatsApp Business API or WhatsApp API.
It is Meta’s offering for companies that require advanced features such as integration with CRMs and third-party applications, unlimited messaging capabilities, chatbot and automation support, and more.
Learn more: WhatsApp API vs WhatsApp Business.
If you use WhatsApp API or WhatsApp Business API, you can still create and maintain a WhatsApp catalog for your customers.
The process of creating a WhatsApp catalog via the WhatsApp Business API or WhatsApp API is slightly different from that of WhatsApp Business. So, in this section, we will discuss how you can use WhatsApp Catalog API to create a product catalog for your business.
This option is only available to the WhatsApp API users. We will go through the process step-by-step.
What are the Benefits of WhatsApp Catalog API?
There are several benefits of creating a WhatsApp catalog with WhatsApp API, such as:
- Automatically import your product data (if your inventory exists on other platforms) from other apps such as Shopify or BigCommerce or Meta Pixel if you want to upload your product data from your website.
- Automatic data import via spreadsheets (such as Google Sheets or Microsoft Excel Sheets).
- Several additional fields to provide more information about the products in your store such as Sale Price, Category, Condition, Status, Availability, Brand, etc.
- Benefit from advanced features like QR codes to scan and quickly determine product information instantly.
And more.
What is the Ordering Process for WhatsApp Catalog API?
The ordering process for WhatsApp catalog API is similar to that of WhatsApp catalog for WhatsApp Business accounts -
- Customer initiates a conversation with the business account inquiring about product details and availability OR opens the business account’s profile and browses the catalog.
- In case the customer doesn’t know about the business product catalog, the company account sends them the same, either the entire catalog or a few specific products depending on their inquiry.
- Customer clicks on the product catalog, browses it, and checks for the product details to determine whether it suits their requirements.
- If the catalog’s products fit their needs, they add them to the cart and send it to the seller’s WhatsApp account.
Steps to Create a WhatsApp Catalog for WhatsApp API
There are four steps to create a WhatsApp catalog in WhatsApp API or WhatsApp Business API based systems.
- Create a WhatsApp shopping catalog on Meta Commerce Manager
- Assign the created WhatsApp catalog to the WhatsApp Business account (WhatsApp Business API)
- Write/code the catalog API to enable it to send single or multi product messages to the customers; single-product messages include only a single product from your catalog, while multi-product messages can include up to 30 items from your inventory to be sent to the customer.
- Collect responses from the customers using Webhooks; note that if you are based out of India, you must comply with the Indian e-commerce laws before being authorized to use WhatsApp API.
Let us go through each step one-by-one.
1. Catalog Creation with Commerce Manager
There are two parts to this step; first, create a new catalog with Meta Commerce Manager, and then, add items to it.
- Log in to Meta Commerce Manager
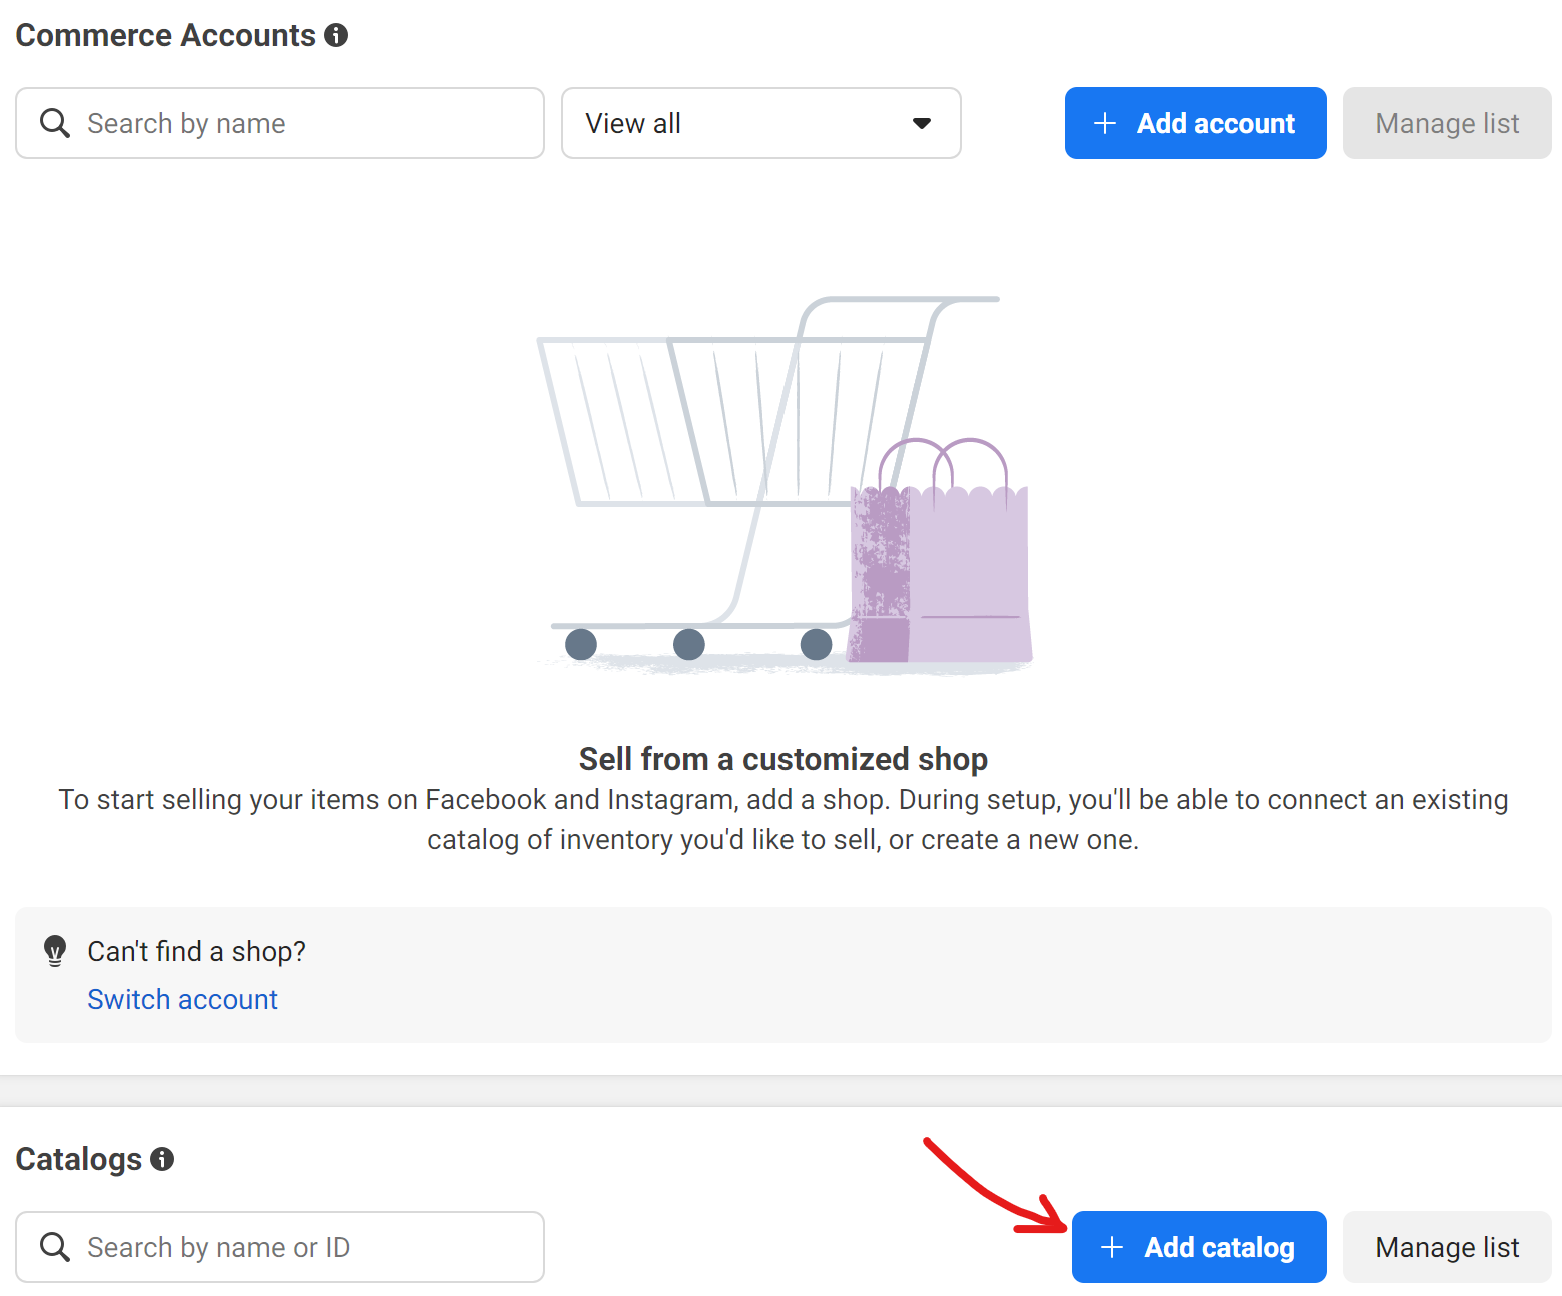
- Click on ‘Add catalog’ since you would not have any catalogs at this point and are creating your first catalog.
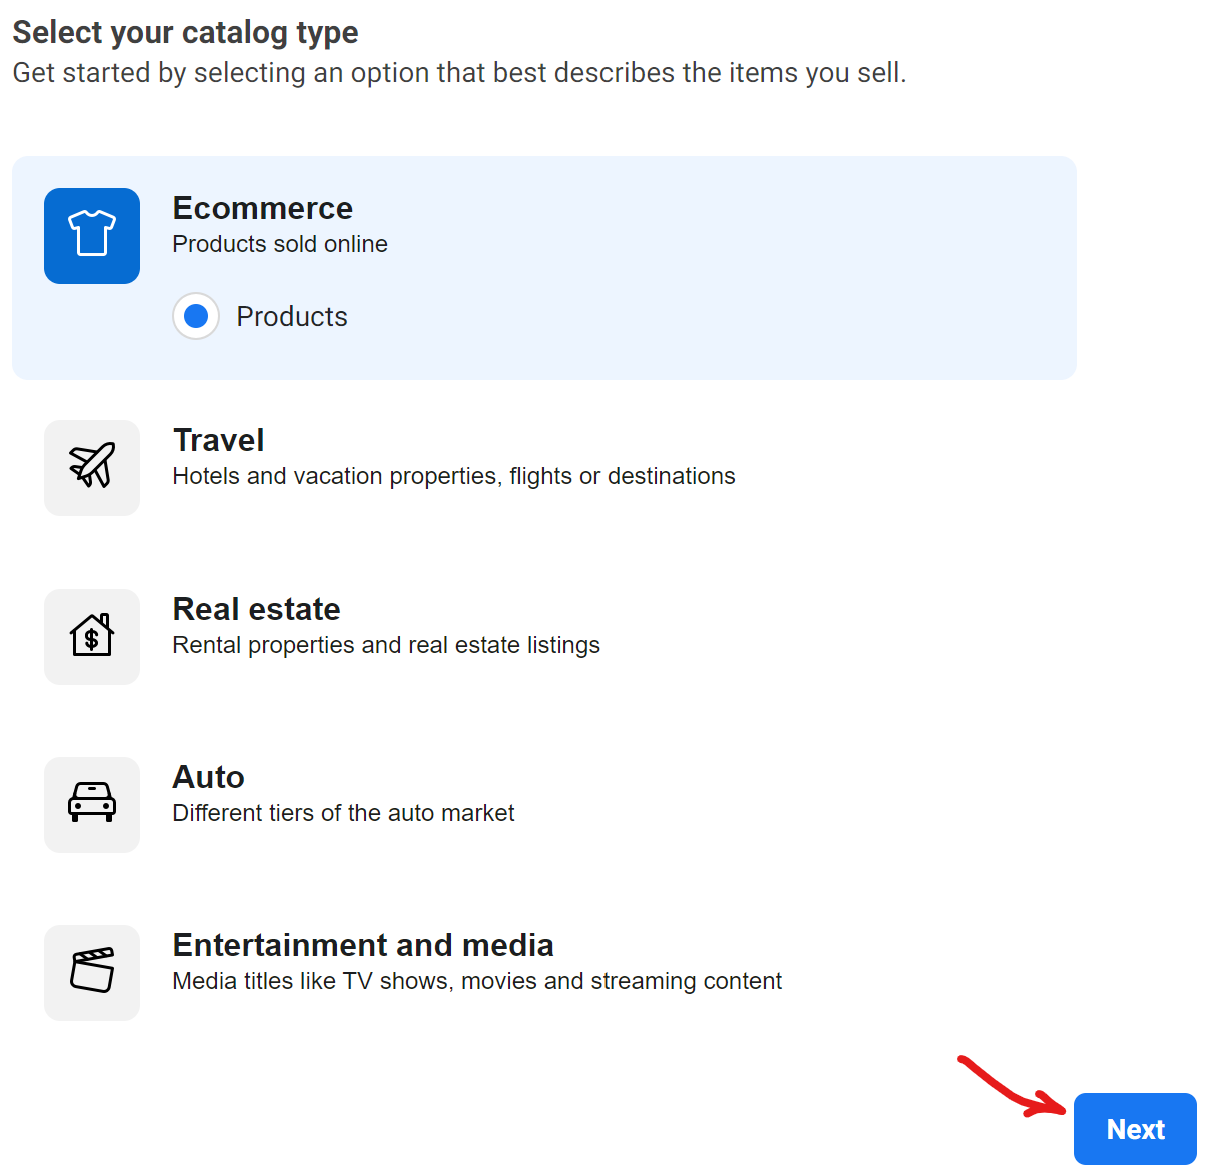
- Select your catalog type; we will choose e-commerce since we are selling products online. Click ‘Next’.
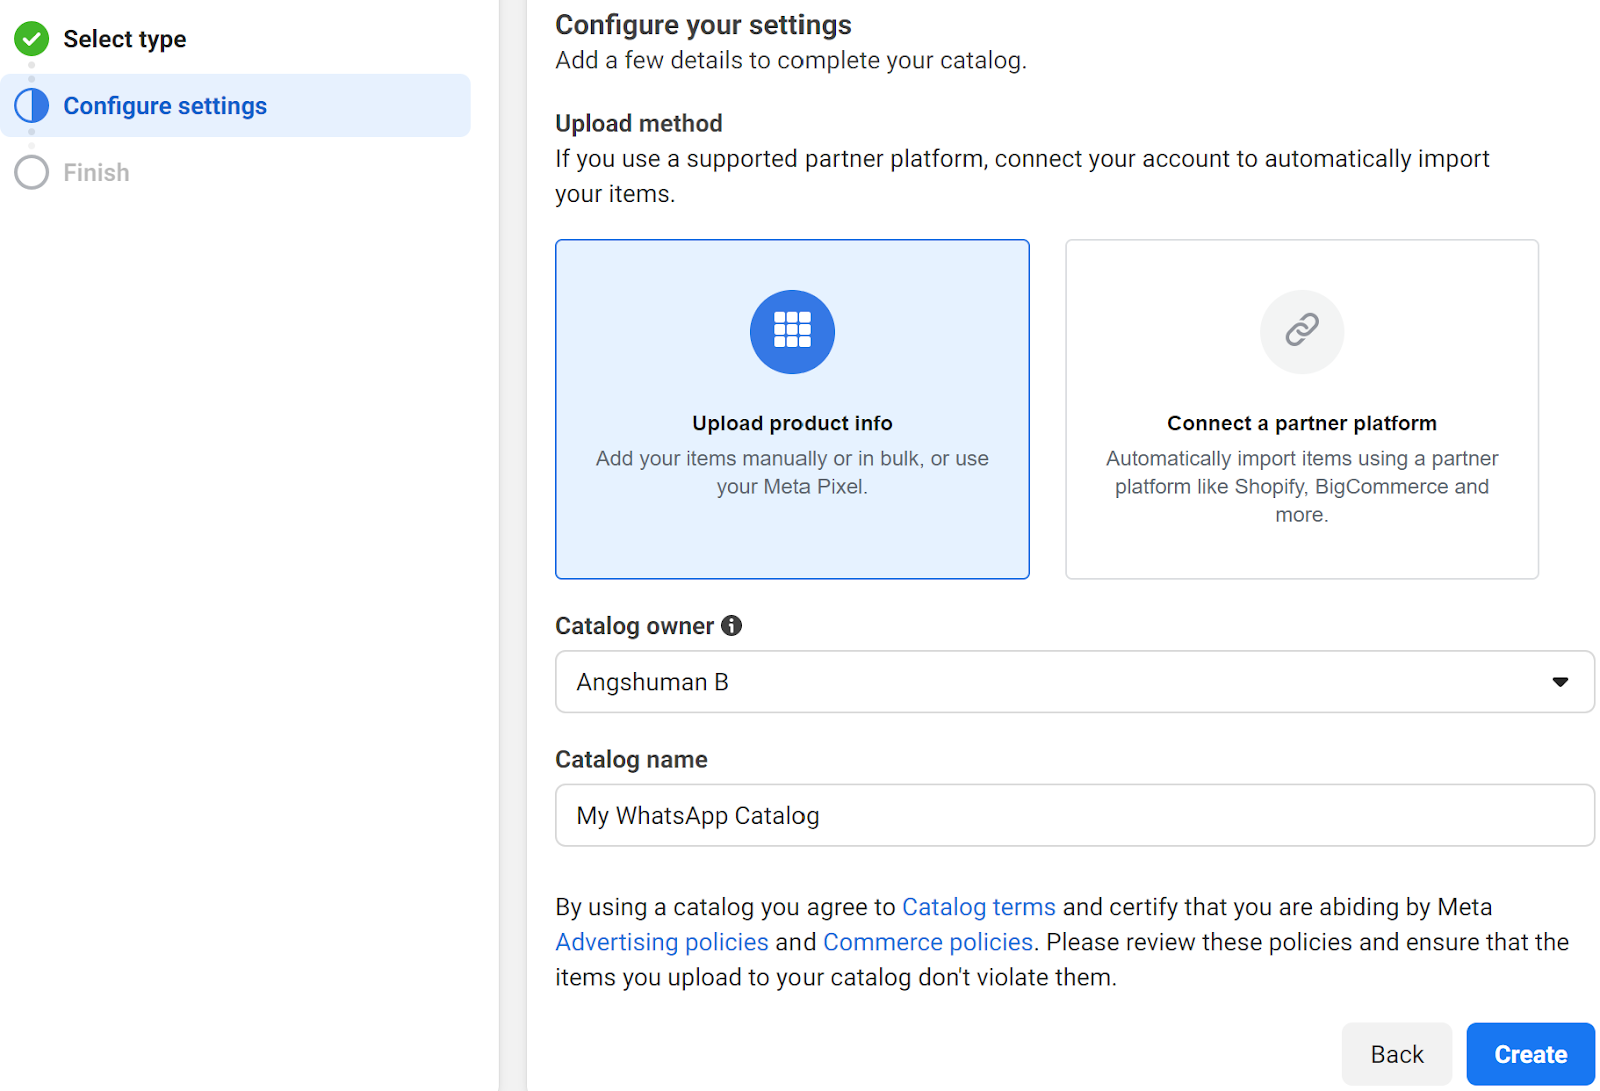
- Now you have to upload your inventory; there are a few ways you can do this. If you have a Shopify store or BigCommerce shop, you can directly import the product inventory from there to the Meta Commerce Manager. Otherwise, choose ‘Upload product info’. Since we do not have a Shopify store at this point, we have chosen ‘Upload product info’. Also, enter your catalog name as you see fit. Click ‘Create’.
- Click ‘View catalog’
- You will see a catalog with no information; we will begin adding the information of the products to our catalog now. Click on ‘Add items’ to do this.

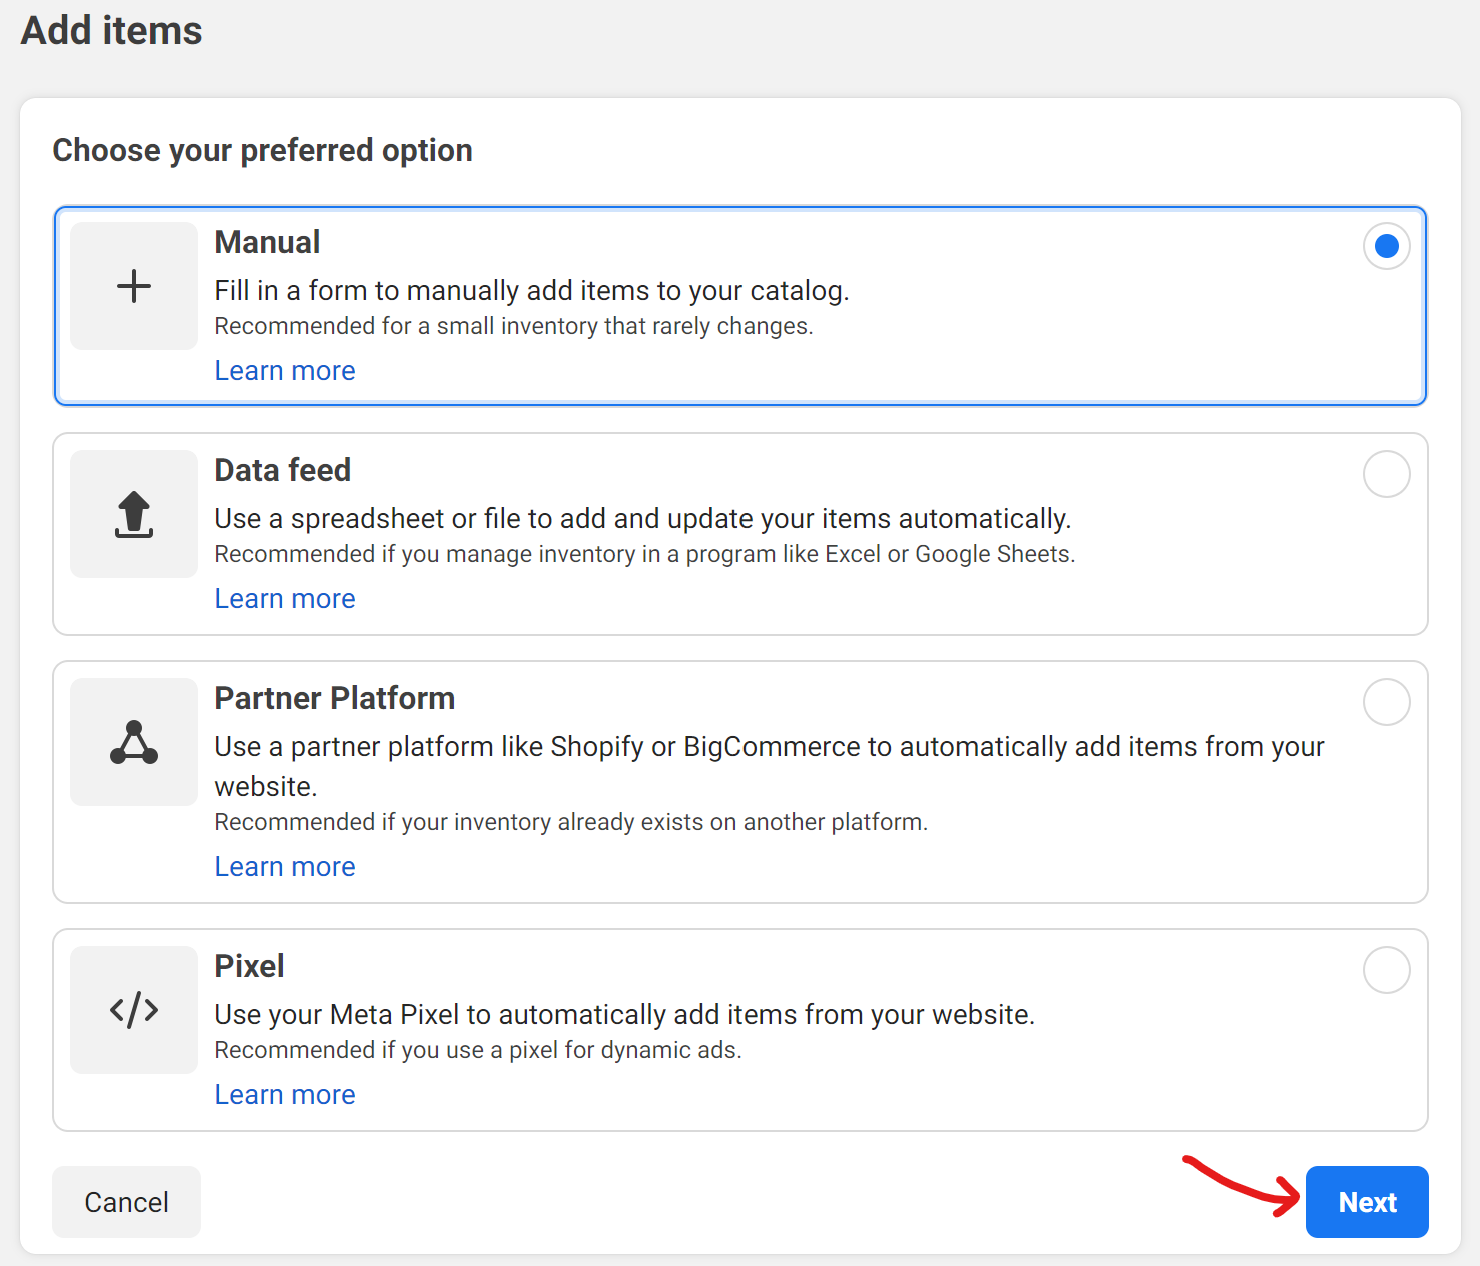
- At this point, you can choose between four options to upload the inventory data (since we did not automatically import data from Shopify or BigCommerce). We will choose ‘Manual’ as we do not have an Excel sheet or Google Sheet or website or partner platform account to import the data from. Click ‘Next’.
- Now, we are at the item creation/addition screen. The following fields are mandatory and must be filled when adding a new item to the Commerce Manager.
- Image
- Title
- Description
- Website Link
- Price
- Condition
- Status
- Availability
9. Click on ‘New item' if you want to add more items; click on the dropdown arrow and choose from 1 item, 5 items, and 10 items. Click on ‘Upload items’ once your list is ready. You will receive a confirmation of the same. Click ‘Done’. If any pop-ups come, click on ‘Show Later’.


2. Assign Catalog to WhatsApp Account
Now that you have created your WhatsApp catalog, the next step is to connect it with your WhatsApp account, so that you can send it to your customers. To do so, follow the steps below.
- Click on ‘All tools’ from the menu on the left-hand sidebar, and click on ‘WhatsApp Manager’.

- On the ‘WhatsApp Manager’ page, select the ‘Catalog’ option from the left-hand sidebar. It may be disabled here, but if you have WhatsApp API access you will see your connected WhatsApp number here.
Contact us if you need WhatsApp API access.

- Select ‘WhatsApp Manager’ from the Catalog page, and click on ‘Choose Catalog’.
- Click on ‘Connect Catalog’ after selecting the WhatsApp catalog we created previously. If you have multiple catalogs, select the correct one and click on ‘Connect Catalog’.
- It’s done. Your WhatsApp catalog is now connected to your WhatsApp Business API phone number. You should see a ‘Connected catalog’ confirmation once the process is done.
Now, the last part is to send the messages; as previously mentioned, we can send single-product and multi-product messages via API from our WhatsApp catalog.
#3 Message Sending via API
Now, the final part is to obtain the API references from Postman, and then edit their variables to match your Meta Commerce Manager’s catalog details.
Head to this link to obtain the WhatsApp API references.
You need to code an interactive object of type product with three components, including body, footer, and action.
`"interactive": {
"type": "product",
"body": {
"text": "text-body-content"
},
"footer": {
"text": "text-footer-content"
},
"action": {
"catalog_id": "catalog-id",
"product_retailer_id": "product-SKU-in-catalog"
}
}`
We will be editing three parts of the code above to meet our needs -
"Text": "text-body-content"
"text": "text-footer-content"
"catalog_id": "catalog-id",
"product_retailer_id": "product-SKU-in-catalog"
A slightly longer message interactive would be the multi-product message:
"interactive": { "type": "product_list", "header":{ "type": "text", "text": "text-header-content" }, "body":{ "text": "text-body-content" }, "footer":{ "text":"text-footer-content" }, "action":{ "catalog_id":"catalog-id", "sections": [ { "title": "the-section-title", "product_items": [ { "product_retailer_id": "product-SKU-in-catalog" }, { "product_retailer_id": "product-SKU-in-catalog" }, ... ]}, { "title": "the-section-title", "product_items": [ { "product_retailer_id": "product-SKU-in-catalog" } ... ]}, ... ] }, }
Just change the product-SKU-in-catalog, the catalog-ID, and the text header and footer, and you are all set!
You can send an API request using the customized interactive code once ready and test it in Postman before you run it to send the messages to your customers.
Upgrade Your WhatsApp Messaging with WhatsApp API!
Sending WhatsApp catalogs becomes much easier with WhatsApp API; you don’t have a limit on the number of customers you can message, you can automate API requests, and more. However, you need to get verified by Meta to receive API access. DelightChat is a certified WhatsApp Business Partner, and we have helped several businesses like yours receive access to the WhatsApp API.
To know more about how our WhatsApp marketing suite as well as how WhatsApp API access can help grow your business, schedule a demo today!

