WhatsApp is transforming business-customer communication with their high open and response rates. While DelightChat provides pre-built integrations for various ecommerce platforms, you may have unique use cases that require a custom integration.
DelightChat's API enables you to leverage the power of WhatsApp messaging for such custom scenarios. You can send automated notifications, alerts, promotions, personalized content and more based on triggers from your website, app, CRM, helpdesk and other systems.
This guide will explain how to:
- Create a custom WhatsApp automation in DelightChat
- Set up triggers in Shopify, Zapier and Integromat to invoke the API
- Format the API request and handle responses
- Test, troubleshoot and analyze message delivery
- Optimize and enhance the automation over time
By the end, you will have the information you need to build automated two-way conversations on WhatsApp for engaging your users and customers.
Quick note on Rate Limit
The rate limit for DelightChat's marketing API is 1 request per second (1 rps).
Overview of Key Concepts
Before we jump into the steps, let's briefly understand some key concepts:
- DelightChat's WhatsApp API: DelightChat provides a REST API that allows sending WhatsApp messages programmatically. You can call this API when certain events occur in your systems.
- Custom API Automation: This is the automation you create in DelightChat which defines the message template for the API call.
- Trigger: The event in your website, app etc. which invokes the API call to send the message.
- Shopify, Zapier, Integromat: Platforms that provide ways to set up triggers and connect to the DelightChat API.
- Request URL, Headers, Body: Components of the API request that contains authentication, payload data etc.
- Response Codes: HTTP response codes indicating the status of the API call.
How to create a custom WhatsApp Automation using DelightChat Marketing API
Now let's dive into the steps to build your custom API automation!
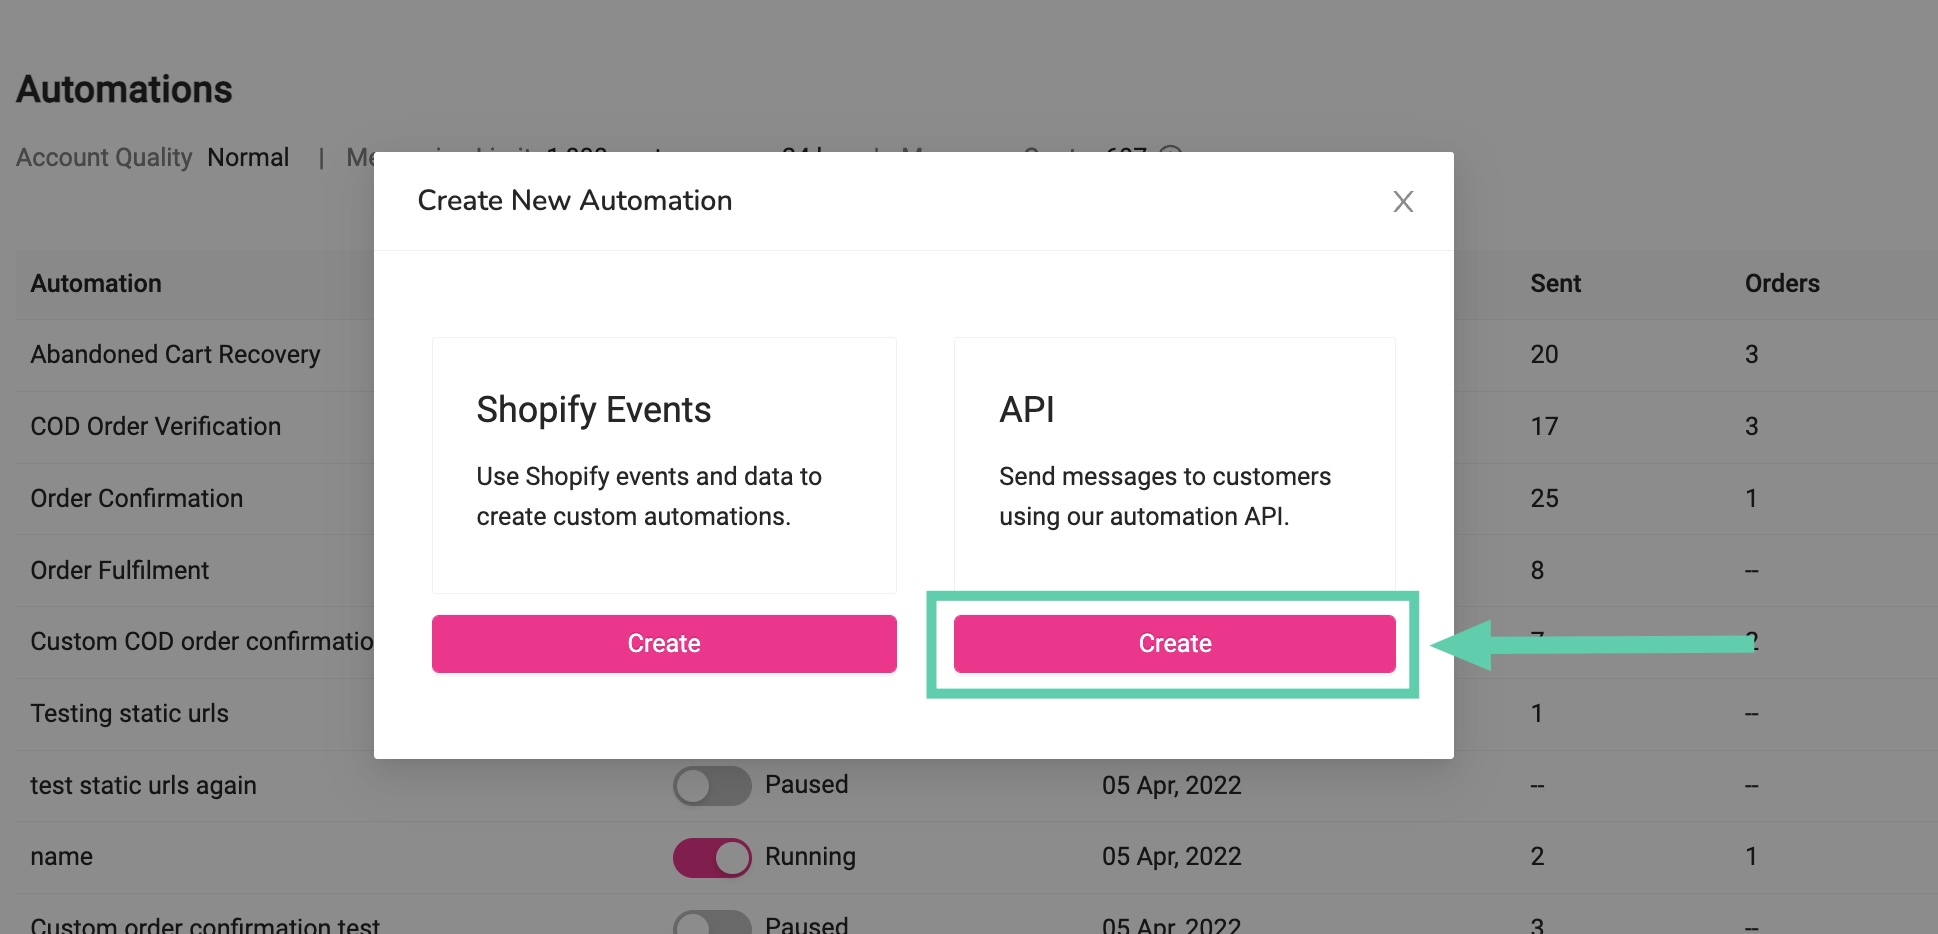
Step 1 - Creating a Custom API Automation in DelightChat
Log in to your DelightChat dashboard and follow these steps:
- Go to the WhatsApp Marketing > Automations section.
- Click on [Create New Automation]

- Give your automation a name like "Order Confirmation" or "Course Enrollment".
- Under Configure Message, choose an existing message template or create a new one from the "Message Templates" section on the left

- The template can have variables like order IDs, customer names etc. which you'll define during the API call.
- Click [Save] at the bottom.
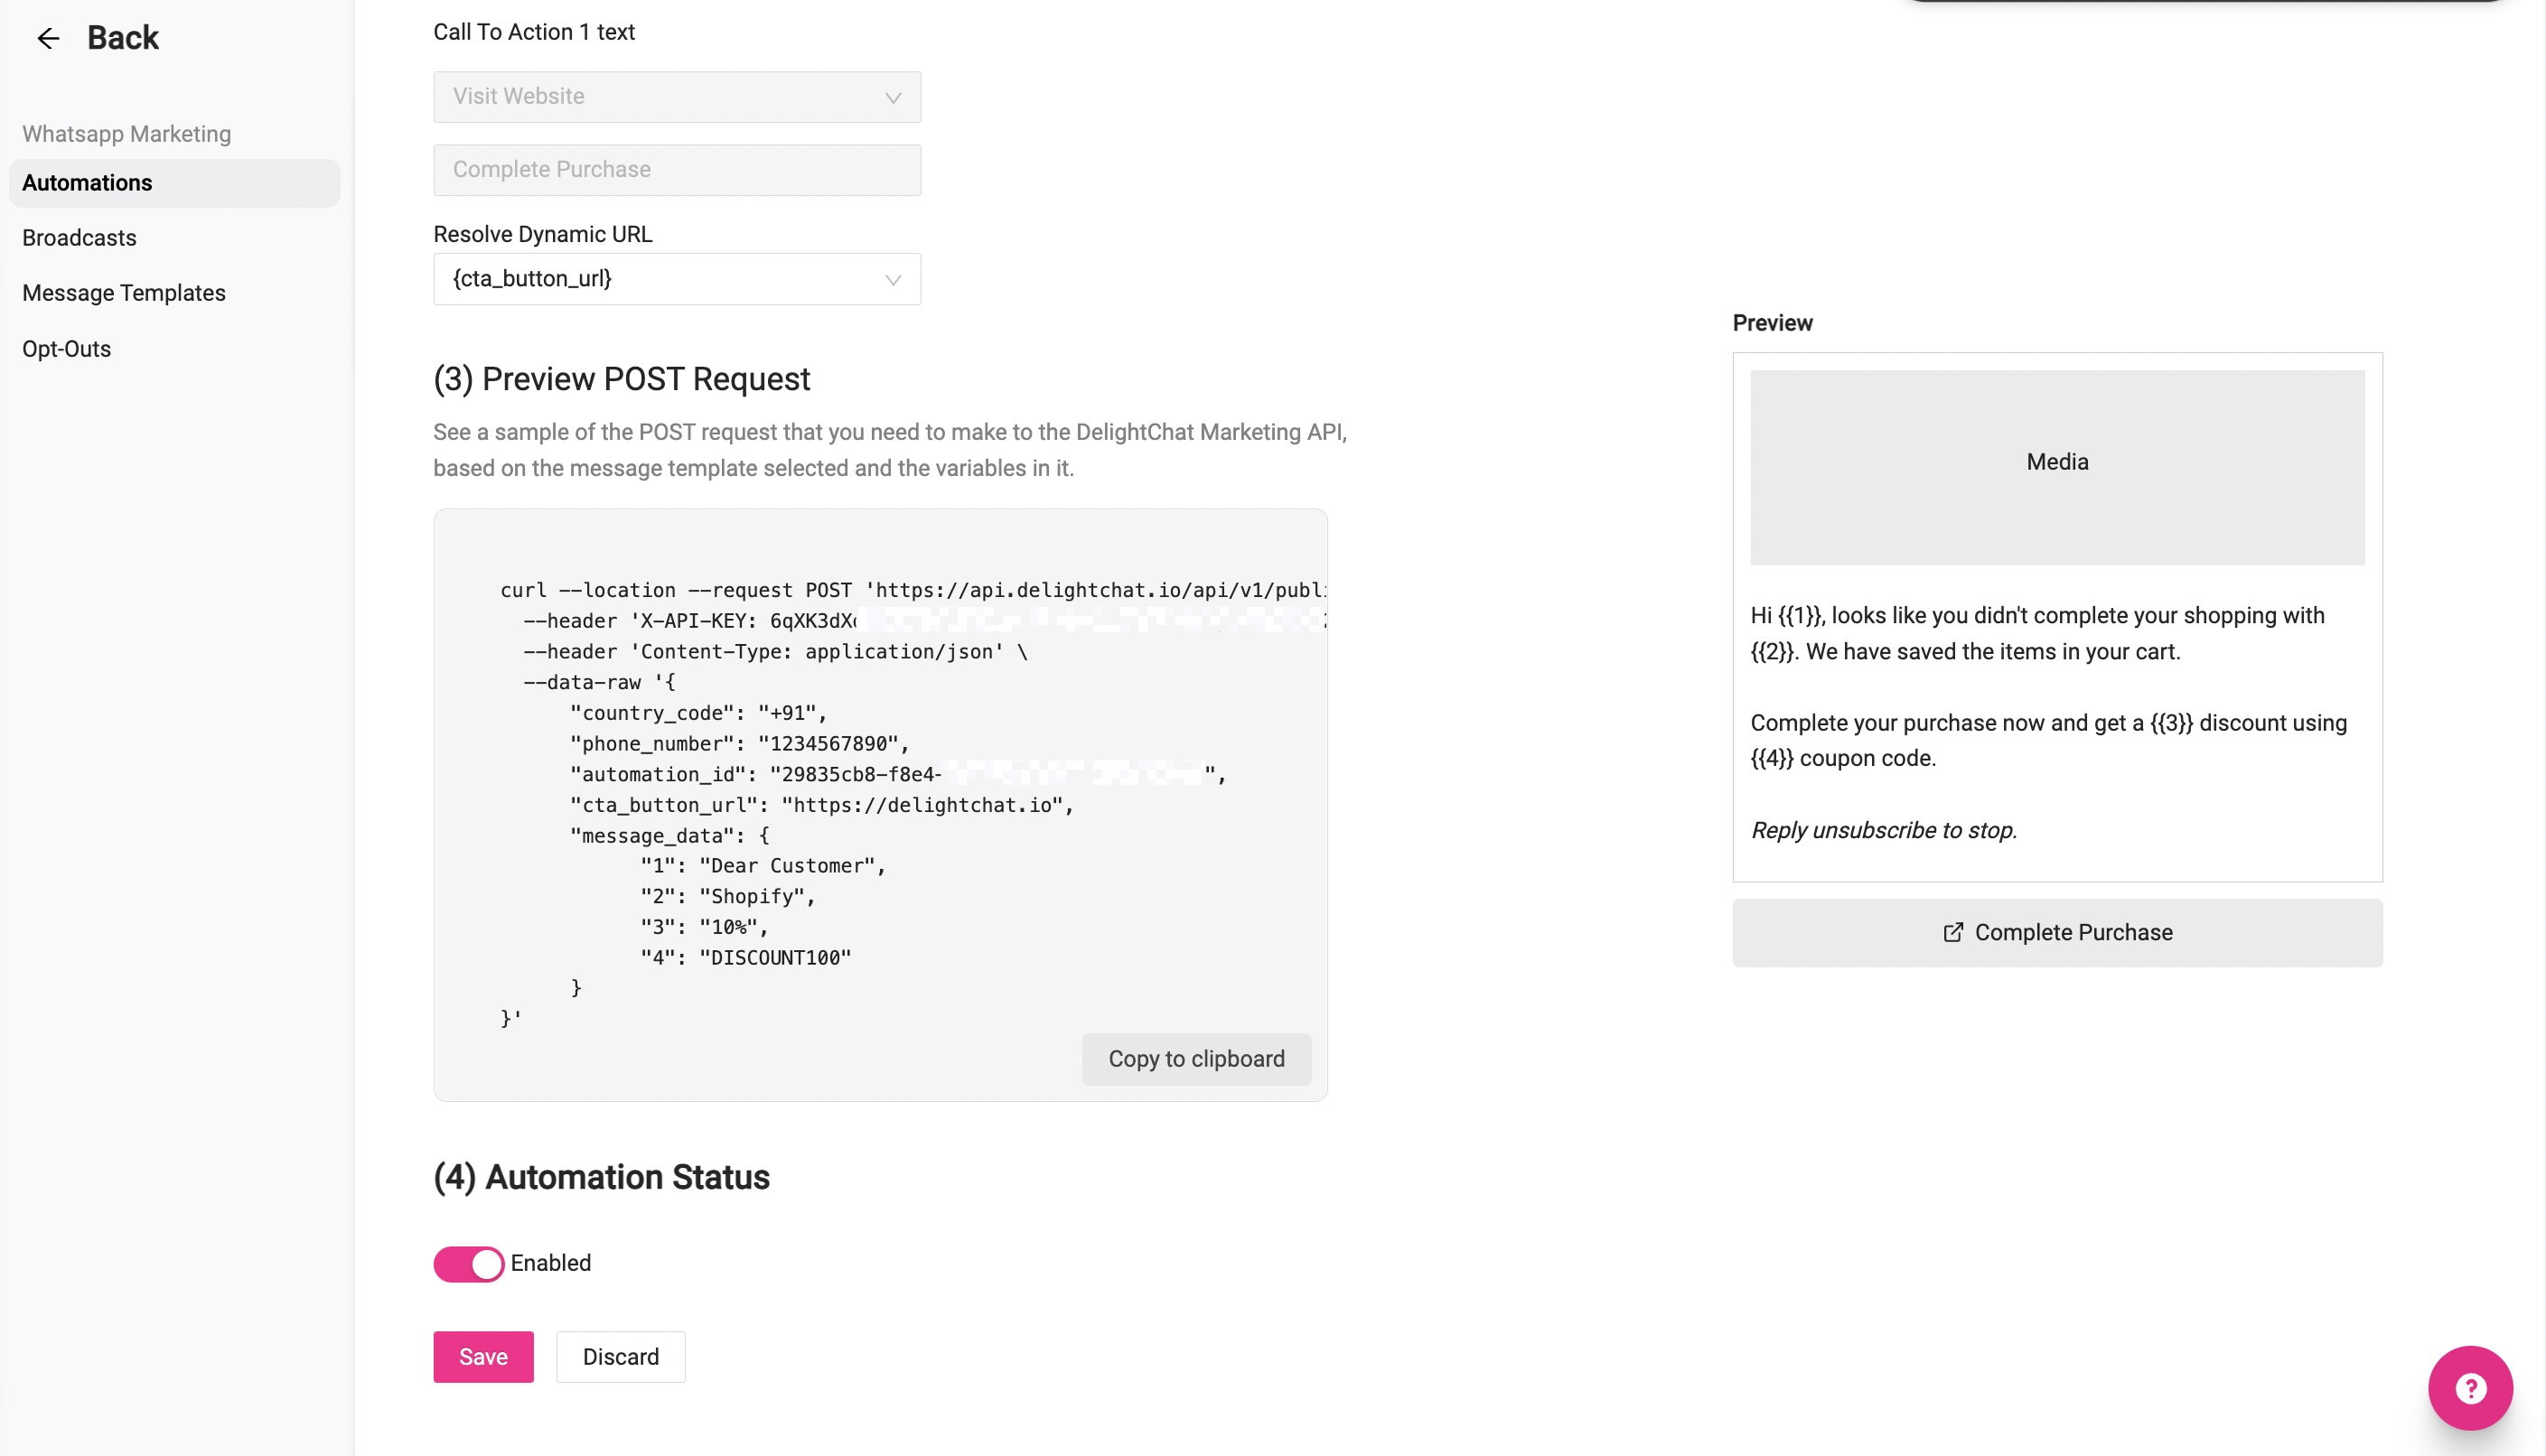
This will generate an Automation ID for your API automation. Note this down as you'll need it later. You can also find the sample API request and response in the DelightChat dashboard once you create the automation.

Step 2 - Setting up Triggers on Different Platforms
Now that you've created the automation in DelightChat, you need to connect it to a trigger from your systems. Here are ways to do it on Shopify, Zapier and Integromat:
Option 1 - Using Shopify Flow
Shopify Flow allows setting up triggers and workflows for automations. You can use it to call the DelightChat API.
- In your Shopify admin, go to Marketing > Automations and click Create automation.
- Click Add action and select "Send HTTP request" from the apps list.
- Configure the request as follows:
- URL: https://api.delightchat.io/api/v1/public/message
- Method: POST
- Headers: Content-Type: application/json and X-API-KEY: <your_api_key> (available in DelightChat dashboard)
- Body: The request payload e.g:
{
"automation_id": "abc123",
"country_code": "",
"phone_number": "1234567890",
"message_data": {
"1": "Hello",
"2": "customer_name"
},
}
- Click Done and activate the automation. It will now send a WhatsApp message via DelightChat's API when the trigger event occurs.
That's it! When your defined event happens in Shopify, it will automatically invoke the API call to DelightChat.
Option 2 - Using Zapier Webhooks
Zapier is an integration platform that can connect your apps and services. You can use Zapier webhooks to call the DelightChat API.
- Create a new Zap in your Zapier account.
- Under Choose Trigger App, search for "Webhooks by Zapier" and choose the Custom Request option
- Under Configure Webhook, specify the following:
- Webhook URL: https://api.delightchat.io/api/v1/public/message
- Method: POST
- Headers:
- Key: Content-Type, Value: application/json
- Key: X-API-KEY, Value: <your_api_key>
- Data: Set appropriate Key-Value pairs, encapsulating string variables in “”.
- Turn on the Zap and it will call the DelightChat API whenever your webhook is triggered.
You can add more steps to the Zap if needed, like fetching data from another app to include in the message.
Option 3 - Using Make (Formerly Integromat) Webhooks
Make is another popular integration platform you can use to connect to DelightChat's API.
- Create a new Integromat scenario.
- Add a Webhook module and configure it:
- Body Type: Raw
- Content Type: JSON (application/json)
- Request Content: Insert the message data body here.
- Headers Item: Add Name-Value pairs; Name as Content-Type and Value as application/json, and Name as X-API-KEY and Value as <Your-API-Key>.
- Parse Response: Yes (unless manual handling of the response is preferred).
- Set up your desired trigger like a CRM event, OAuth authentication etc. to activate this webhook.
- Turn on the scenario and Integromat will invoke the webhook whenever the trigger occurs, calling the DelightChat API.
These are just a few examples of tools you can use to configure triggers for the API. You can explore many other options like Zoho Workflows, Microsoft Power Automate, IFTTT etc.
Step 3 - Constructing the API Request
Now let's understand how to format the API request correctly. The key components are:
API Endpoint URL:
https://api.delightchat.io/api/v1/public/message
This is the base URL to send WhatsApp messages via DelightChat's API.
Headers:
You need to include two headers in the request:
Content-Type:
Set as application/json since we're sending a JSON payload.
X-API-KEY:
Specify your DelightChat account's API key available in the dashboard. This authenticates the request.
Request Body:
The body should be a JSON object with the following parameters:
- automation_id: The ID of the custom automation created in Step 1.
- phone_number: The phone number you want to send the message to, in E.164 format.
- country_code: Optional if you specify the country code within phone_number.
- message_data: Key-value pairs for replacing variables in the message template.
- cta_button_url: Optional call-to-action button URL.
- cta_button_text: Optional CTA button text.
Here's an example request body:
{
"automation_id": "abc123",
"country_code": "",
"phone_number": "911234567890",
"message_data": {
"1": "Hello",
"2": "customer_name"
},
"cta_button_url": "https://example.com/order-status",
"cta_button_text": "Track Order"
}
The message_data parameters correspond to the variables defined in your message template. This allows dynamic personalization.
Step 4 - Handling API Responses
The API will return status codes indicating the result of your request:
- 200 OK - Request was successful and message sent.
- 400 Bad Request - Something was wrong with the request format, payload or headers.
- 401 Unauthorized - Invalid API key.
- 404 Not Found - The automation_id couldn't be found.
- 5xx errors - Server error on DelightChat's end.
The 200 response means the message was accepted for delivery. But there could still be errors sending it to the user's phone, like an invalid number.
To check final delivery status, you need to look at the analytics for your custom automation within DelightChat.
For other errors like 400 or 401, you will have to fix the request before resending it.
Step 5 - Testing and Troubleshooting
Once you've built the integration, it's crucial to test it end-to-end and identify any issues.
Here are tips for testing and troubleshooting:
- Make sure your custom automation is enabled in the DelightChat dashboard.
- Try triggering the event manually first e.g. creating a test order in Shopify.
- See if the message was received properly on your phone.
- Check the DelightChat dashboard for analytics data on messages sent.
- Look at the HTTP response code returned by the API call.
- Enable logging or debugging options in the platform you're using e.g. Zapier's "Enable Test Mode".
- Try with different phone numbers and payload values.
- If messages are getting stuck or errors occurring, contact DelightChat support.
- Once confident, switch to live phone numbers like your actual customers.
- Start with small segments first before expanding to larger audiences.
Thorough testing is key to flushing out any bugs or bad configurations early on. FIX things now before you scale up the automation.
Example Use Cases for DelightChat's WhatsApp Marketing API
To give you ideas for how you could use this API, here are some example automations:
- Welcome Series - Send a series of onboarding/educational messages when a user signs up.
- Appointment Reminders - Remind customers of upcoming appointments your business has scheduled.
- Alerts and Notifications - Send real-time order, shipment and payment notifications.
- Lead Engagement - Follow up with prospects who filled a form or started an application.
- Event Promotions - Notify customers of sales, new product launches, store openings etc.
- Order Updates - Share order confirmations, shipping details and tracking info.
- Surveys - Request customer feedback through surveys and polls.
- Birthday Offers - Provide exclusive offers or discounts on birthdays.
- Loyalty Programs - Update points, tiers and rewards to loyalty members.
- Support Messages - Send guides, how-to's and helpful information as needed.
- Live Chatbot - Build automated conversational flows for self-service.
Let your creativity run wild! The possibilities are truly endless when you customize messaging experiences for different user segments and contexts.
Conclusion
We've now reached the end of this comprehensive guide on using DelightChat's WhatsApp API for automated messaging. We're excited to see what kind of automations you'll build with DelightChat's API!
As next steps, you can:
- Set up your first custom automation for a high-value use case.
- Work on enhancing integrations and building more complex flows.
- Analyze performance data to optimize messaging effectiveness.
- Explore other features like branding, payments and offline messaging.
Let us know if you need any help along the way and we'll be happy to assist you in delivering delightful omnichannel journeys with the WhatsApp API. The possibilities are endless when you put your creativity to work!

